
Set the HTTP proxy on a BYOC Premises Edge with an LCD
You can set the Edge HTTP proxy using either the internal LCD in the Edge Standard v1 or an external LCD connected to the Edge Standard v2/v3, Edge Mini v1/v2, or Edge Micro.
The Edge uses RFC-2817 HTTP CONNECT to establish a TLS connection through a proxy server. HTTP CONNECT allows an HTTP TCP connection to upgrade to HTTPS TLS. This creates an HTTP CONNECT tunnel.
Notes:
- Required authentication is not permitted on the HTTP proxy.
- You may need to configure the proxy server with a policy that allows TCP tunneling without HTTPS interception.
- While this operation typically doesn’t require you to reboot the Edge, some network environments may require a new HTTP request from the device for validation. Rebooting the Edge will initiate a new HTTP request, thus providing the validation.
Note: Check that an Ethernet cable connects your network to the Edge port labeled Port 1 (WAN).
- Press the lower right button at Genesys Cloud Edge.
- Press the lower right button at Status.
- Press the upper left button at Settings.
- Press the lower right button at System.
- Press the upper left button at Network.
- Press the upper left button at Proxy.
- Press the upper left button at Set Proxy IPV4.
- Press the upper left button at Set IPV4.
- Set the IP address at Set IPV4 000.000.000.000. Move the cursor left and right using the upper left and upper right buttons. Increase and decrease the highlighted number using the lower left and lower right buttons.Note: If you move the cursor past the rightmost digit before you finish setting the IP, cancel and re-enter the IP address.
- After you set the IP address, press the upper right button at to move the cursor past the rightmost digit at Set IPV4 xxx.xxx.xxx.xxx.
- Press the upper left button at Set IPV4 xxx.xxx.xxx.xxx.
- Press the lower right button at Set IPV4.
- Press the lower right button at Clear changes?
- Press the upper left button at Apply Changes?
- Press the lower left button repeatedly until you are back at the Genesys Cloud Edge screen.
Note: Check that an Ethernet cable connects your network to the Edge port labeled Port 1 (WAN).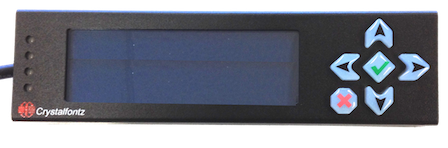
- Press the right arrow at Genesys Cloud Edge.
- Press the down arrow at Status.
- Press the green check mark at Settings.
- Press the down arrow at System.
- Press the green check mark at Network.
- Press the green check mark at Proxy.
- Press the green check mark at Set Proxy IPV4.
- Press the green check mark at Set IPV4.
- Set the IP address at Set IPV4 000.000.000.000. Move the cursor left and right using the left and right arrows. Increase and decrease the highlighted number using the up and down arrows.Note: If you move the cursor past the rightmost digit before you finish setting the IP, cancel and re-enter the IP address.
- After you set the IP address, press the right arrow button to move the cursor past the rightmost digit at Set IPV4 xxx.xxx.xxx.xxx.
- Press the green check mark at Set IPV4 xxx.xxx.xxx.xxx.
- Press the down arrow at Set IPV4.
- Press the down arrow at Clear changes?
- Press the green check mark at Apply Changes?
Note: When you finish using the external LCD, Genesys recommends that you disconnect the device from the Edge. Leaving the external LCD connected to the Edge for extended periods of time can cause unnecessary CPU usage.