
Manually configure the provisioning information for the Polycom VVX phone
- Telephony > Plugin > All permission
The most common method to configure the phones to discover the phone settings stored on the Genesys Cloud Edge is to enable DHCP on the phone. For more information, see Enable DHCP on the phone to discover the phone settings from the Edge.
You can also manually configure three settings on the physical phone for the phone to retrieve its configuration settings from the Edge:
- Set the DHCP Boot Server to static
- Set the Provisioning Server Type to HTTPS
- Set the Provisioning Server Address to the provisioning URL
- To create a generic Polycom VVX base setting, see Configure the base phone settings.
- If you are using Genesys Cloud Voice, see Configure base settings for phones under Genesys Cloud Voice.
Manually configure the phone
- Press the Home button.
- Press the right arrow five times for Settings.
- Press 2 for Advanced.
- Enter the Admin password.
(default = 456, or default = 1234 if previously provisioned in Genesys Cloud) - Press 1 for Admin Settings.
- Press 1 for Network Config.
- Press the Select soft key to enter the Provisioning Server menu.
- Press the Select soft key to enter the DHCP menu.
- Press the Edit soft key to enter the Boot Server menu.
- Select Static using the left and right arrow keys.
- Press the OK soft key.
- Use the down arrow to go to BootSrv Type.
- Press the Edit soft key.
- Select String.
- Press the OK soft key.
- Press the Menu button to exit.
- Press Yes soft key to Save Config (if prompted).
- Press the Home button.
- Press the right arrow five times for Settings.
- Press 2 for Advanced.
- Enter the Admin password.
- (default = 456, or default = 1234 if previously provisioned in Genesys Cloud)Note: You can change the default password in the phone management console. Go to Admin > Telephony > Phone Management > Base Settings > (choose phone model) > Phone Configuration > General > Administrative Password.
- (default = 456, or default = 1234 if previously provisioned in Genesys Cloud)
- Press 1 for Admin Settings.
- Press 1 for Network Config.
- Press the Select soft key to enter the Provisioning Server menu.
- Press the down arrow to highlight the Server Type setting.
- Select HTTPS using the left and right arrow keys.
- Press the OK soft key.
- Press the Menu button to exit.
- Press Yes soft key to Save Config (if prompted).
The provisioning URL for a local Edge is either:
- The IP address and port of a local Edge. (8088 for HTTP or 8089 for HTTPS)
- The domain address of the Edge if a DNS record exists for your Edges, for example, Customer-Domain.com/GenesysCloudEdges
For Genesys Cloud Voice use the appropriate VVX phone provisioning endpoint address for your region:
| Region | Phone Home Address |
| US East (N. Virginia) | https://phone-home.use1.pure.cloud |
| US East (Ohio) | https://phone-home.use2.us-gov-pure.cloud |
| US West (Oregon) | https://phone-home.usw2.pure.cloud |
| Canada (Canada Central) | https://phone-home.cac1.pure.cloud |
| South America (Sao Paulo) | https://phone-home.sae1.pure.cloud |
| Europe (Frankfurt) | https://phone-home.eu-central-1.mypurecloud.de |
| Europe (Ireland) | https://phone-home.eu-west-1.mypurecloud.ie |
| Europe (London) | https://phone-home.euw2.pure.cloud |
| Europe (Zurich) | https://phone-home.euc2.pure.cloud |
| Middle East (UAE) | https://phone-home.mec1.pure.cloud |
| Asia Pacific (Tokyo) | https://phone-home.ap-northeast-1.mypurecloud.jp |
| Asia Pacific (Mumbai) | https://phone-home.aps1.pure.cloud |
| Asia Pacific (Seoul) | https://phone-home.apne2.pure.cloud |
| Asia Pacific (Sydney) | https://phone-home.ap-southeast-2.mypurecloud.com.au |
| Asia Pacific (Osaka) | https://phone-home.apne3.pure.cloud |
To set the Provisioning Server Address
- Press the Home button.
- Press the right arrow five times for Settings.
- Press 2 for Advanced.
- Enter the Admin password.
(default = 456, or default = 1234 if previously provisioned in Genesys Cloud) - Press 1 for Admin Settings.
- Press 1 for Network Config.
- Press the Select soft key to enter the Provisioning Server menu.
- Press the down arrow to highlight the Server Type setting.
- Select HTTPS using the left and right arrow keys.
- Select Server Address.
- Enter your provisioning URL. Use repeated presses of number keys 0 – 9 to enter numerals and letters. Press the asterisk (*) key repeatedly to select punctuation such as periods (dots) and hyphens.
- Press the OK soft key.
- Press the Menu button to exit.
- Press Yes soft key to Save Config (if prompted).
- Press the Home button.
- Press the right arrow five times for Settings.
- Press 2 for Advanced.
- Enter the Admin password.
(default = 456, or default = 1234 if previously provisioned in Genesys Cloud) - Select Reboot Phone.
- Press the Yes soft key.
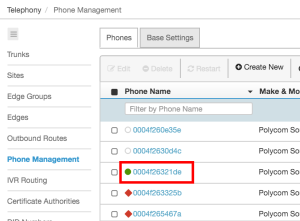
- View the phone in Genesys Cloud to verify that it is operational:
- Log in with the telephony admin role and navigate to Telephony > Phone Management.
- Find the phone in the Phone Name column and verify that a green status symbol displays.
Troubleshoot a Polycom VVX
If you feel the phone’s settings have been misconfigured you can put the phone back to a factory default state. Doing so clears all settings allowing you to re-configure the DHCP and provision server settings in the phone.
- Press the Menu button.
- Press the right arrow five times for Settings.
- Press 2 for Advanced.
- Enter the Admin password and press the Enter soft key.
(default = 456, or default = 1234 if previously provisioned in Genesys Cloud) - Press 1 for Admin Settings.
- Press 5 for Reset to Defaults.
- Press 3 for Reset Dev(ice) Settings.
- Press the Yes soft key.
If you do not know the Administrator password, try the default password “456” or the common Genesys Cloud default password “1234.” If these default passwords don’t work, reset the phone to the default factory settings. The default factory setting for the administrator password is “456.”