
Use Process Builder to route Salesforce emails
After you configure the routing of Salesforce emails in Salesforce, create a process in Process Builder to route Salesforce emails through Genesys Cloud for Salesforce. With Process Builder, you define a process and determine the criteria for when the process is run.
A basic process for routing Salesforce emails only requires two fields in the Immediate Actions component: Queue (or Inbound Email Flow) and Salesforce Object ID (for screenpop). You can use more fields in Process Builder for advanced customization.
- In Salesforce, click Setup.
- Search for Process Builder.
- Under Build > Create > Workflow & Approvals, click Process Builder.
- Click New.
- Enter a name for the process in the Process Name text box.
- Under The process starts when, select A record changes.
- Click Save.
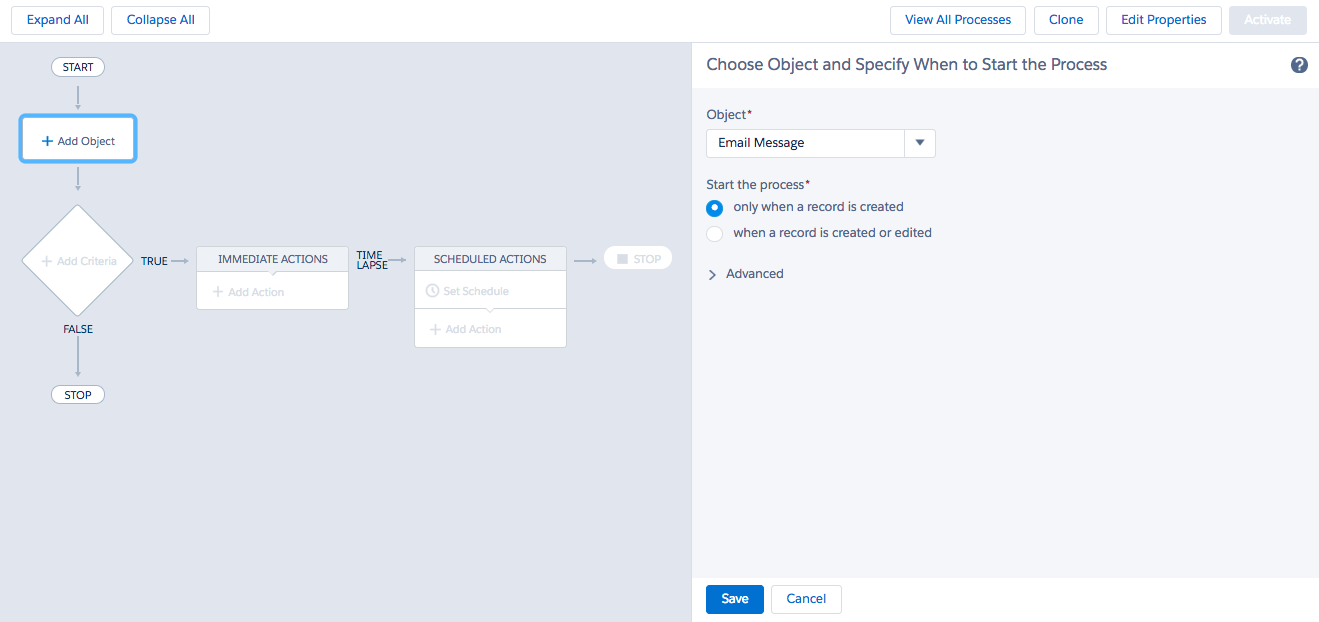
- Click Add Object.
- Under Object, select Email Message.
- Under Start the process, select only when a record is created.
- Click Save.
Click image to enlarge.
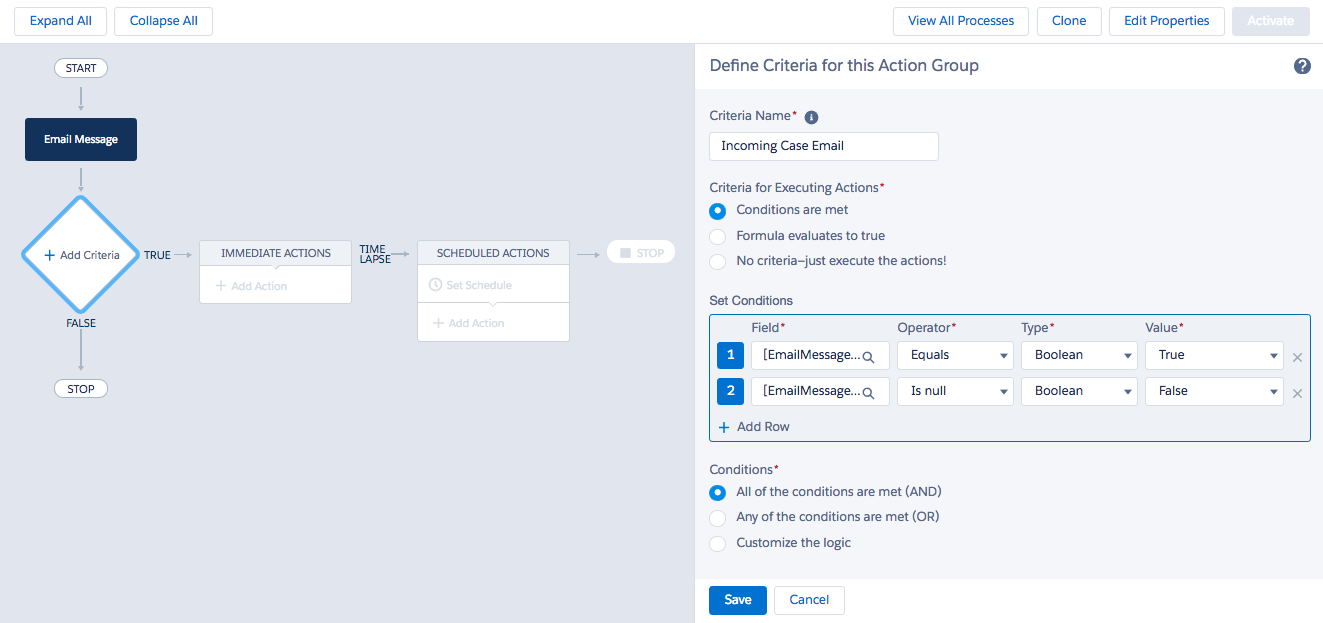
- Click Add Criteria.
- Under Criteria Name, enter Incoming Case Email.
Criteria for Executing Actions is automatically set to Conditions are met.
- Under Set Conditions, set the following two fields:
- Under Field, select Is Incoming.
The API Name is Incoming.
- Click Choose.
Operator is automatically set to Equals. Type is automatically set to Boolean.
- Under Value, select True.
- Click Add Row.
- Under Field, select Case ID (not Case ID >).
The API Name is ParentId.
- Click Choose.
- Under Operator, select Is null.
Type is automatically set to Boolean. Value is automatically set to False.
- Conditions is automatically set to All of the conditions are met (AND).
- Click Save.
- Under Field, select Is Incoming.
Click image to enlarge.
- Under Criteria Name, enter Incoming Case Email.
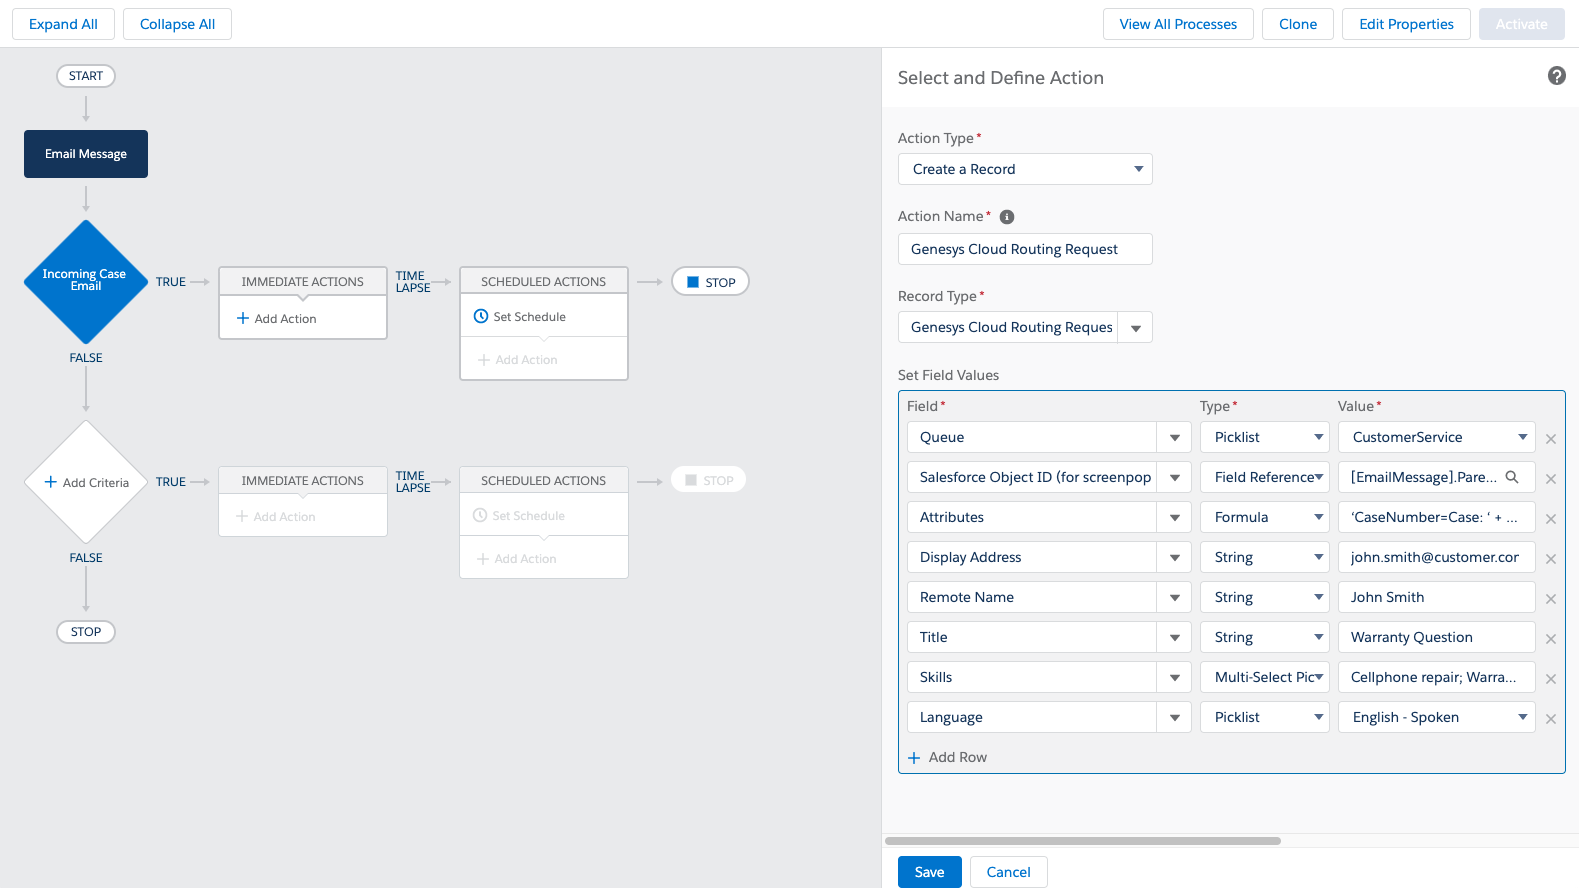
- Click Add Action.
- Under Action Type, select Create a Record.
- Under Action Name, enter Genesys Cloud Routing Request.
- Under Record Type, select Genesys Cloud Routing Request.
- Under Set Field Values, add two required fields: Queue (or Inbound Email Flow) and Salesforce Object ID (for screenpop).
Note: Do not use both Queue and Inbound Email Flow. If you use both fields, the integration defaults to Queue and logs an error. If you use Inbound Email Flow, set skills and languages on a queue in your Architect flow.
You can use other fields in Process Builder to cause screen pops, to modify interaction details, or to add data to the activity records in Salesforce. See Advanced customization tab.
- Under Field, select Queue or Inbound Email Flow.
Type is automatically set to Picklist.
Note: Picklists for queues, skills, languages, and inbound email flows are limited to 1,000 each. If you have more than 1,000 of each in your Genesys Cloud organization, when you click Retrieve Options in the Retrieve Genesys Cloud Routing Options section, the integration displays an error message. For more information, see Configure the routing of Salesforce emails. - Under Value, select the queue that you want Salesforce emails to route to or the Architect flow that you want the integration to route Salesforce emails through.
- Click Add Row.
- Under Field, select Salesforce Object ID (for screenpop).
- Under Type, select Field Reference.
- Under Value, select Case ID (not Case ID >).
The API Name for the field is ParentId.
- Click Choose.
- Click Save.
- Under Field, select Queue or Inbound Email Flow.
Click image to enlarge.

- Click Activate.
The process is now ready to use.
For a more robust process, you can use more than the two required fields in the Immediate Actions component. Some of the fields available in Process Builder map to default and custom attributes. (See following table.)
Default attributes map automatically to interaction details and, if you map activity fields in Salesforce, to activity records. For more information, see Map interaction attributes to Salesforce activity fields.
Custom attributes require configuration. For custom attributes to appear in interaction details and interaction logs, first add them to the Customize Interaction Details and Activity Field Mapping sections under Client Settings in Salesforce. For more information about Client Settings, see Managed package settings.
The following example shows the use of required fields, default attributes, and custom attributes to route Salesforce emails.
Click image to enlarge.
The following table describes the fields used in the example process. (*Inbound Email Flow does not appear in the example process. Use either Queue as in the example or Inbound Email Flow.)
| Field | Type | Value | Description |
|---|---|---|---|
| Queue | Picklist | CustomerServiceQueue |
Required. Name of the queue in your Genesys Cloud organization that you want to receive interactions. Maps to Call.QueueName in interaction details. Note: Use either Queue or Inbound Email Flow. If you use both, the integration defaults to Queue. |
| *Inbound Email Flow | Picklist | RouteEmail |
Required. Name of the Architect inbound email flow in your Genesys Cloud organization that you want to route Salesforce emails through. Note: Use either Queue or Inbound Email Flow. If you use both, the integration defaults to Queue. |
| Salesforce Object ID (for screenpop) | Reference | [EmailMessage].ParentId | Required. ID of the Salesforce object that you want to screen pop when the interaction alerts. |
| Attributes | Formula | 'CaseNumber=Case: ' + [EmailMessage].Parent.CaseNumber + ',contactEmailAddress=' + [EmailMessage].ToAddress |
Custom attribute that adds data to interaction details (for example, CaseNumber) and to activity records in Salesforce (for example, contactEmailAddress). Format: 'Name1=Value1,Name2=Value2'." Note: Because CaseNumber and contactEmailAddress are custom attributes, you must first add Participant.{CustomFieldName} to the Customize Interaction Details and Activity Field Mapping sections under Client Settings. For more information about Client Settings, see Managed package settings. |
| Display Address | String | john.smith@customer.com | Remote email address for the active interaction added to interaction details when an interaction alerts. |
| Remote Name | String | John Smith | Remote name for the active interaction added to interaction details when an interaction alerts. Maps to Call.RemoteName in interaction details. |
| Title | String | Warranty Question | Email subject line added to the interaction details when an interaction alerts. Maps to Email.Subject in interaction details. |
| Skills | MultiPicklist | Cellphone repair; Warranties | Skills in your Genesys Cloud organization associated with agents who you want to receive interactions. |
| Language | Picklist | English – Spoken | Language skill in your Genesys Cloud organization associated with agents who you want to receive interactions. |
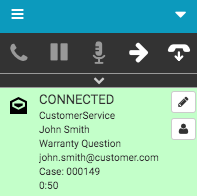
The example routes Salesforce emails to the CustomerServiceQueue. Agents in this queue who are assigned the skills ‘Cellphone repair’ and ‘Warranties’ and the language ‘English – Spoken’ in Genesys Cloud receive alerting interactions.
When the interaction alerts, the field Salesforce Object ID (for screenpop) causes a page with the ID 500360000015OCJ to screen pop in Salesforce.
The fields Title (Warranty Question) and Remote Name (John Smith) are default attributes that appear in the interaction details.
The field DisplayAddress (john.smith@customer.com) is an attribute that we mapped in the Customize Interaction Details section under Client Settings. For more information about Client Settings, see Managed package settings.
The field Attributes uses custom attributes CaseNumber and contactEmailAddress to add Case: 000149 to the interaction details and to write the email address to the activity record in Salesforce.
To use these attributes with an Architect flow, see About Architect.
For more information, see Configure the routing of Salesforce emails and About Routing of Salesforce Emails.
For more information about the integration, see About Genesys Cloud for Salesforce.