
Configure external routing of Salesforce messaging
- A Salesforce routing configuration with External Routing as the routing model.
- A Salesforce queue linked with the external routing configuration and the Messaging Session object assigned to the queue.
After you install and configure the Omni-Channel external routing package, create a flow in Salesforce to route a Salesforce messaging through Genesys Cloud. Genesys Cloud routes and delivers the message to the appropriate agent. The agent handles the message within Salesforce and can also transfer the message to another agent. Genesys Cloud for Salesforce handles the life cycle of the message within Genesys Cloud and creates an activity record in Salesforce to log all critical information.
Create a flow
A flow in Salesforce automates the routing process. You use elements, connectors, and resources to build a flow. For more information, see Flows in the Salesforce documentation.
- In Salesforce, create a flow using the Omni-Channel Flow template.
- From Setup, search for Flows in the Quick Find box and select Flows.
- Click New Flow.
- Select Start From Scratch and click Next.
- Under All Flow Types, select Omni-Channel Flow as the flow type and click Create.
- To add elements to the canvas, select Free-Form.
- Create the recordId and input_record variables as described in the Salesforce documentation for your messaging session object.
- Drag the Route Work action onto the canvas and enter the values for the new action.
- Give the action a Label and API Name and optionally, a Description.
- Under Set Input Values > RecordID, select the recordId that you created.
- Under Service Channel, select the channel created for Messaging.
- Under Route To, select Queue.
- Under Queue, enter the Salesforce queue ID that you want to route through Genesys Cloud.
- Click Done.
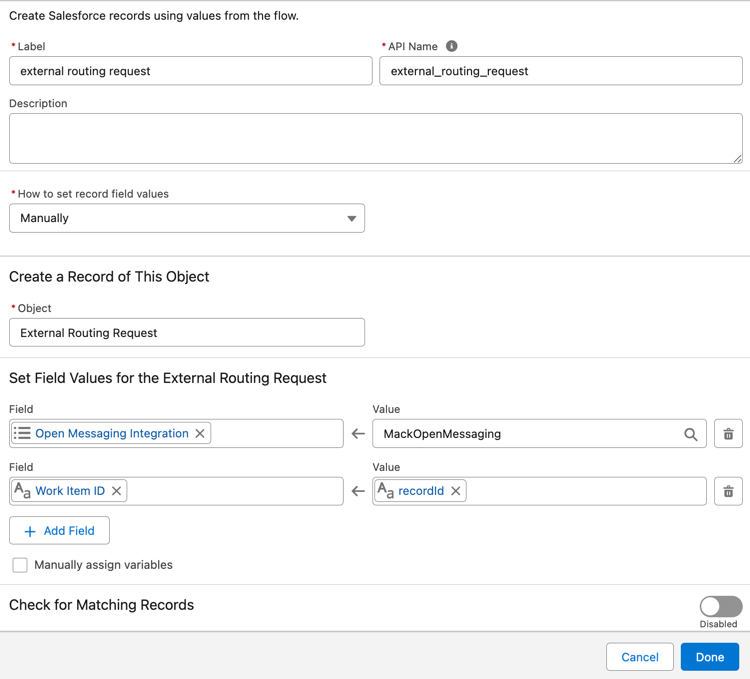
- Drag the Create Records action onto the canvas and enter the details of the record.
-
- Type a name for the record.
- Select the option Manually to configure the record fields.
- Select the object External Routing Request from the list.
- Add the two fields Open_Messaging_Integration__c and Work_Item_ID__c and set the values for the fields.
- Open Messaging Integration – Select the picklist values retrieved from Genesys Cloud.
- Work Item ID – Select the recordId variable that you created for the messaging session object.
- Optionally, you can also add the field Custom_Attributes__c and the values in the format
customAttribute1=customAttr1, customAttribute2=customAttr2. If you are adding any Salesforce objects, use the formatcustomAttribute={!Object.Value}. - Click Done.
Note: You can add or edit the external routing package message attributes in theOpenMessageService.apxcfile except for the custom attribute,SF_ExternalRoutingWorkItemId. Ensure that you do not edit or remove the custom attribute,SF_ExternalRoutingWorkItemId. See Inbound open messages for more information about the API referenced by the routing package. -
- Connect the Start element to the Route Work action element in the flow.
- Connect the Route Work action element to the Create Record element in the flow.
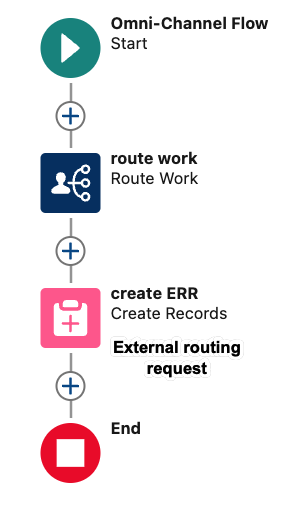
- Click Save.
- Click Activate.
Activate the Request Deletion flow
The package for external routing includes the External Routing Request Deletion flow. This flow cleans up the request records that are created when either of the following occurs:
- Disconnected work items that are successfully routed and completed.
- The user closes the message before it is routed to an agent.
Activate this flow before using external routing.
- In Salesforce Setup, search for Flows.
- In the list of flows, click External Routing Request Deletion.
- Click Activate.
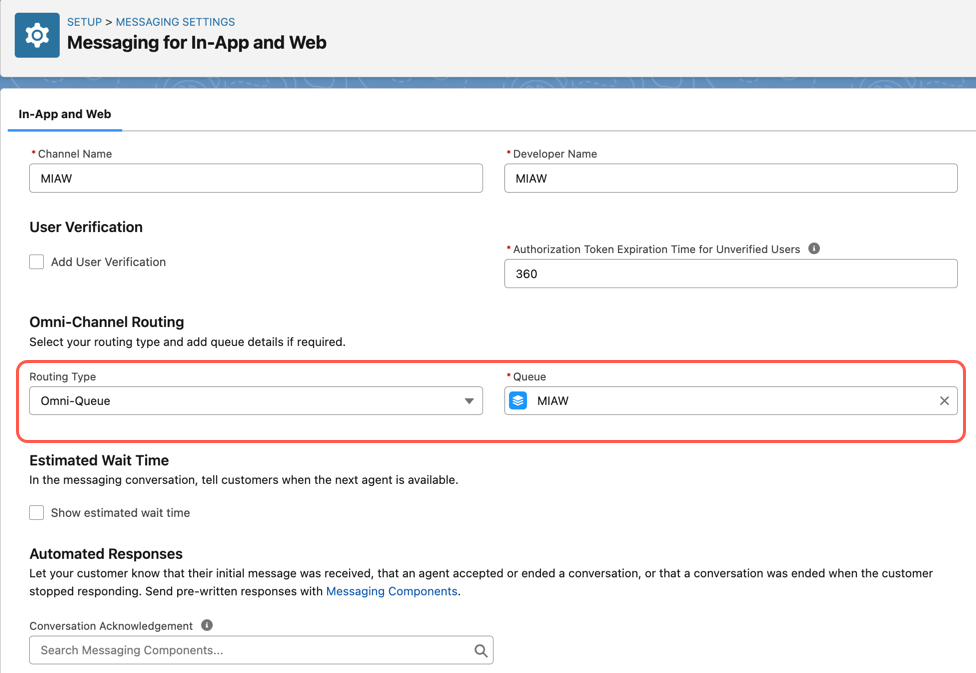
Set up for Messaging for In-App and Web
Create a messaging channel for Messaging for In-App and Web and ensure that you select the following details for the messaging channel:
- Select Omni-Queue as the Routing Type. Select the flow created to route a Salesforce messaging through Genesys Cloud.
- Select the fallback queue created for Messaging for In-App and Web.
Create Embedded Service Deployment
After creating the messaging channel, you can connect it to a website with a new embedded deployment:
- Enable Digital Experiences. See Enable Digital Experiences.
- Create a web deployment for the messaging session with your end user. Ensure to select the Messaging for In-App and Web option and the messaging channel. See Configure a Messaging for Web Deployment.
- Publish the web deployment.
- Add your code snippet for embedding messaging on an external website.
- Add your domain to the CORS allowlist.
- Add the messaging console to your agent. See Add Messaging to the Service Console.
Create chat buttons (Legacy)
When you create chat buttons in Salesforce, you can specify how the incoming chat requests are directed to agents. In the Salesforce chat button setting, select Omni-Channel in the Routing Type field and use the Omni-Channel flow created for routing the specific queue.

For more information about how to use Omni-Channel sync settings, see How to use Omni-Channel sync.
For more information about the integration, see About Genesys Cloud for Salesforce.