
Configure IAM role with permissions for the Amazon Lex V2 app
To access Amazon Lex V2 bots, Genesys Cloud must have permission to use resources in Amazon Web Services (AWS). This procedure explains how to set up an IAM role in AWS. This role is assigned to Amazon Lex V2 later, when you configure and activate the app in Genesys Cloud.
Note: AWS Identity and Access Management (IAM) is a web service that controls access to AWS resources. An IAM role is similar to a user, because it defines an AWS identity with permission policies that determine what the identity can and cannot do in AWS. An IAM role can be assumed by trusted identities, including applications such as Genesys Cloud, AWS services such as EC2, or an end user. Each IAM role defines necessary permissions to make AWS service requests. For more information, see IAM Roles in Amazon’s AWS Identity and Access Management User Guide.
Configure IAM role with permissions for the Amazon Lex V2 app
To configure an IAM role, follow these steps:
- Log in to AWS.
- Navigate to the AWS Services page.
- Select IAM.
- Under Dashboard, select Roles.
- On the Roles page, click Create role.
- Select Another AWS Account as the type of trusted entity.
- In the Account ID box, enter 765628985471 in the Account ID box. This is Genesys Cloud’s production account ID. If you need the FedRAMP region (US-East-2) account ID, please contact your Genesys representative.
- To enhance security, Genesys recommends that you check the Require External ID box and enter your Genesys Cloud organization’s ID.
- Click Next Permissions.
- Next, assign permission policies to the role. In the search box, type Lex V2. Then select the AmazonLexReadOnly and AmazonLexRunBotsOnly policies check boxes.
- AmazonLexReadOnly provides read-only access to Amazon Lex V2, allowing the role to look at Lex V2 bots.
- The AmazonLexRunBotsOnly policy provides access to Amazon Lex V2 conversational APIs, so that audio can be sent at runtime.
Note: These permissions do not give Genesys Cloud any ability to edit your Lex V2 bots.
- Click Next: Tags.
- (Optional) Add metadata to the role by attaching tags as key-value pairs. For more information, see Tagging IAM Entities in the AWS Identity and Access Management User Guide.
- Click Next: Review.
- In the Role Name box, type a name. For example, DemoLexRole.
- In the Role description box, enter descriptive text about the role .
- Verify that the account number for Trusted entities matches the Genesys Cloud production account ID you entered in step 6.
- Click Create Role.
- In the listing page, click the name of the role. This link is the name you entered in the Role Name box in step 12. Summary details about the role appear.
- Note the Role ARN. You need this credential later. An Amazon Resource Name (ARN) is a unique identifier that unambiguously identifies a resource.
- Click the Copy icon (to the right of Role ARN) to copy your ARN to the clipboard.
Create a Lex V2 policy and assign it to your IAM role
Create a Lex V2 policy in JSON format in the AWS console and then assign it to your IAM role. This policy ensures that Genesys Cloud Architect can interact with an Amazon Lex V2 bot.
- Sign in to the AWS Management Console and open the IAM console.
- In the navigation pane on the on the left side, click Policies.
- Click Create policy.
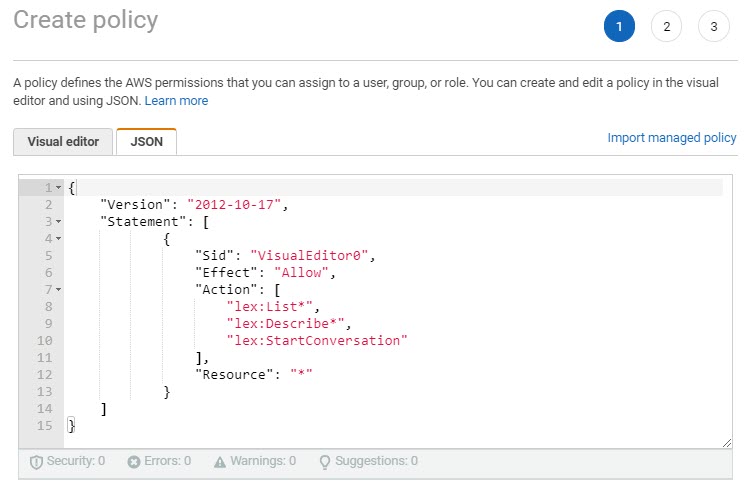
- Click the JSON tab.
- Type or paste the following JSON content:
{

     "Version": "2012-10-17",

     "Statement": [

          {

               "Sid": "VisualEditor0",

               "Effect": "Allow",

               "Action": [

                    "lex:List*",

                    "lex:Describe*",

                    "lex:StartConversation"

               ],

               "Resource": "*"

          }

     ]

} - Resolve any security warnings, errors, or general warnings that the policy validation generates, and then click Review policy. Note: You can switch between the Visual editor and JSON tabs anytime. However, if you make changes or choose Next: Tags in the Visual editor tab, IAM might restructure your policy to optimize it for the visual editor.
- Click Next: Tags.
- (Optional) Add metadata to the policy by attaching tags as key-value pairs.
- On the Review policy page, type a Name and a Description (optional) for the policy. Review the policy Summary to see the permissions that your policy grants.
- Click Create policy.
- After you create a policy, attach it to your IAM role.
Next: Configure and activate the Lex V2 integration in Genesys Cloud.