
Unbox and set up Edge Standard v1 hardware
To unbox and set up Edge Standard hardware:
-
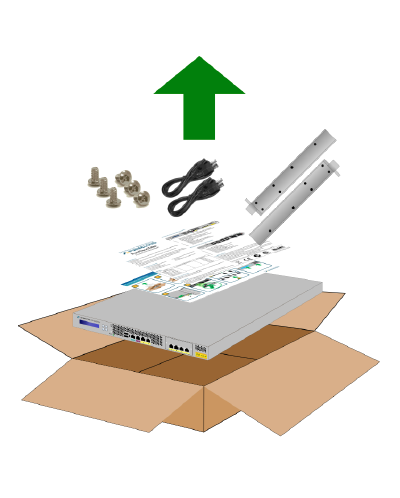
Unpack contents of the shipping box.
-
Ensure that all parts are available before you proceed. Your Genesys Cloud Edge package includes the following items:
- 1 Genesys Cloud Edge Standard v1 appliance
- Two power cables (if ordered)
- 2 rack mounting brackets
- 6 mounting bracket screws
- 1 Genesys Cloud Edge Setup Quick Reference Guide
-
Follow the visual instructions in the Genesys Cloud Edge Setup Quick Reference Guide. If you prefer more detailed instructions, complete the tasks below.
-
Decide on a suitable location for the rack unit that will hold Genesys Cloud Edge. It should be situated in a clean, dust-free area that is well-ventilated. Avoid areas where heat, electrical noise, and electromagnetic fields are generated. You must also place it near a grounded power outlet.
You must remember the following needs of Genesys Cloud Edge when choosing the location where it will reside:
-
Leave approximately 30 inches of clearance in the back of the rack to allow for sufficient airflow and ease of servicing.
-
You should only install this product in a Restricted Access Location, such as dedicated equipment rooms or service closets.
-
-
Consider the following rack precautions:
-
Ensure that the leveling jacks on the bottom of the rack are fully extended to the floor with the full weight of the rack resting on them.
-
In a single rack installation, ensure that stabilizers are attached to the rack.
-
In multiple rack installations, ensure that the racks are coupled together.
-
Always make sure that the rack is stable before extending a component from the rack. You should never extend more than one component at a time as extending two or more components simultaneously can cause the rack to become unstable.
-
-
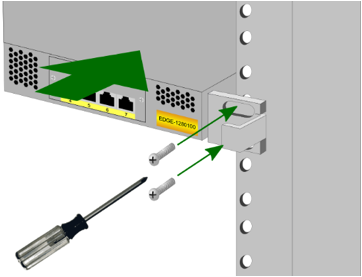
Attach the provided mounting brackets to the Genesys Cloud Edge chassis with the provided screws. There are multiple methods with which you can install the mounting brackets:
Mount position Example Flush with front

Midpoint

Recessed

Important
Always use a screw in the last position (farthest from the faceplate of the bracket) to ensure that the mounting bracket is fastened securely to the Genesys Cloud Edge chassis and the weight bearing of the bracket is distributed. Failure to do so can result in wear or damage to the chassis, which can then cause a change in its mounted angle or separation from the mounting brackets.
-
Install the system into a rack.
To mount the system into a rack, attach the faceplate of each mounting bracket on the Genesys Cloud Edge chassis directly to the front of the rack.
Important
Ensure that you use attach each bracket faceplate through both openings. Genesys Cloud Edge does not supply any hardware to attach the faceplate of the mounting bracket to a rack. Use the method of attachment required, such as screws or bolts, for your specific rack.
After you have mounted Genesys Cloud Edge into a rack or placed it on a shelf, you must connect the necessary cables for successful operation. The exact number and type of cables that you connect is dependent on your telephony system. To connect the necessary cables, refer to the following table:
Interface Task 1 (WAN) port
Plug a Category 5 or better network cable into the 1 (WAN) port. The cable must provide connection to the Internet.
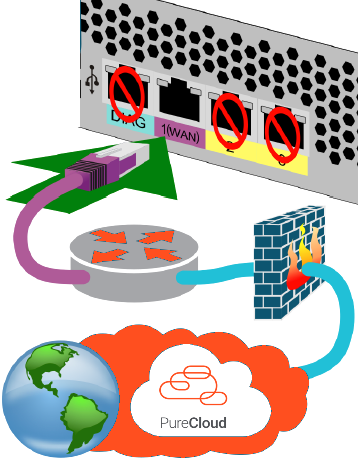 Note: The WAN port does not require a public IP address.
Primary network interfaces (2, 3)
Not normally used. Accepts a Category 5e or better network cable into the Genesys Cloud Edge NIC port labeled 2 and then connect the available end to a 1000Base-Tor better network switch.
Secondary network interfaces
(4,5,6,7)
Not normally used. Accepts Category 5e or better network cables. Connect these ports to any additional SIP carriers or Ethernet networks, as needed.
DIAG
The DIAG port provides access to the Intelligent Platform Management Interface (IPMI) of Genesys Cloud Edge.
WarningTo maintain a high security profile, do not connect the DIAG port to your network unless directed to do so by an Genesys representative. Connecting the DIAG port to your network or the Internet presents a point of access for scanning, probing, or intrusion.
Power
Plug the power cables supplied with Genesys Cloud Edge into each socket on the back of the Genesys Cloud Edge appliance. There are two redundant power supplies in Genesys Cloud Edge.
Ground stud
Connect the earth ground stud on the rear of the Genesys Cloud Edge appliance to an available grounding facility with a safety ground conductor that is 12 AWG minimum.

The safety ground conductor should be terminated with a closed-loop ring terminal (Digikey catalog part number: 920010-09-ND; 3M part number: MVU10-8RK).
Refer to the instructions provided with terminals for crimping tools and assembly instructions.
USB
Do not connect any USB devices directly or through cables to Genesys Cloud Edge before the initial start and pairing process with Genesys Cloud. The USB ports are intended for USB thumb drives, which can be used for the transfer of files.
After you have installed Genesys Cloud Edge into a rack or placed it on an appropriate flat surface, and have connected all necessary cables, use an ink pen or a similar thin, rigid utensil to press the recessed PWR button.
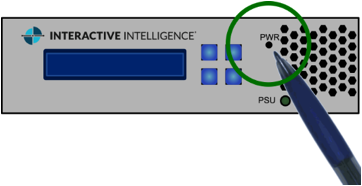
Genesys Cloud Edge begins its initial start sequence.
-