
Format Salesforce URL for new record screen pop
This article describes how to format the value of an SF_URLPop or GC_SCREEN_POP custom attribute to screen pop a new record in Salesforce that pre-populates with the customer’s data. These examples use a Salesforce New Contact, but you can use this same approach to screen pop and pre-populate literally any Salesforce record.
The following information applies to Classic console.
Identify the URL
Each record in Salesforce uses an exact URL code. Creating a contact results in this URL: https://na5.salesforce.com/003/e. The 003 is a three-character code for contacts. The e identifies the contact as a new record.
The first portion of the URL (https://na5.salesforce.com) could look different in your environment. The value of a custom attribute only needs the portion that follows the main URL, for example, 003/e.
Fill out new record data
After you have identified the URL for a new contact, you can define the fields that you want to prefill with data. To get the exact field names from Salesforce, use the developer tools in your browser. These steps use developer tools to identify the First Name and Last Name field names:
- To display the HTML code for the New Contact page, right-click the webpage, and then click View Source or View Page Source.
- Find the exact field names by searching for the exact label text from the New Contact record, in this case First Name and Last Name.
<label for="name_firstcon2">First Name</label>
<label for="name_lastcon2”>Last Name</label>
In this example, the exact field names are name_firstcon2 and name_lastcon2.
Format the URL
Create the URL by combining the relative URL with the field names and values, as described in this table.
| Format element | Description |
|---|---|
| <object code>/ | Relative URL of the Salesforce object to screen pop. |
| e? | e indicates a new record; ? indicates that pre-filled values follow in the URL. |
| <field name X>=<field value X> | Zero to many fields with pre-filled values can be sent on the URL. Delimit each field name/value pair with an ampersand (&). This portion of the URL must be HTML-encoded. |
<object code>/e?<field name 1>=<field value 1>&<field name 2>=<field value 2>
The URL in this example would be: 003/e?name_firstcon2=John&name_lastcon2=Smith
Example flow
This example uses the Set Participant Data action to set the attribute for an Inbound Call flow.
The information used to set the attribute on the call can come from multiple different places: data dip, caller data entry, workgroup information, a static URL, or a combination of other interaction attributes. For more information, see Add a Set Participant Data action to a task.
- Create an Inbound Call flow in Architect.
- Add a task with Set Participant Data as the action.
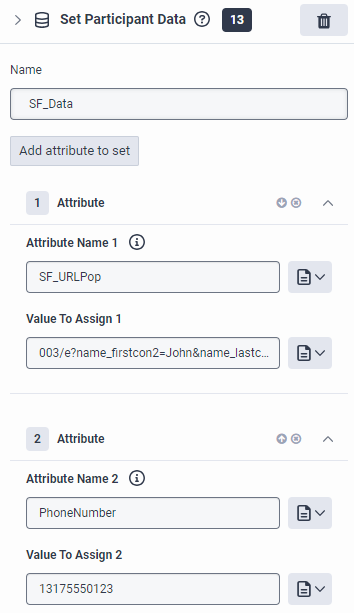
- For Attribute Name, add SF_URLPop.
- For Value to Assign, add a relative link to the Salesforce page that appears when an incoming interaction contains this custom attribute. In this example, the value is a new contact URL, appended with input data: 003/e?name_firstcon2=John&name_lastcon2=Smith.
- Add a Transfer to ACD action to the flow.
- Select the Queue that receives this call.
- Click Publish .
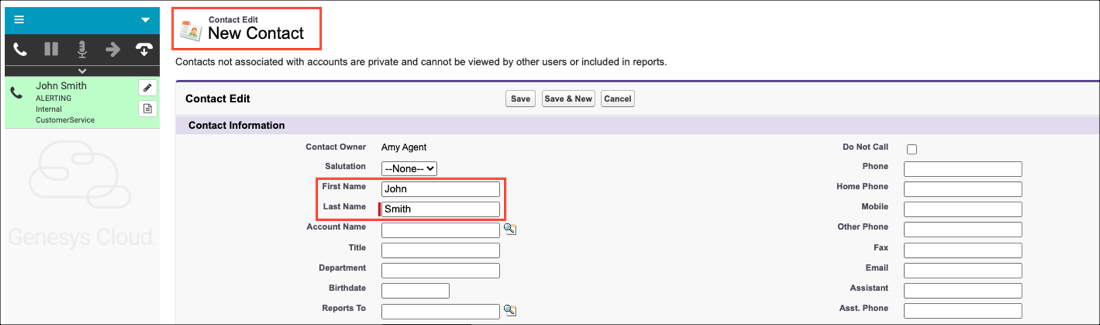
- When a call comes in through this call flow, it is assigned the custom attribute of SF_URLPop with a value of 003/e?name_firstcon2=John&name_lastcon2=Smith. After the call is routed to an agent, the alerting call screen pops a New Contact record in Salesforce with John Smith in the First Name and Last Name fields.
The following information applies to Lightning Experience.
Identify the URL
Each record in Salesforce uses an exact URL code. Creating a contact results in this URL: https://na5.salesforce.com/lightning/o/Contact/new.
The first portion of the URL (https://na5.salesforce.com) could look different in your environment. The value of a custom attribute only needs the portion that follows the main URL, for example, lightning/o/Contact/new.
Format the URL
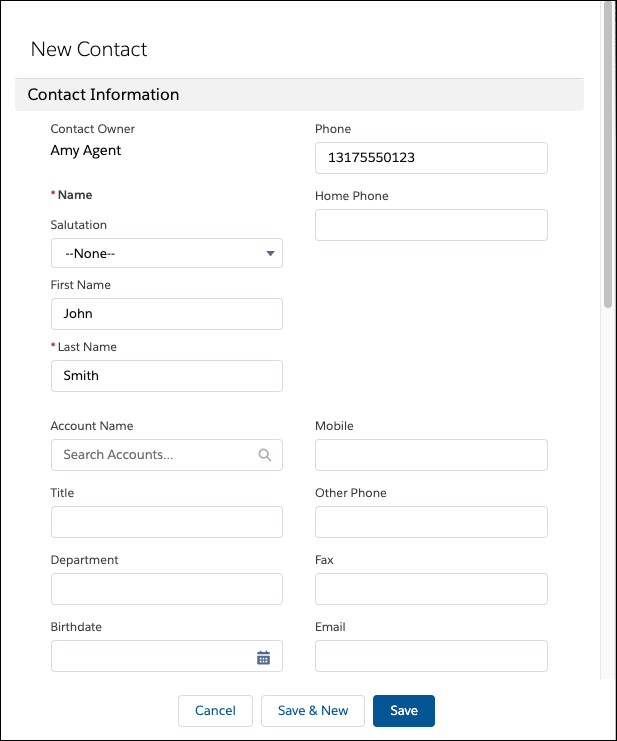
Create the URL by combining the relative URL with API names for requested fields. For example, lightning/o/Contact/new?defaultFieldValues=FirstName=John,LastName=Smith,Phone=13175550123 pops a new contact record with the First Name, Last Name, and Phone fields pre-populated with John, Smith, and 13175550123.
For more information, see Launching Record Create Page with Default Field Values in the Salesforce documentation.
Example flow
This example uses the Set Participant Data action to set the attribute for an Inbound Call flow.
- For Genesys Cloud for Salesforce integration, you can follow the same steps for callbacks, emails, messages, and ACD voicemails. For emails and messages, create and publish an Inbound Email or Inbound Message flow instead of an Inbound Call flow.
- For CX Cloud from Genesys and Salesforce integration, you can follow the same steps for callbacks.
The information used to set the attribute on the call can come from multiple different places: data dip, caller data entry, workgroup information, a static URL, or a combination of other interaction attributes. For more information, see Add a Set Participant Data action to a task.
- Create an Inbound Call flow in Architect.
- Add a task with Set Participant Data as the action.
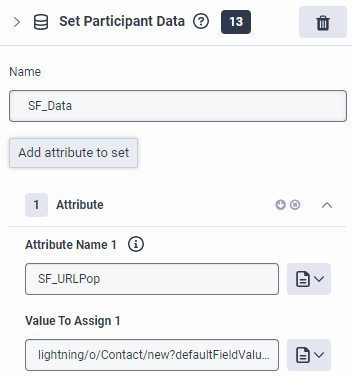
- For Attribute Name, add SF_URLPop or GC_SCREEN_POP.
- For Value to Assign, add a relative link to the Salesforce page that appears when an incoming interaction contains this custom attribute. In this example, the value is a new contact URL, appended with query parameters: lightning/o/Contact/new?defaultFieldValues=FirstName=John,LastName=Smith,Phone=13175550123.
- Add a Transfer to ACD action to the flow.
- Select the Queue that receives this call.
- Click Publish .
- When a call comes in through this call flow, GC_SCREEN_POP or SF_URLPop custom attribute is assigned with a value of lightning/o/Contact/new?defaultFieldValues=FirstName=John,LastName=Smith,Phone=13175550123. After the call is routed to an agent, the alerting call screen pops a New Contact record in Salesforce with John Smith in the First Name and Last Name fields and 13175550123 in the Phone field.
For more information, see Screen pop in Genesys Cloud for Salesforce and Screen pop in CX Cloud from Genesys and Salesforce.
For more information about the integration, see About Genesys Cloud for Salesforce and About CX Cloud from Genesys and Salesforce.