
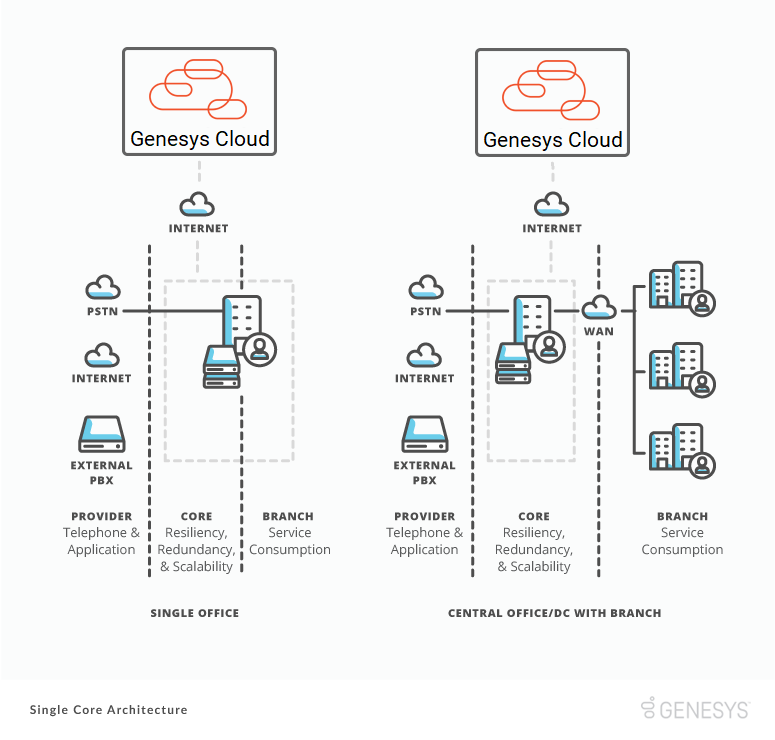
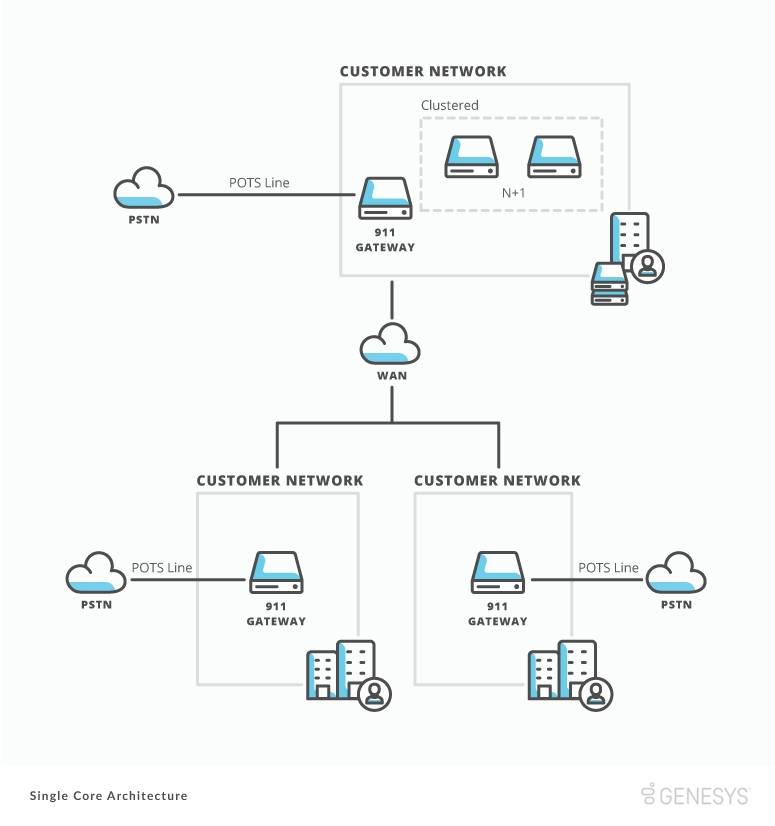
Single core architecture
Single core architecture refers to a single Communicate site providing core services. It provides local redundancy and scalability for BYOC Premises Edges deployed in an N+1 configuration. It also helps companies reduce costs by consolidating and removing telephony lines from branch offices.
Customers who use single core architecture often have:
- A single physical company office supporting users that work at home.
- A single central office supporting remote branch offices.
- A central data center hosting all of the companies regional IT.
- Regional divisions of global companies.
Technical architecture requirements and best practices
Architecture diagram
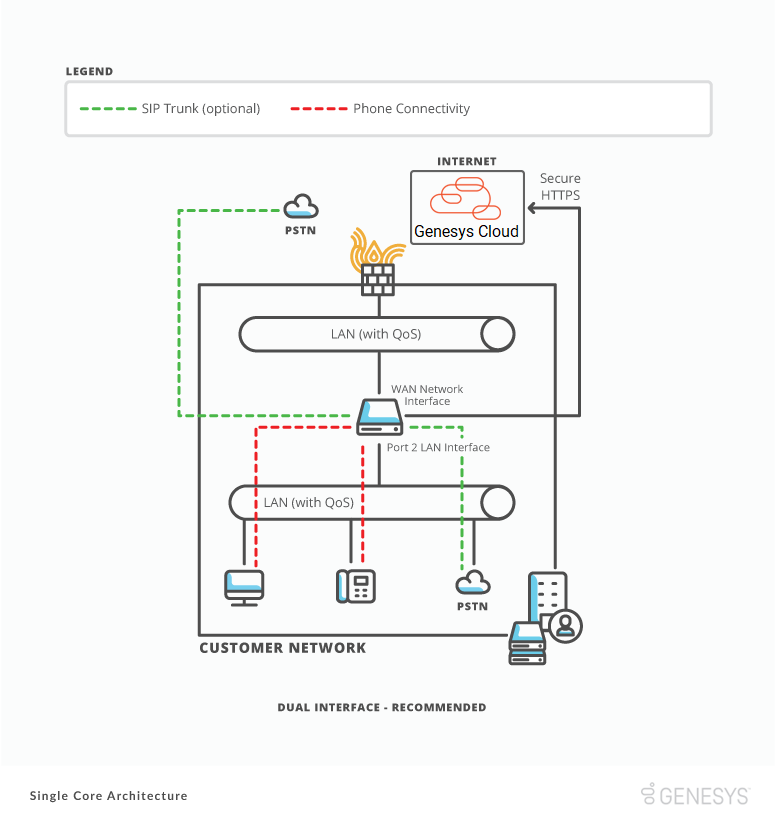
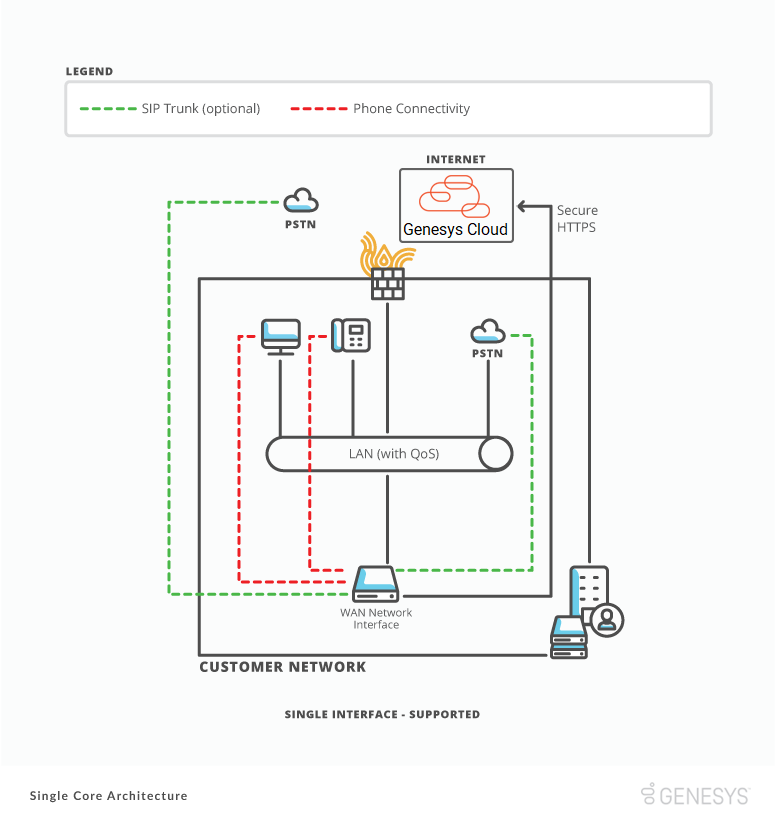
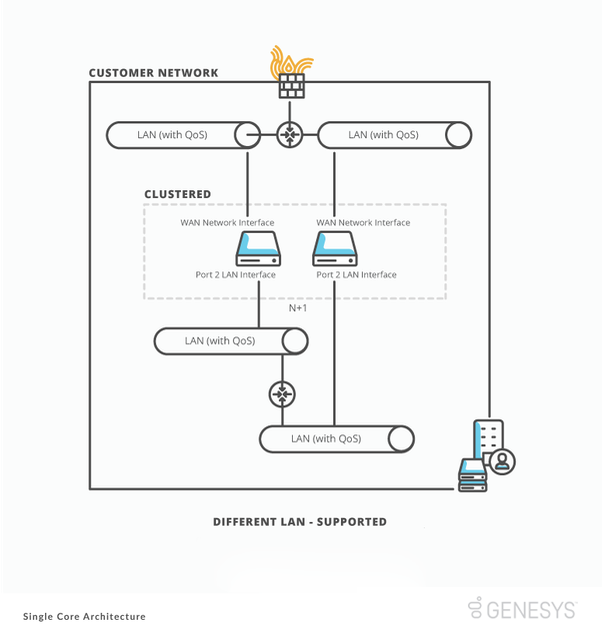
BYOC Premises Edge to your LAN
A BYOC Premises Edge comes standard with either three or seven usable network interfaces based on the model. An Edge uses these interfaces to connect to your local area network (LAN). We recommend deploying an Edge using the built-in WAN interface and Port 2.
If you only have a single network segment, you can deploy an Edge using a single network interface. However, separating traffic helps prevent your Edge network interface from becoming congested. Congestion occurs when an Edge processes all traffic on a single network interface. In a single interface deployment, the WAN interface on an Edge must connect to your network for an Edge to function correctly.
To deploy an Edge using two interfaces, connect the WAN interface to a network segment that has outbound access to the public Internet. Use it to connect to the Genesys Cloud platform. Connect the Port 2 interface to a different network segment that has access to your company LAN.
The following diagrams show the two supported best practice deployments.
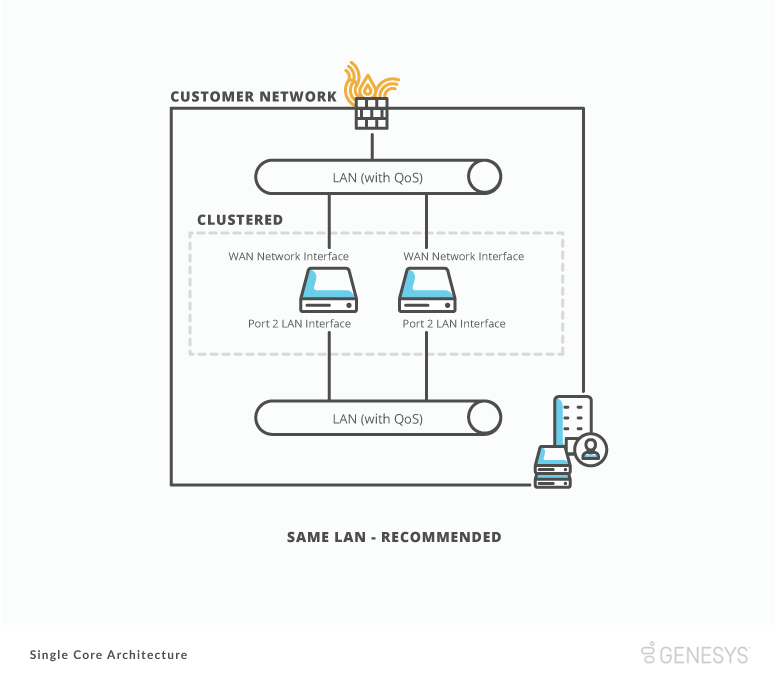
BYOC Premises Edge to BYOC Premises Edge
In the Single Core architecture, deploy BYOC Premises Edges at the same physical Communicate site. We recommend deploying all Edges on the same LAN network segments.
We recommend this deployment to ensure the most output with the least amount of latency between the devices. Edge appliances frequently communicate with each other due to automatic clustering and load balancing. Voice traffic also passes between them during standard operations.
If you deploy an Edge appliances on different LAN network segments within the site:
- The maximum network latency between the appliances is 10 ms.
- The traffic has less than 1 ms of packet jitter.
- All network ports between the devices are open.
- The available bandwidth between the devices supports your maximum number of simultaneous calls.
BYOC Premises Edge to PSTN provider (SIP)
Genesys Cloud customers bring SIP voice providers into Genesys Cloud through three main channels:
- SIP trunking to an external voice provider
- SIP trunking to a legacy third party PBX provider
- SIP trunking to a network gateway device or SBC
Genesys Cloud supports all three channels. From an SIP trunking perspective, architect them the same way. We recommend establishing SIP trunks to each of your Edges.
When using SIP trunking in Genesys Cloud, we recommend separating inbound and outbound traffic to different SIP trunks. Separating traffic provides the best telephony resiliency and future scalability options.
Genesys Cloud can also support bidirectional SIP trunks. We do not recommend them. They can cause scalability, functionality, and failover restrictions in your solution.
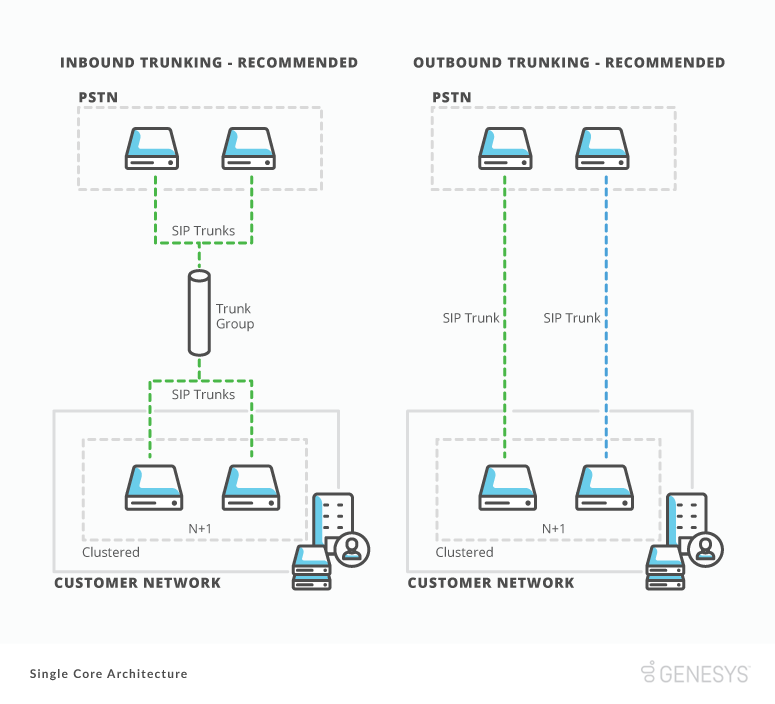
Inbound SIP trunking
Inbound SIP trunking is how the people outside your company reach people and services within your company. Architecting your inbound SIP trunking correctly is important to ensure the serviceability of outside customers. We recommend that when architecting your inbound SIP trunks, you:
1. Work with your PSTN provider to build a SIP trunk to each of your Edges.
2. Bind all trunks together in a trunk group.
3. Assign the inbound telephone numbers (DID, NGN, or TFN) by your PSTN provider to the inbound SIP trunk group.
This process provides your company with redundancy and resiliency in a scenario that an Edge or PSTN Provider component fails.
Outbound SIP trunking
Outbound SIP trunking is important to reach parties outside your company. Its architecture is simpler than inbound SIP trunking. Outbound SIP trunking does not depend on inbound telephone numbers. We recommend that you work with your PSTN provider to build a dedicated outbound SIP trunk to each Edge.
Building independent trunks gives each Edge the ability to process outbound calls at the same time. This ability helps you ensure that your other Edge can make outbound calls to your PSTN provider. If a component fails, it also allows call balancing across your Edge for greater scalability and reduces the number of active calls impacted.
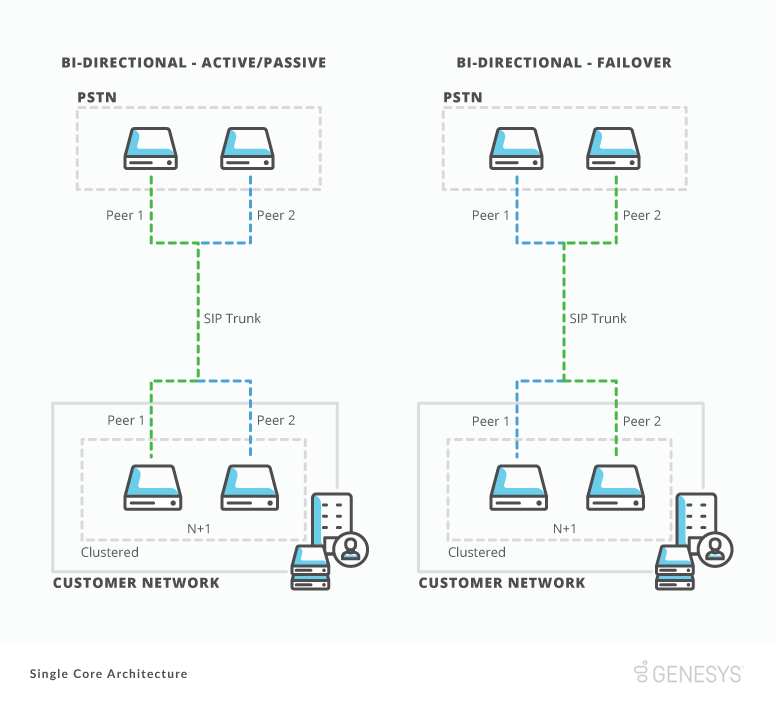
Bidirectional SIP trunking
Bidirectional SIP trunking refers to the same SIP trunk facilitating inbound and outbound voice traffic to your PSTN Provider. Genesys Cloud supports it, but it can introduce scalability restrictions depending on the capabilities and features of your PSTN provider. PSTN providers often only offer active/passive configuration for bidirectional SIP trunking redundancy.
Active/active or active/passive load balancing
Many PSTN Carriers provide a redundancy option of active/passive or active/active load balancing on SIP trunk groups. We recommend deploying in an active/active trunk group. Active/active load balancing enables you to make sure that your other Edges can accept calls from your PSTN provider. If a component fails, it also allows call balancing across your Edges providing for greater scalability and reduces the number of active calls impacted.
Genesys Cloud also supports active/passive load balancing. In an active/passive configuration, the PSTN provider builds a single SIP trunk. Both the customer and SIP provider provide a sequentially ordered list of SIP servers for the SIP trunk. Calls attempt to connect to the first SIP server on the list. If a SIP server on the list does not respond, calls attempt to connect to the next server on the list. When you provide your SIP server list to your PSTN provider, make sure also to provide a list of your Edge devices. This list ensures that the service fails over to another Edge in the event of a component outage. Currently with this configuration, a single Edge manages all PSTN bound calls, limiting your scalability.
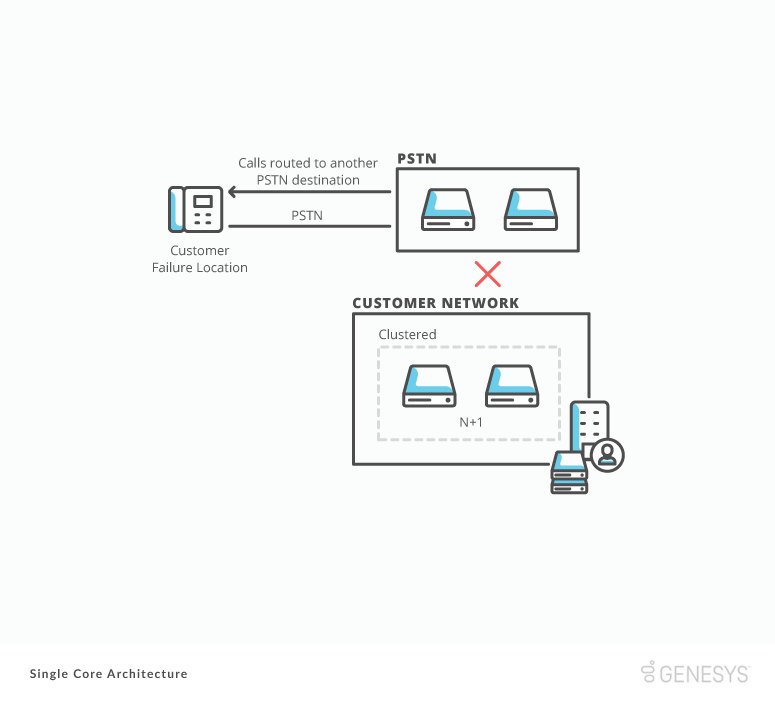
Special Tip: PSTN Failure Routing Plan
Some carrier PSTN Providers offer a “failure routing plan” with their SIP trunking services. This service allows a customer to set up an inbound telephony number routing plan that enables, either manually or automatically, if your PSTN provider SIP trunking services are interrupted. If there is a failure, the routing plan allows you to divert your telephony numbers to other locations.
If your carrier offers this service, we advise that you set up a basic routing plan for your mission-critical inbound telephone numbers.
Emergency Dialing
You may need to enable your Communicate solution to connect with public emergency services depending on your company’s jurisdiction, regulations, industry, or internal polices. Public emergency numbers include 911 in the United States.
You can integrate emergency services into your solution in many ways. The most common practice is to deploy a local analog gateway connected to a business POTS line at each physical Communicate site. This practice allows you to configure your dial plan to direct calls to the site classified as “Emergency” out the local POTS line.
If you are interested in other emergency dialing solutions, consult with your sales engineer for the best method based on your company requirements.
Phones
When connecting physical phones to Genesys Cloud, we recommend using DHCP and DNS services. DHCP and DNS services allow you to streamline your initial deployment, reduce ongoing phone management, and provide better resiliency for your users. Genesys Cloud supports manually deploying each phone with its static IP information and Provisioning. We do not recommend manual deployment.
Phone Provisioning with DHCP and DNS
To deploy your phones using DHCP and DNS, you need these services enabled on your internal customer network. Once these services are available, set up new host “A” resource records for Genesys Cloud phone provisioning in your DNS forward lookup zone. The host “A” records all have the same name, but create a new record with the IP of each Edge. Adding all of the Edges ensures that if a single Edge device is unavailable, your phones will attempt to connect to the next Edge.
After creating your host “A” records, create a DHCP scope for your phones. Each phone network segment needs a different DHCP scope defined in your DHCP server. After creating the DHCP scopes, create a new DHCP option for the scope of Code: 160. This Option notifies your phones of their provisioning Edge when they are on your network. In the Option 160, you add the name of the phone provisioning DNS record that you created in your forward lookup zone.