
Navigate and download example web survey invite flows
When planning and designing your survey invite flow, use the following examples, tips, and considerations to help maximize agent productivity and improve customer satisfaction. Before you begin, familiarize yourself with canned responses. For more information, see About canned responses and Create responses.
Web survey invite flow examples
These examples contain generic keywords and variable information. To adapt the example survey invite flows for your organization, replace the generic information with ones appropriate for your situation.
This example illustrates how to set up a simple survey invite flow:
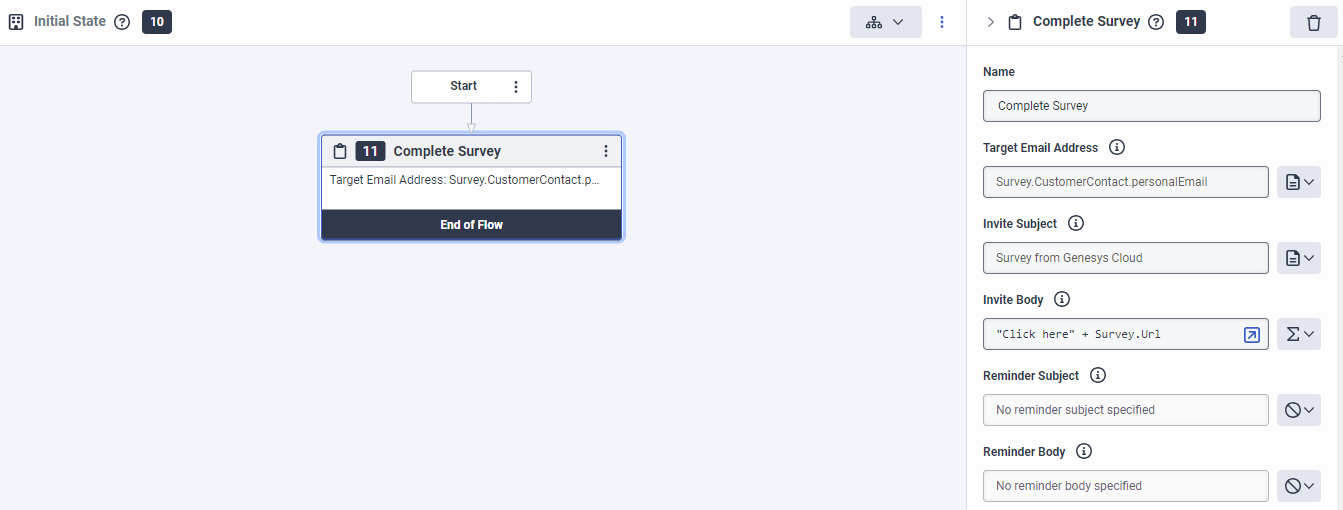
- From the task editor Toolbox, expand Survey Invites and drag a Complete Survey action into the task editor.
- Under Target Email Address, enter a literal value or an expression to retrieve the address to use to contact the survey invitee. This entry is typically an email address. In this example, switch to expression mode and type Survey.CustomerContact.personalEmail.
- Under Invite Subject, enter a literal value or an expression to set the subject line of the initial survey invitation. In this example, type Survey from Genesys Cloud!
- Under Invite Body, enter a literal value or an expression to set up the contents of the initial survey invitation. For this example, switch to expression mode and type this expression: “Click here” + Survey.Url. Note: You can optionally set subject and body information for a separate reminder email. However, our simple survey flow does not include this step.
- Validate, save, and publish the survey invite flow.
Download and import a simple survey invite template flow into your Genesys Cloud Organization.
Download the Simple survey invite flow template.
The following procedures describe how to create an advanced survey invite flow based on the contact’s preference to opt in or out of survey invitations.
Create a reusable task and retrieve the external contact
This task encapsulates logic that attempts to collect the external contact in various ways.
- From the Toolbox, drag a Task action into the Reusable Tasks area.
- Name the task action Get External Contact.
- Click Click to open. The task editor opens.
- From the task editor Toolbox, expand Logical, and do the following:
- Drag a Decision action below Start.
- Under Expression, type IsSet(Survey.CustomerContact). This expression checks to see if an External Contact is verified for the conversation. If so, the external contact is available to the flow in Survey.CustomerContact.
- Configure the Decision action’s Yes path:
- From the task editor Toolbox, expand Data, drag an Update Data action into the Decision action’s Yes path, and do the following:
- Click Add update statement and select ExternalContact.
- Under Variable Name, type Task.externalContact.
- Click Task.externalContact. The Edit Variable dialog box opens.
- Under Variable Options, select the Output from Task check box.
- Click Save to return to the Update Data action configuration.
- Under Value To Assign, type Survey.CustomerContact.
- Configure the Decision action’s No path. If the system cannot find a verified External Contact, this action searches for one using the participant’s address. Typically, this result is a phone number or email address:
- From the task editor toolbox, expand External Contacts, drag a Search External Contact action into the Decision action’s No path, and do the following:
- Under Search Term, type Survey.CustomerAddress.
- Under External Contact Results, type Task.ExternalContactsList.
- Configure the Search External Contacts action’s Exact Match path:
- From the task editor Toolbox, expand Data and drag an Update Data action into the Exact Match path.
- Click Add update statement and select ExternalContact.
- Under Variable Name, type Task.externalContact.
- Under Value To Assign, type GetAt(Task.externalContactsList, 0).
- Configure the Search External Contacts action’s Multiple path. Because the system did not locate an exact match and therefore may not have a correct email address, we choose not to send a survey and instead end the task:
- From the task editor Toolbox, expand Task and drag an End Task action into the Multiple path.
- (Optional) Rename the action.
- Under Output Path, select Default.
- Configure the Search External Contacts action’s Not Found path. As in step 8, because the system did not locate an exact match and may not have a correct email address, we do not send a survey and instead end the task:
- From the task editor Toolbox, expand Task and drag an End Task action into the Not Found path.
- Under Output Path, select Default.
- Check the contact to see if they indicated that they do not want surveys. If so, end the task with the OptOut disposition for tracking purposes:
- From the task editor Toolbox, expand Logical and drag a Decision below the Update Data action.
- Under Expression, type Task.externalContact.surveyOptOut.
- Configure the Decision action’s Yes path:
- From the task editor Toolbox, expand Task and drag an End Task action into the Yes path.
- Under Output Path, select Default.
- Configure the Decision action’s No path:
- From the task editor toolbox, expand Task and drag an End Task action into the No path.
- Under Output Path, select ExternalContactFound.
Create a reusable task and retrieve an external contact’s email address
- From the Toolbox, drag a Task action into the Reusable Tasks area.
- Name the task action Get Invite Email Address.
- Click Click to open. The task editor opens.
- From the task editor Toolbox, expand Logical and drag a Switch action below Start.
- Under Evaluation Style, select Take path of first case that returns True. The contact may have multiple email addresses, or perhaps does not have a personal email address. This action allows the survey flow to use any available email address, while giving preference to the personal email:
- Under Case 1, type IsSet(Task.customerExternalContact.personalEmail).
- Under Case 2, type IsSet(Task.customerExternalContact.workEmail).
- Under Case 3, type IsSet(Task.customerExternalContact.otherEmail).
- Configure the path for Case 1:
- From the task editor Toolbox, expand Data, drag an Update Data action into the Switch action’s Case 1 path, and do the following:
- Click Add update statement and select String.
- Under Variable Name, type Task.surveyInviteEmailAddress.
- Click Task.surveyInviteEmailAddress. The Edit Variable dialog box opens.
- Under Variable Options, select the Output from Task check box.
- Click Save to return to the Update Data action configuration.
- Under Value To Assign, type Task.customerExternalContact.personalEmail.
- Configure the path for Case 2:
- From the task editor Toolbox, expand Data, drag an Update Data action into the Switch action’s Case 2 path, and do the following:
- Click Add update statement and select String.
- Under Variable Name, type Task.surveyInviteEmailAddress.
- Under Value To Assign, type Task.customerExternalContact.workEmail.
- Configure the path for Case 3:
- From the task editor Toolbox, expand Data, drag an Update Data action into the Switch action’s Case 3 path, and do the following:
- Click Add update statement and select String.
- Under Variable Name, type Task.surveyInviteEmailAddress.
- Under Value To Assign, type Task.customerExternalContact.otherEmail.
- Configure the path for Default:
- From the task editor Toolbox, expand Task and drag an End Task action into the Yes path.
- Under Output Path, select Default.
- Configure the task’s ending action:
- From the task editor Toolbox, expand Task and drag an End Task action below the Switch action’s Case paths.
- Under Output Path, select EmailAddressFound.
Create and configure the action to send a survey invitation to the external contact
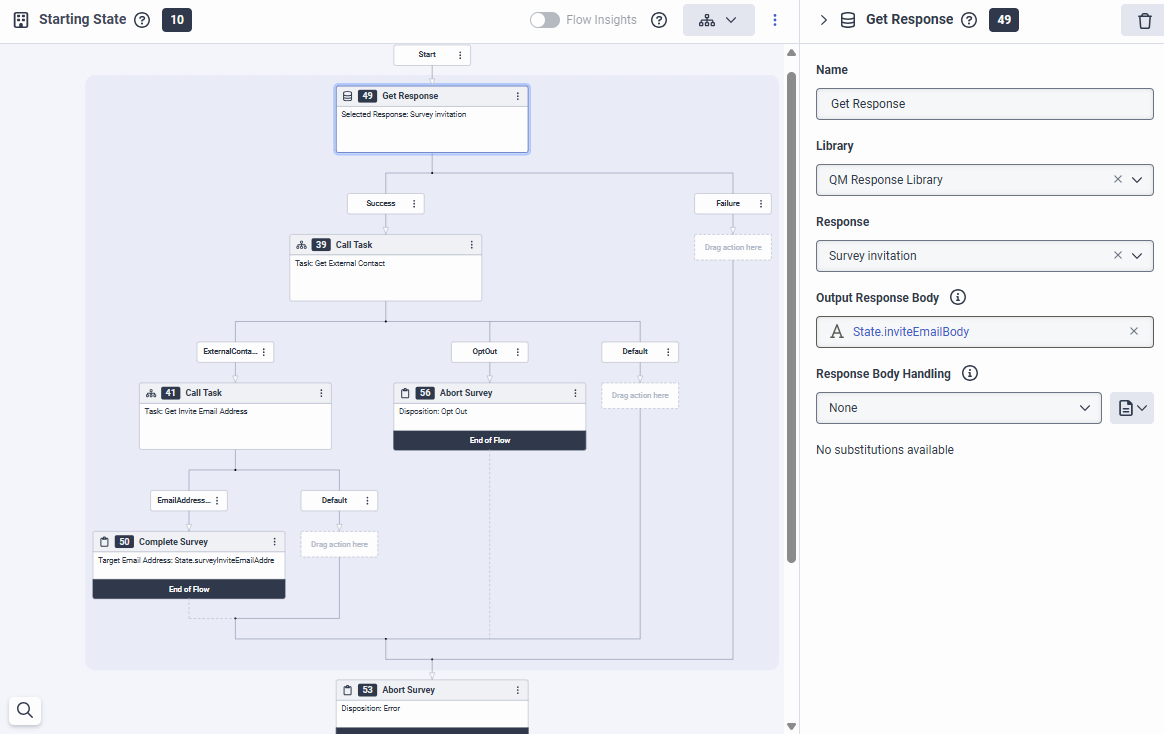
- From the Starting State, click Click to open.
- From the task editor Toolbox, expand Data and drag a Get Response action below Start. Note: The library, response, and substitutions available here depend on what you define in Canned Responses.
- Configure the Get Response action:
- Under Library, select the collection that contains the response you want to add. In this example, the response is in the QM Response Library. Note: This selection depends on your quality management response configuration. To see an example of a canned response, see Show me a canned response example at the end of this article.
- Under Response, select the predefined message you want to add to the flow. In this example, the response is Survey invitation.
- Under Output Response Body, type the name of the variable used to store response configuration, allowing it for use in other locations within the flow. In this example, switch to expression mode and type State.inviteResponse.
- Enable the Perform Substitutions check box. This example includes four available substitutions. For more information, see the canned response example image in the next section.
- Under COMMUNICATION_TYPE, switch to expression mode and type Survey.ConversationType.
- Under AGENT_NAME, leave the default configuration.
- Under CONTACT_DATE, switch to expression mode and type ToString(Month(Survey.ConversationEndDateTimeUtc)) + “/” + ToString(Day(Survey.ConversationEndDateTimeUtc)) + “/” + ToString(Year(Survey.ConversationEndDateTimeUtc)).
- Under SURVEY_URL, type Survey.URL.
- Under Library, select the collection that contains the response you want to add. In this example, the response is in the QM Response Library.
- Complete the Get Response action’s Success path:
- From the task editor Toolbox, drag a Call Task action into the Get Response action’s Success path.
- Under Task, select the Get External Contact task created previously.
- Under Outputs, type State.externalContact.
- Configure the Call Task action’s ExternalContact path:
- From the task editor Toolbox, drag a Call Task action into the Call Task action’s ExternalContact path.
- Under Task, select the Get Invite Email Address task created previously.
- Under Inputs, type State.externalContact.
- Under Outputs, type State.surveyInviteEmailAddress.
- Configure the Call Task action’s EmailAddress path:
- From the task editor Toolbox, expand Survey Invites and drag a Complete Survey action below the Call Task action’s EmailAddress path.
- Under Target Email Address, type State.surveyInviteEmailAddress.
- Under Invite Subject, type “Thank you for your ” + Survey.ConversationType.
- Under Invite Body, type State.inviteResponse.
- Configure the Call Task action’s OptOut path and end the flow if the contact does not participate in surveys:
- Expand Survey Invites and drag an Abort Survey action below the Call Task action’s OptOut path.
- Under Disposition, select OptOut. Note: Configure the option that allows an external contact to opt out of surveys in Genesys Cloud > Directory > External Contacts. For more information, see Note an External Contact’s survey opt-out preference.
- Configure the closing action for the flow:
- Expand Survey Invites and drag an Abort Survey action to the bottom of the task.
- Under Disposition, select error.
- Validate, save, and publish the survey invite flow.
Download and import an advanced survey invite template flow into your Genesys Cloud Organization.
Download the Advanced survey invite flow template.
For information about creating canned responses, see Add a response.