
Work with the analytics workspace
- Analytics > Tab Configurations > View permission
- Analytics > Tab Configurations > Edit permission
- Analytics > Tab Configurations > Delete permission
- Analytics > View Configurations > View permission
- Analytics > View Configurations > Edit permission
The analytics workspaces enables you to create and customize your working environment so that you can find exactly what you need, when you need it. The analytics workspace contains up to 20 views, each represented by a tab. The data presented in each view depends on your filter and configuration preferences. For more information, see About analytics workspaces and Understand analytics workspaces.
- To change the order of the tabs, simply drag the tab to the location you prefer.
- For additional tab actions, click the tab’s More menu or right-click the tab.
From the analytics workspace, you can perform the following procedures.
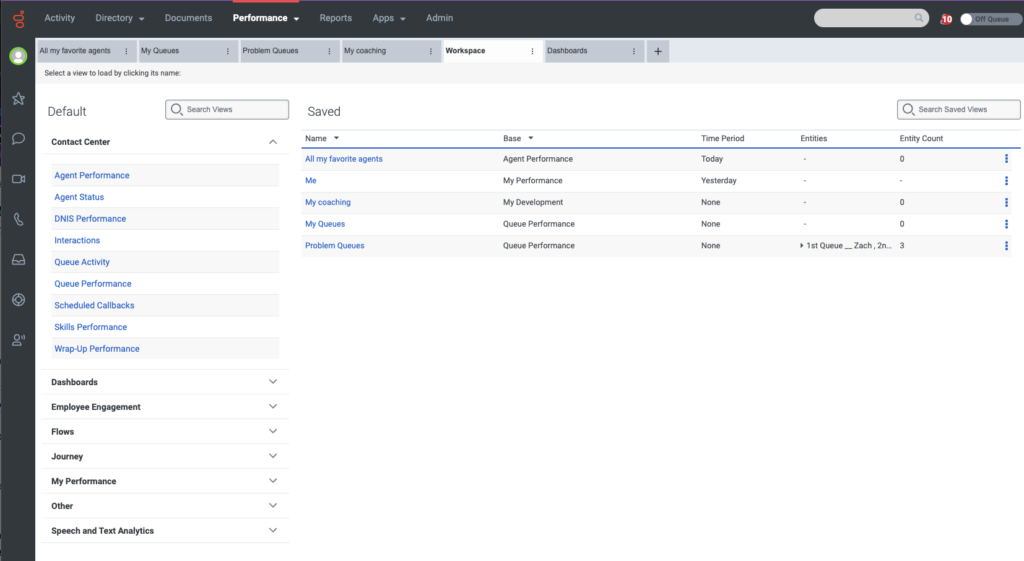
- Click Performance > Workspace. The analytics workspace opens with a Workspace tab that contains a list of all of the views that you can create.
Click the image to enlarge.
-
From the workspace Default list, select the view that you want to create. The view you select replaces the Workspace tab.

- Click Performance > Workspace.
- From the workspace Saved list, select the view whose name you want to change.
- Click Save on the right side of the screen and select the Save View As tab.
Click the image to enlarge.

- Enter the view name in the field provided.
- Select a default time period.
- Click Save.
- The saved view appears in the Saved list in the Workspace tab.
- If you do not save the changes you made to a tab and asterisk (*) appears next to the tab name.
- Click Performance > Workspace.
- From the workspace Default list, select the view that you want to create.
- Select the Overwrite Existing View tab on the right side of the screen under Save View.
Click the image to enlarge.
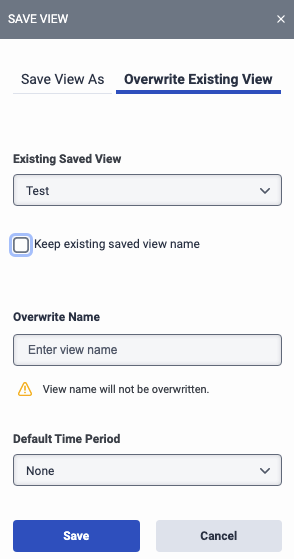
- From the Existing Saved View list, select the view whose name you want to change.
- Enter the new view name in the Overwrite Name field.
- Select a default time period.
- Click Save.
- Create a new analytics workspace view or open an existing saved view.
- Open the filter panel associated with the specific view and configure the available options.
For more information about how to save you filter configuration, see Save a view’s filters and column settings.
- Create a new analytics workspace view or open an existing saved view.
- Select any of the view tabs, columns, rows, and so on to drill down into the details.
- Create a new analytics workspace view or open an existing saved view.
- Export the data from selected views as a CSV file or a PDF report delivered to your inbox in Genesys Cloud.
For more information, see Export a view.