
Navigate an email flow
When planning and designing your email flow, use the following examples, tips, and considerations to help maximize agent productivity and improve customer satisfaction.
Email flow examples
These examples contain generic product keywords and business hours as well as pre-configured queues. To adapt the example email flows for your organization, replace the generic information with ones appropriate for your situation.
This example illustrates how to set up an email flow to look for a product in the subject line, and then transfer it to the queue assigned to handle that product:
Click the image to enlarge.
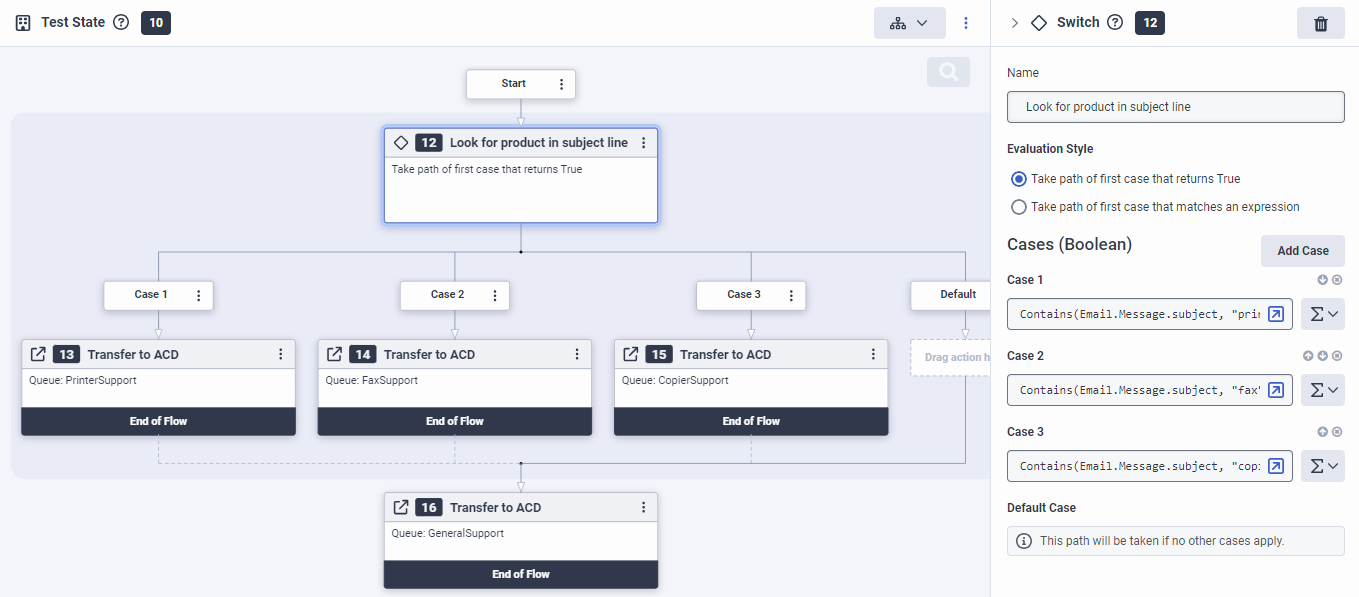
- From the task editor Toolbox, expand the Logical category and drag a Switch action into the task.
- Configure the Switch action:
- Under Name, type a meaningful description of the Switch action. This label becomes the action’s displayed name in the task sequence.
- Under Case 1, switch to expression mode and enter the following expression: Contains(Email.Message.subject, "printer").
- Under Case 2, switch to expression mode and enter the following expression: Contains(Email.Message.subject, "fax").
- Under Case 3, switch to expression mode and enter the following expression: Contains(Email.Message.subject, "copier").
- Set up action paths for each Switch action case:
- Drag a Transfer to ACD action below the Switch Action’s Case 1 location.
- From the Queue list, select PrinterSupport.
- Drag a Transfer to ACD action below the Switch Action’s Case 2 location.
- From the Queue list, select FaxSupport.
- Drag a Transfer to ACD action below the Switch Action’s Case 3 location.
- From the Queue list, select CopierSupport.
- Drag a Transfer to ACD action into the task, below the Case transfer paths.
- From the Queue list, select GeneralSupport.
- Validate, save, and publish the inbound email flow.
The following procedures describe how to create a task in an inbound email flow that takes action based on the organization’s current open and closed schedules.
Click the image to enlarge.
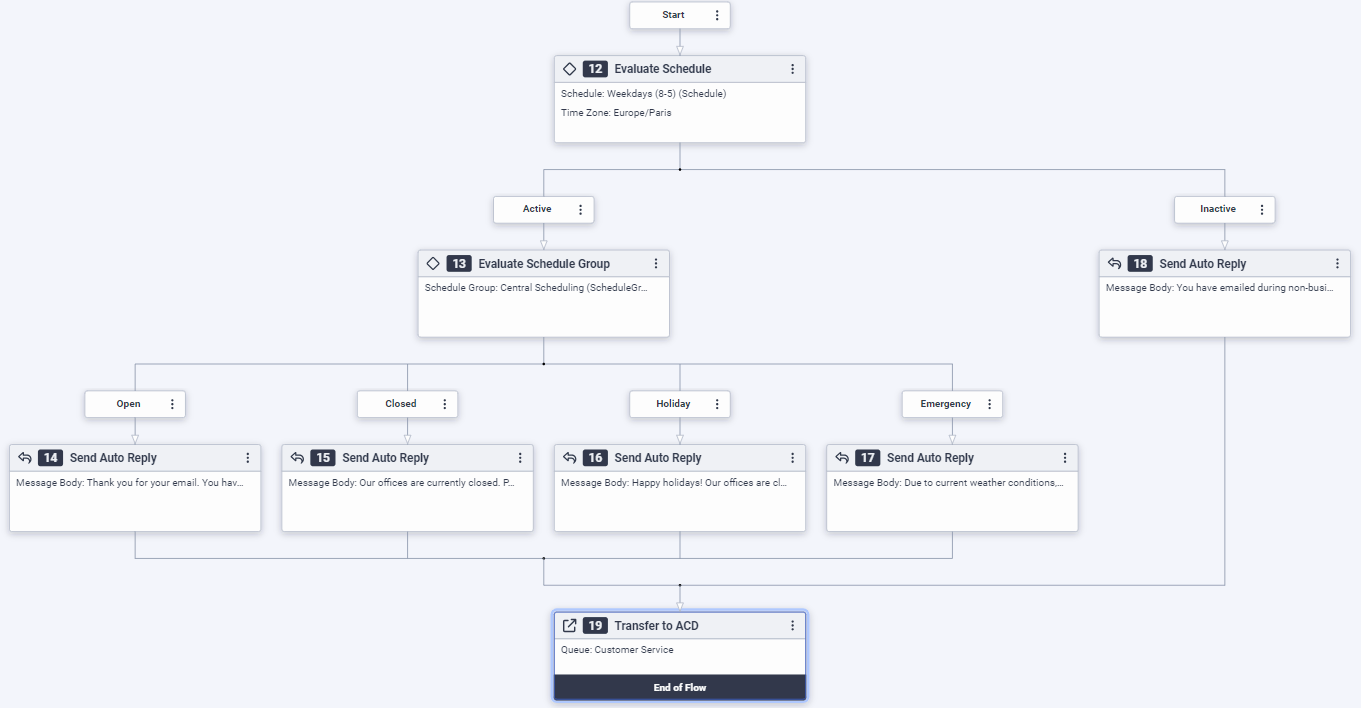
Set up the Evaluate Schedule action
- From the Toolbox, expand the Logical category.
- Drag an Evaluate Schedule action to the appropriate location in the editor.
- (Optional) In the Name field, rename the schedule evaluation action. By default, this name is Evaluate Schedule.
- Under Schedule, select the schedule you want to evaluate.
- (Optional) Under Time Zone, change the default time zone.
- To use the current evaluation DateTime (UTC), leave the Current default setting.
- To use a different evaluation DateTime (UTC):
- Click Specific.
- Enter the evaluation expression.
- Next, configure the active and inactive paths.
Configure the email flow’s active path
Here, specify the action to take when the flow occurs during the schedule’s active hours.
- From the Toolbox, expand the Logical category.
- Drag an Evaluate Schedule Group action below the Evaluate Schedule action’s Active path.
- (Optional) In the Name field, rename the schedule evaluation group action. By default, this name is Evaluate Schedule Group.
- Under Schedule, select the schedule you want to evaluate.
- To use the current evaluation DateTime (UTC), leave the Current default setting.
- To use a different evaluation DateTime (UTC):
- Click Specific.
- Enter the evaluation expression.
- Define open and closed paths:
- Under Open, drag and configure an appropriate action to take if the flow occurs during an open schedule. For example, a Send Auto Reply action from the Email category that lets users know they reached you during open hours. Or, you could add a Transfer to ACD action that routes the email to a designated queue.
- Under Closed, drag and configure an appropriate action to take if the flow occurs during a closed schedule. For example, a Send Auto Reply action from the Email category that lets users know they reached you outside of normal business hours, and that they may expect a delayed reply.
- Under Holiday, drag and configure an appropriate action to take if the flow occurs during a holiday schedule. For example, a Send Auto Reply action from the Email category that lets users know they reached you during a company holiday, and when they may expect a reply.
- Under Emergency, drag and configure an appropriate action to take if the flow occurs during an emergency schedule. For example, a Send Auto Reply action from the Email category that lets users know that the office is currently closed due to weather conditions, and that an agent will return the call when the office reopens.
Configure the email flow’s inactive path
Here, specify the action to take when the flow occurs during the schedule’s inactive hours.
- From the Toolbox, drag an appropriate action below the Evaluate Schedule action’s Inactive path. For example, a Send Auto Reply action from the Email category that lets customers know they emailed during non-business hours and should expect a delayed reply.
This email flow example shows how to transfer the email to a separate queue outside of standard business hours:

- From the task editor Toolbox, expand the Logical category and drag a Decision action into the task.
- Configure the Decision action:
- Under Name, type a meaningful description of the Decision action. This label becomes the action’s displayed name in the task sequence.
- Under Expression, switch to expression mode and enter the following expression: (Hour(GetCurrentDateTimeUtc()) <8 and (Hour(GetCurrentDateTimeUtc())>17)).
- Set up action paths for each Decision exit path:
- Drag a Transfer to ACD action below the Decision’s Yes path. Architect selects this path if the email arrives after regular business hours.
- From the Queue list, select LateNightSupport.
- Drag a Transfer to ACD action below the Decision’s No path. Architect selects this path if the email arrives within regular business hours.
- From the Queue list, select GeneralSupport.
- Validate, save, and publish the inbound email flow.
In this example, the system confirms the “#CASE ID#” token in the email body, and then transfers it accordingly:
Click the image to enlarge.
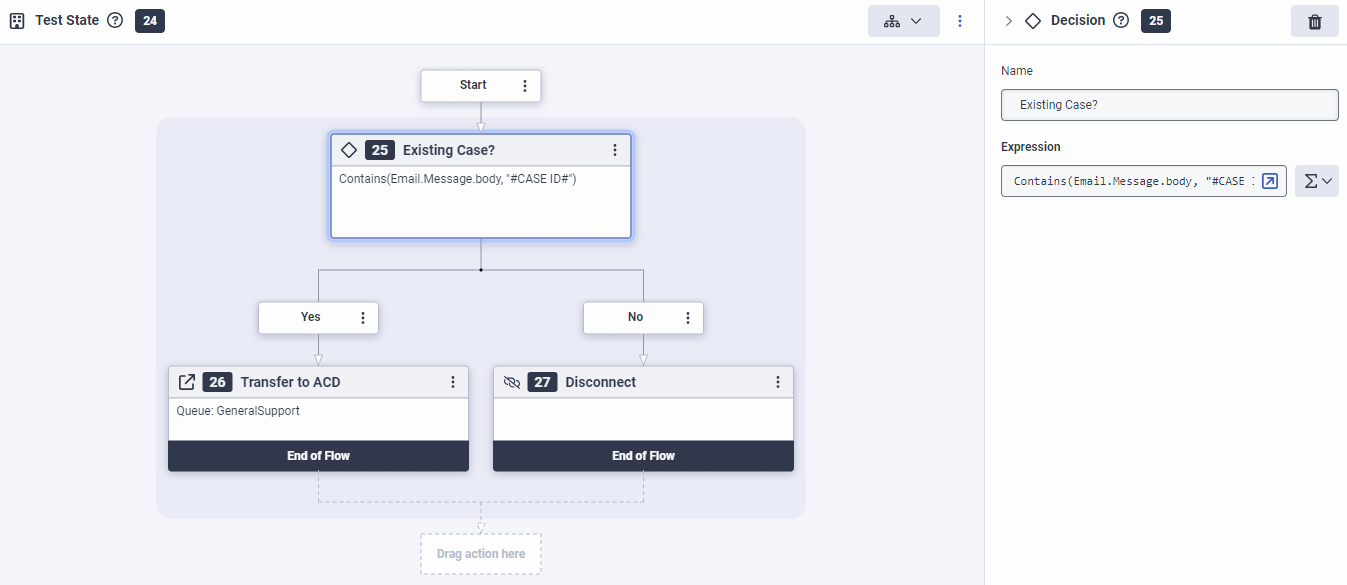
- From the task editor Toolbox, expand the Logical category and drag a Decision action into the task.
- Configure the Decision action:
- Under Name, type a meaningful description of the Decision action. This label becomes the action’s displayed name in the task sequence.
- Under Expression, switch to expression mode and enter the following expression: Contains(Email.Message.body, "#CASE ID#").
- Set up action paths for each Decision exit path:
- Drag a Transfer to ACD action below the Decision’s Yes path. Architect selects this path if the email contains a case ID in the email body.
- From the Queue list, select GeneralSupport.
- Drag a Disconnect action below the Decision’s No path. Architect selects this path if the email does not contain a case ID in the email body.
- Validate, save, and publish the inbound email flow.
Considerations during flow design
Architect includes a robust set of tools and actions to help you design your email flow. Consider the following options and solutions:
- To route to a different location based on a word in the subject line, use the “Contains()” function in a Decision action.
- To route to a different location based on the domain-part of the sender’s email address, use the EmailAddressDomainPart() function in a Decision. This process might be helpful if you want to send help requests from internal employees to the employee queue, and requests from everyone else to the standard customer queue.
- Look for keywords in the body; for example, CASE ID, or whatever your organization company uses to differentiate new cases from follow-up or existing cases.
- For time of day, consider sending conversations to one queue during work hours, and to another queue after hours. You can also configure the flow to send emails to the Japan queue during the workday in Japan, and to the Americas queue during U.S. working hours.