
Series: Set up CX Cloud, Digital and AI for Salesforce Service Cloud Voice
Create flows to route Experience and Email Experience objects
- Create backup queues for the flows
- Set up CX Cloud, Digital and AI for Salesforce Service Cloud
- Create service channels
- Assign field-level security
- Create and assign presence statuses to user profiles
- Create presence user and routing configurations
- Create backup queues for the flows
- Create record pages for the Experience objects
- Create an OAuth Client for Salesforce Service Cloud Voice
- Integrate Einstein Next Best Action in Salesforce
- Create a Lightning app for Digital and AI for Salesforce Service Cloud
- Create record pages for the Experience objects
A flow in Salesforce automates the routing process. You use elements, connectors, and resources to build a flow. For more information, see Flows in the Salesforce documentation.
Create a flow to route the Experience and Email Experience objects through the queues created for the objects.
- In Salesforce, create a flow using the Omni-Channel Flow template.
- On the Setup Home page, search for Flows in the Quick Find box and select Flows.
- Click New Flow.
- Select Start From Scratch and click Next.
- Select Omni-Channel Flow and click Create.
- Create the following resources of type Variable:
- input_record – Record data type for the object Experience.
- recordId – Text data type.
For more information, see recordId and input_record in the Salesforce documentation.
- Drag the Route Work action onto the canvas and enter the values for the new action:
- Give the action a Label and API Name and optionally, a Description.
- Under Set Input Values > RecordID Variable, select the recordId that you created in Step 2.
- Select Genesys Cloud Messaging for Service Channel.
- Select Queue for Route To.
- Under Queue, choose Select Queue and select the queue that you created for the Experience object. For more information, see Create backup queue for the flows.
- Click Done.
- Click Save in the Flow Builder.
- Enter a name for the flow, for example, Route Messaging Experience to Queue and click Save.
- Click Activate in the Flow Builder.
- In Salesforce, create a flow using the Omni-Channel Flow template.
- On the Setup Home page, search for Flows in the Quick Find box and select Flows.
- Click New Flow.
- Select Start From Scratch and click Next.
- Select Record-Triggered Flow and click Create.
- Under Select Object, choose Experience from the list.
- Under Configure Trigger, select Trigger the Flow when a record is created.
- Under Set Entry Conditions, select All Conditions Are Met (AND) as the Condition Requirements.
- Set the following conditions:
- Field – Interaction Id
- Operator – Is Null
- Value – False
- Add a Subflow element after the Start step in the Flow.
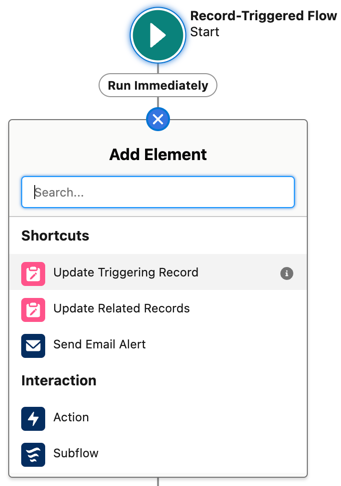
- In the New Subflow window, select the flow created previously to route the experience to the queue as the Referenced Flow.
- Enter a label name for the Subflow.
- Add the two input values – input_record and recordId.
- Click Done.
- Click Save in the flow builder.
- Enter a name for the flow, for example, Start Omni-Channel for a new Messaging Experience and click Save.
- Click Activate in the flow builder.
- In Salesforce, create a flow using the Omni-Channel Flow template.
- On the Setup Home page, search for Flows in the Quick Find box and select Flows.
- Click New Flow.
- Select Start From Scratch and click Next.
- Select Omni-Channel Flow and click Create.
- Create the following resources of type Variable:
- input_record – Record data type for the object Email Experience.
- recordId – Text data type.
For more information, see recordId and input_record in the Salesforce documentation.
- Drag the Route Work action onto the canvas and enter the values for the new action:
- Give the action a Label and API Name and optionally, a Description.
- Under Set Input Values, select Single for the number of work records to route.
- Select the recordId variable that you had created.
- Select Genesys Cloud Email for Service Channel.
- Select Queue for Route To.
- Under Queue, choose Select Queue and select the queue that you created previously for the Email Experience object. For more information, see Create backup queue for the flows.
- Click Done.
- Click Save in the flow builder.
- Enter a name for the flow, for example, Route Email Experience to Agent and click Save.
- Click Activate in the flow builder.
- In Salesforce, create a flow using the Omni-Channel Flow template.
- On the Setup Home page, search for Flows in the Quick Find box and select Flows.
- Click New Flow.
- Select Start From Scratch and click Next.
- Select Record-Triggered Flow and click Create.
- Under Select Object, choose Email Experience from the list.
- Under Configure Trigger, select Trigger the Flow when a record is created.
- Under Set Entry Conditions, select All Conditions Are Met (AND) as the Condition Requirements.
- Set the following conditions:
- Field – Interaction Id
- Operator – Is Null
- Value – False
- Add a Subflow element after the Start step in the Flow.
- In the New Subflow window, select the flow created previously to route the email experience to the queue as the Referenced Flow.
- Enter a label name for the Subflow.
- Add the two input values – input_record and recordId.
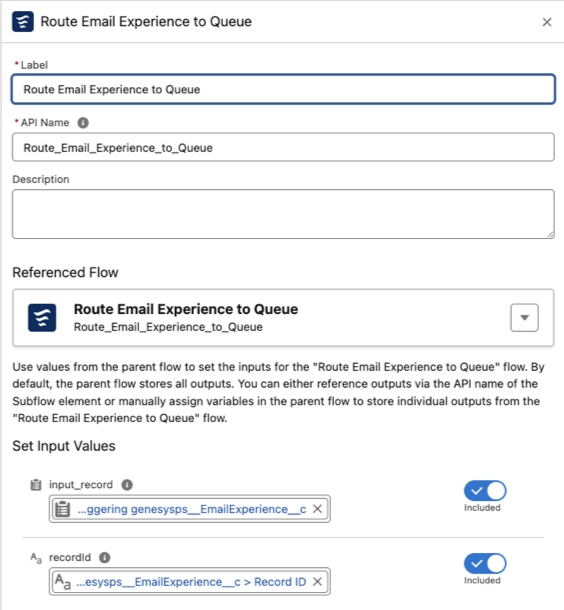
- Click Done.
- Click Save in the flow builder.
- Enter a name for the flow, for example, Start Omni-Channel for a new Email Experience and click Save.
- Click Activate in the flow builder.
Create backup queues for the flows :Previous Suggested Article Next Suggested Article: Create record pages for the Experience objects