Set up a domain for outbound email campaigns and agentless email notifications
Prerequisites
- Genesys Cloud CX 2, Genesys Cloud CX 2 Digital, Genesys Cloud CX 3, Genesys Cloud CX 3 Digital, Genesys Cloud CX 4, or Genesys Cloud CX 1 Digital Add-on II license
- Routing > Email > Manage permission
- Responses > Response > View permission
- Email > Settings > View permission
This article describes how to register an email domain for an outbound email campaign or to trigger an agentless email notifications. If you plan to give customers the option to reply to these email messages, you also need an inbound email domain. Once you register these email domains in Genesys Cloud, they are available for use on any email campaign.
Notes:
- The use of outbound emails requires that you have your own email domain or subdomain.
- You can use your own SMTP server to send agentless outbound emails or run campaigns. For more information, see Best practices to use your SMTP server to run email campaigns and send agentless email notifications.
- Genesys Cloud does not separate sending domains from bounce domains. Because you have to set up a CNAME for the bounced email to point to sparkpostmail.com, all requests coming to the subdomain will point to sparkpostmail.com. If you used your root domain, all requests to that domain would go to sparkpostmail.com. For this reason, you must use a subdomain for Campaign and Agentless Email.
- Genesys Cloud uses two hosting locations for outbound email: one in the European Union (EU) and one in the United States. Customers in the EU are hosted in the EU location, while all other regions go through the United States hosting location.
Set up outbound email for campaigns or agentless email notifications
Genesys Cloud enables you to run email campaigns and send agentless email notifications using either the Genesys native solution or your own SMTP server. You have the option to switch between the server types after original configuration. However, when you switch the server type, all active campaigns are lost. You must restart all the campaigns after you activate the new server type.
Note: The Domain Type must be Campaign/Agentless. Genesys Cloud, Custom domain, and Microsoft Graph server types are not supported for outbound email campaigns and agentless email notifications.
- Click Admin.
- Under Contact Center, click Email. The Manage Domains page opens.
- Click Menu > Digital and Telephony > Email.
- Click Add Domain. The Add Domain dialog box opens.
- From the Domain Type list, select Campaign/Agentless.
-
In the Domain name box, type the name of the email domain from which emails will be sent.
Note: Make sure that campaign and the agentless email domains are always subdomains. For example, if your domain is xyzcorp.com, the campaign domain you set up is something like sales.xyzcorp.com or marketing.xyzcorp.com.
- To use an existing SMTP server to run campaigns and send agentless oubound emails, select Use my organization’s SMTP server for sending campaign and agentless emails. Ensure that the SMTP server is installed and activated. As a best practice, if you are using an SMTP server that is in use for agent-initiated outbound emails, create a new domain specifically for use for agentless emails and campaigns. For more information about installing and activating a custom SMTP server, see About custom SMTP server integration for outbound emails and Best practices to use your SMTP server to run email campaigns and send agentless email notifications.
- Click Save.
Continue the following procedure only if you are using the Genesys native solution or if you are switching from SMTP server to the Genesys native solution.
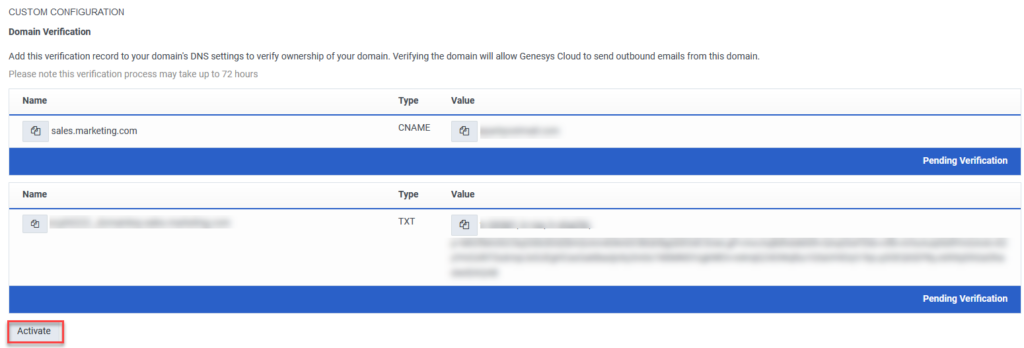
- On the Domain Settings page, copy and paste the TXT and CNAME values into the DNS configuration settings for your specific DNS provider.
-
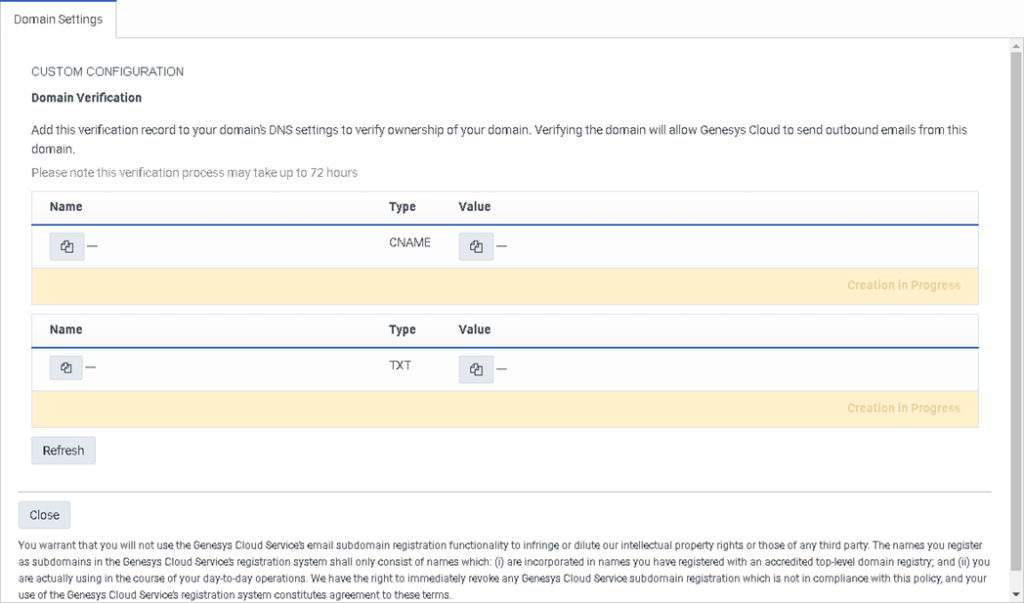
- Wait a few minutes for the DNS information to propagate.
- Return to Genesys Cloud and click Activate to verify the email domain.
Important Note: Once your domain has been provisioned, wait two hours before sending a campaign or agentless email. The waiting period gives the system enough time to run all necessary compliance and regulatory checks. If you try to send an email before two hours has passed, message delivery could fail.
You do not need to register email addresses for this outbound domain. To enable customers to reply to campaign or agentless email messages, you need an inbound email domain. The reply to an address is configured on the inbound domain. For more information, see the options listed in Email routing scenarios.
