
Extract Secure Data action
Use the Extract Secure Data data action in a secure call or voice bot flow to copy secure data to a non-secure variable of the same type. For example, you might create a variable that extracts the last 4 digits of a customer’s credit card or a customer’s account balance. Architect grants read access to secure variables so that you can use them in the action’s expressions without extracting to a non-secure variable prior to using them.
In the Extract Secure Data data action, you can create secure or unsecure update statements. In the update statement:
- The destination variable must be a non-secure variable
- The input data must be an expression that contains a secure variable reference. For example,
If(IsSet(Secure.CustomerId),Substring(Secure.CustomerId, 0, 3), "")
For each Extract Secure Data data action, Architect prompts you with a check box to acknowledge the user is making the data insecure. When checked, the application displays the user name and date the box was checked. This confirms that you plan to use the data in a way that Architect can no longer guarantee is secure.
After you confirm security risk acceptance, the Extract Secure Data data action contains the same functionality as the Update Data data action:
| Name | Description |
|---|---|
| Name field |
Type a distinctive name for the Extract Secure Data data action. The label you enter here becomes the action’s name displayed in the call or voice bot flow structure. |
| Add update statement button | Click this button to open a menu from which to choose the value to assign to a particular variable. The form may change, depending on the value or collection you choose. For information on the available variables and how to build them, see the Suggested content. |
Add update statement variables
Choose from these variables:
ACD skills are arbitrary designations of tasks, expertise, or knowledge that someone must have to handle an interaction. A skill variable represents a Genesys Cloud ACD skill (such as a language or certification) possessed by an agent. In Architect, an ACD skill requirement routes a work item to an eligible recipient. ACD skills are established and configured by the Genesys Cloud administrator.
Add a skill variable to a task sequence
In a task sequence, you can add a skill variable to an Update Data action and then call it from a Transfer to ACD action. For example, to send the call to an agent with fluent Spanish-speaking skills or a higher level of proficiency in Windows OS.
- From the Toolbox, expand the Data category and drag an Update Data action to the desired location in the task.
- In the Update Data workspace, add a meaningful name to describe the item.
- Click next to Update Statements and select the ACD Skill data type.
- In the Variable Name field, type the label to identify the variable on tasks.
- In the Value To Assign field, perform one of these steps:
- To set the value from literal mode, click the list and select the desired ACD skill.
- To set the value using an expression, click the Expression modes button and select Expression, and do one of the following:
- Add the expression inline.
- Click the Large Expression Editor button to open the Edit Expression Editor and build your expression.
- (Optional) To add another variable, click next to Update Statements.
- Add a Transfer to ACD action to the task sequence and configure it to use the skill variables you created here.
A boolean expression can have only one of two values: true (yes) or false (no). For example, the expression "Date equal to 07/17/2014" has a value of yes (true) if the current variable's value is July 17, 2014; otherwise, it has a value of no (false). Use boolean values (or expressions that return boolean values) with If-Then-Else actions to tell Architect how to make decisions based on two clear alternatives.
Examples
- Call.Ani=="tel:+13175551212": In this Boolean expression, the result is true if the originating phone number is 1-317-555-1212; otherwise, false.
- ToAudioTTS(If(Hour(GetCurrentDateTimeUtc()) >= 12, "Good afternoon", "Good morning")): In this expression that includes boolean values, if the current time is on or after 12:00:00 p.m., the system plays "Good afternoon" audio. Otherwise, it plays "Good morning" audio. Note: In this example, the system runs the check against UTC datetime value.
You can test for only one condition with one variable, or you can test for multiple conditions with multiple variables. Each time you click Add update statement, Architect adds a variable row. If the table has more than one row, then:
- The process evaluates the conditions in top-to-bottom order as they appear in the table.
- The process uses "short-circuit evaluation." When an expression combines multiple conditions by using OR, then the whole expression is true if any of the conditions are true. Therefore, if the first condition is true, the process knows that the whole expression is true and doesn't need to evaluate any of the other conditions. As soon as the process hits a condition that is true, it stops evaluating an OR expression. On the other hand, if an expression combines multiple conditions by using AND, then the whole expression is false if even one of its conditions is false. Therefore, as soon as the process hits a condition that is false, it stops evaluating an AND expression because it knows that the whole expression is false. In either case, the process moves on to the next step.
Add a boolean expression to a task sequence
In a task sequence, you can add a boolean expression to an Update Data data action. For example,
- From the Toolbox, expand the Data category and drag an Update Data action to the desired location in the task.
- On the Update Data design form, in the Name field, add a meaningful name to describe the item.
- Click next to Update Statements and select the Boolean data type.
- In the Variable Name field, type the label to identify the variable on tasks.
- In the Value To Assign field, do one of the following:
- To set the value from literal mode, click the True or False radio button.
- To set the value using an expression, click the Expression modes button , select Expression, and do one of the following:
- Add the expression inline.
- Click the large expression editor button to open the editor and build your expression.
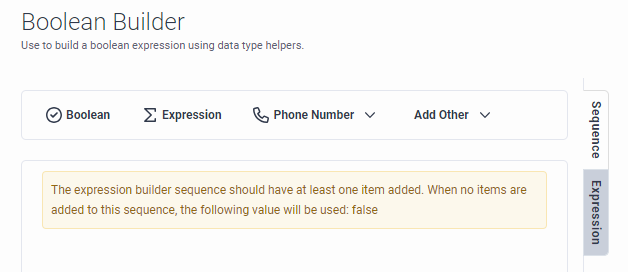
- To set the value using the Boolean Buider, click the Expression modes button , select Boolean Builder, and build your boolean expression using data type helpers:
- (Optional) To add another variable, click next to Update Statements.
A currency value represents monetary values. It has two properties:
- The currency property is a decimal value or the value NOT_SET
- The string property is a string that holds either a 3-character ISO 4217 code
For example, the following expression is valid at runtime:
MakeCurrency(10.50,"USD")
This expression evaluates to a currency value with an amount of 10.50 and currency code of 'USD'.
Obtaining the symbol for a currency
There is no "Symbol" property for a currency. However, you can use an expression to return the correct currency symbol:
GetCurrencySymbol(MakeCurrency(5.0,”USD”))
This expression returns $.
Add a currency variable to a task sequence
In a task sequence, you can add a currency variable to an Update Data data action. For example,
- From the Toolbox, expand the Data category and drag an Update Data action to the desired location in the task.
- On the Update Data design form, in the Name field, add a meaningful name to describe the item.
- Click next to Update Statements and select Currency.
- In the Variable Name field, type the label to identify the variable on tasks.
- To set the values in literal mode, in the Value To Assign field, do the following:
- Click the + or - buttons to set the desired value.
- Click the arrow at the end of the currency symbol drop-down list and select the appropriate 3-character currency value.
- To set the value using an expression, in the Value To Assign field, click the expression button and do one of the following:
- Add the expression inline.
- Click the Edit Expression button to open the Edit Expression Editor and build your expression.
- (Optional) To add another currency variable, click next to Update Statements.
A DateTime value is a string in the format prescribed by the XML standard for date data, similar to ISO 8601.
Add a DateTime variable to a task sequence
In a task sequence, you can add a date | time variable to an Update Data action.
- From the Toolbox, expand the Data category and drag an Update Data action to the desired location in the task.
- In the Update Data workspace, in the Name field, add a meaningful name to describe the item.
- Click next to Update Statements and select DateTime.
- In the Variable Name field, type the label to identify the variable on tasks.
- To set the values in literal mode, in the Value To Assign field, do the following:
- Click the date field to display a calendar dialog box and select the appropriate date, month, and year.
- Click the time field and select the appropriate time value, including AM and PM.
- To set the value using an expression, click the Expression modes button , and do one of the following:
- Select Expression and add the expression inline.
- Select Expression and click to open the large expression editor and build your expression.
- Select DateTime Builder to build a DateTime value with the builder.
- (Optional) To add another DateTime variable, click next to Update Statements.
A decimal number is a value consisting only of digits (0 to 9) and a decimal point. The number of display decimal places is configurable.
Add a decimal variable to a task sequence
In a task sequence, you can add a decimal variable to an Update Data data action. For example,
- From the Toolbox, expand the Data category and drag an Update Data action to the desired location in the task.
- On the Update Data design form, in the Name field, add a meaningful name to describe the item.
- Click next to Update Statements and select Decimal.
- In the Variable Name field, type the label to identify the variable on tasks.
- In the Value To Assign field, do one of the following:
- To set the value from literal mode, click the + or - buttons to select the desired value.
- To set the value using an expression, click the Expression modes button , and do one of the following:
- Select Expression and add the expression inline.
- Select Expression and click to open the large expression editor and build your expression.
- (Optional) To add another decimal variable, click next to Update Statements.
A duration is a representation of time expressed as a string in a subset of the format prescribed by the XML date data standard. Durations have a composite value of days, hours, minutes, and seconds. The length of the duration is the sum total of days, hours, minutes, and seconds values. You can use a duration value to determine how long a "portion" of a process should wait before proceeding.
Add a duration variable to a task sequence
In a task sequence, you can add a duration variable to an Update Data data action. For example,
- From the Toolbox, expand the Data category and drag an Update Data action to the desired location in the task.
- On the Update Data design form, in the Name field, add a meaningful name to describe the item.
- Click next to Update Statements and select Duration.
- In the Variable Name field, type the label to identify the variable on tasks.
- To set the values in literal mode, in the Value To Assign field, do the following:
- Select the time unit (days, hours, minutes, seconds, milliseconds) in which you want to specify the duration value.
- Use the + or - buttons to set the desired duration value, or type it inline.
- To set the value using an expression, in the Value To Assign field, click the expression modes button and do one of the following:
- Select Expression and add the expression inline. Use the
MakeDurationfunction to specify the duration value. - Select Expression and click to open the large expression editor and build your expression.
- Select Expression and add the expression inline. Use the
- (Optional) To add another duration variable, click next to Update Statements.
Groups are communities within your organization based on common skills, relationships, location, or other information. Groups are useful for creating categories of knowledge or contact within your enterprise. In Architect, a group expression routes a work item to an eligible group. Groups are established and configured by the Genesys Cloud administrator.
Add a group variable to a task sequence
In a task sequence, you can add a group variable to an Update Data data action. For example, to send a call to agents with specialized subject matter knowledge.
- From the Toolbox, expand the Data category and drag an Update Data action to the desired location in the task.
- On the Update Data design form, in the Name field add a meaningful name to describe the item.
- Click next to Update Statements and select Group.
- In the Variable Name field, type the label to identify the variable on tasks.
- In the Value To Assign field, do one of the following:
- To set the value from literal mode, select the appropriate group from the drop-down list.
- To set the appropriate group using an expression, click the expression button and do one of the following:
- Add the expression inline.
- Click to open the large expression editor and build your expression.
- (Optional) To add another Group variable, click next to Update Statements.
An integer is a whole number such as 987 or 5. Use integer values to represent complete objects and processes that cannot be subdivided, such as the number of calls waiting or the number of agents on duty. An integer is an eight-byte value, which means that it can hold positive or negative numbers of practically any size. Flow runtime supports values from -999999999999999 to +999999999999999 for an Architect integer value. An integer variable has an integer value at runtime, but an expression of 999999999999999 + 1 will cause an error because the result is >999999999999999.
Add an integer variable to a task sequence
In a task sequence, you can add an integer variable to an Update Data data action. For example,
- From the Toolbox, expand the Data category and drag an Update Data action to the desired location in the task.
- In the Name field, add a meaningful name to describe the item.
- Click next to Update Statements and select Integer.
- In the Variable Name field, type the label to identify the variable on tasks.
- In the Value To Assign field, do one of the following:
- To set the value from literal mode, click the or button to select the desired value. Hold shift and click the corresponding button to increase or decrease the value by five.
- To set the value using an expression, click the Expression modes button and do one of the following:
- Add the expression inline.
- Click to open the large expression editor and build your expression.
- (Optional) To add another Integer variable, click next to Update Statements.
Create a phone number type variable in an Update Data action sequence when you want to specify a phone number whose properties can be accessed in other flow locations. For more information, see About the phone number data type.
Example
A typical use case for phone number update statement is to create a phone number from Call.Ani. Because Call.Ani is a string, converting it to a phone number and accessing the properties gives flow authors easy access to information about the phone number via properties. This alleviates the need to write your own string parsing code to retrieve the information:
- Variable name: Flow.ClientPhoneNumber
- Value to assign: ToPhoneNumber(Call.Ani)
| Property | Description |
|---|---|
| Flow.ClientPhoneNumber.uri | Returns the URI for the tel scheme phone number, otherwise a NOT_SET string. |
| Flow.ClientPhoneNumber.e164 | Returns the E.164 formatted string for the tel scheme phone number with a valid E.164 phone number, including dialing code and subscriber number, otherwise a NOT_SET string. |
| Flow.ClientPhoneNumber.subscriberNumber | Returns the E.164 formatted subscriber number for a tel scheme phone number with a valid E.164 phone number, otherwise a NOT_SET string. |
| Flow.ClientPhoneNumber.dialingCode | Returns theE.164 formatted dialing code string for a tel: scheme phone number, otherwise a NOT_SET string. |
| Flow.ClientPhoneNumber.isSip | Returns false. |
| Flow.ClientPhoneNumber.isTel | Returns true. |
| Flow.ClientPhoneNumber.isGlobal | Returns true. |
| Flow.ClientPhoneNumber.scheme | Returns tel. |
| Flow.ClientPhoneNumber.raw | Returns the Call.Ani. |
Example
The following example illustrate the property data you can extract and the ouput returned when you create a phone number type in a task sequence:
- Variable name: Flow.ClientPhoneNumber
- Value to assign: ToPhoneNumber(+13175550116)
| Property | Output |
|---|---|
| Flow.ClientPhoneNumber.uri | "tel:+13175550116" |
| Flow.ClientPhoneNumber.e164 | "+13175550116" |
| Flow.ClientPhoneNumber.subscriberNumber | "3175550116" |
| Flow.ClientPhoneNumber.dialingCode | "1" |
| Flow.ClientPhoneNumber.isSip | false |
| Flow.ClientPhoneNumber.isTel | true |
| Flow.ClientPhoneNumber.isGlobal | true |
| Flow.ClientPhoneNumber.scheme | tel |
| Flow.ClientPhoneNumber.raw | "+13175550116" |
Add a phone number update statement to a task sequence
In a task sequence, you can add a phone number expression to an Update Data data action. For example,
- From the Toolbox, expand the Data category and drag an Update Data action to the desired location in the task.
- On the Update Data design form, in the Name field, add a meaningful name to describe the item.
- Click next to Update Statements and select Phone Number.
- In the Variable Name field, type the label to store the data and identify the variable on tasks.
- To assign a telephone number, complete one of the following steps:
- In the Value To Assign field, leave the default tel: data type unchanged.
- Click the arrow at the end of the Dialing Code drop-down list and choose the dialing code for the telephone number to ensure the phone number has global dialing information.
- In the Enter phone number box, add the subscriber number for the phone number.
- To assign a SIP URI to the phone number, follow these steps:
- In the Value To Assign field, click the arrow at the end of the tel: drop-down list and select sip:.
- In the Enter SIP URI box, add the SIP URI phone number string.
- To assign a secure SIP URI to the phone number, follow these steps:
- In the Value To Assign field, click the arrow at the end of the tel: drop-down list and select sips:.
- In the Enter SIP URI box, add the secure SIPS URI phone number string.
- Add the expression inline.
- Click to open the large expression editor and build your expression.
- (Optional) To add another Phone Number variable, click next to Update Statements.
Queues are the “waiting line” of interactions. In Architect, a queue expression routes a work item to an eligible queue. Queues are established and configured by the Genesys Cloud administrator.
Add a queue variable to a task sequence
In a task sequence, you can add a queue variable to an Update Data data action. For example, to send a call to senior technical support or a specialized marketing team. If you set an Update Data action with a queue variable named Flow.QueueName, for example, then you can use Flow.QueueName.id inside the Call Data action to obtain the queue id.
- From the Toolbox, expand the Data category and drag an Update Data action to the desired location in the task.
- On the Update Data design form, in the Name field add a meaningful name to describe the item.
- Click next to Update Statements and select Queue.
- In the Variable Name field, type the label to identify the variable on tasks.
- In the Value To Assign field, do one of the following:
- To set the queue from literal mode, select the appropriate queue from the drop-down list.
- To set the queue using an expression, click the expression modes button and perform one of the following steps:
- Add the expression inline.
- Click to open the large expression editor and build your expression.
- (Optional) To add another Queue variable, click next to Update Statements.
This is a standard text string or a custom series of alphabetical, numerical, and symbolic characters. In Architect, the limit for string variables is 32,000 characters. However, the size can be limited by available system resources.
Add a string variable to a task sequence
In a task sequence, you can add a string variable to an Update Data data action. For example,
- From the Toolbox, expand the Data category and drag an Update Data action to the desired location in the task.
- On the Update Data design form, in the Name field, add a meaningful name to describe the item.
- Click next to Update Statements and select String.
- In the Variable Name field, type the label to identify the variable on tasks.
- In the Value To Assign field, do one of the following:
- To set the value from literal mode, type the string inline.
- To set the value using an expression, click the expression modes button and perform one of the following steps:
- Add the expression inline.
- Click to open the large expression editor and build your expression.
- (Optional) To add another String variable, click next to Update Statements.
This variable is a user type that Architect associates with configured users. In Architect, choose this type from a list box. From the user value, you can retrieve user-related information such as ID or username string values.
In a task sequence, you can add a user variable to an Update Data data action. For example, to an agent assigned to a specific account.
- From the Toolbox, expand the Data category and drag an Update Data action to the desired location in the task.
- On the Update Data design form, in the Name field, add a meaningful name to describe the item.
- Click next to Update Statements and select User.
- In the Variable Name field, type the label to identify the variable on tasks.
- In the Value To Assign field, complete one of the following steps:
- To set the user from literal mode, select the appropriate user from the drop-down list.
- To set the user using an expression, click the expression modes button and perform one of the following steps:
- Add the expression inline.
- Click the Large Expression Editor button to open the Edit Expression Editor and build your expression.
- (Optional) To add another User variable, click next to Update Statements.
To indicate the nature of an interaction, agents specify wrap-up codes; for example, a completed sale, a customer dissatisfied with service, or a billing problem. In Architect, a wrap-up code expression assigns a specific code to a variable, which can then be used throughout the flow. Wrap-up codes are established and configured by the Genesys Cloud administrator.
This action is available from the Architect toolbox, located in the task editor.
Add a wrap-up code variable to a task sequence
In a task sequence, you can add a wrap-up code variable to an Update Data data action.
- From the Toolbox, expand the Data category and drag an Update Data action to the desired location in the task.
- On the Update Data design form, in the Name field add a meaningful name to describe the item.
- Click next to Update Statements and select Wrapupcode.
- In the Variable Name field, type the label to identify the variable on tasks.
- In the Value To Assign field, complete one of the following steps:
- To set the wrap-up code from literal mode, select the appropriate code from the drop-down list.
- To set the wrap-up code using an expression, click the expression modes button and perform one of the following steps:
- Add the expression inline.
- Click the Large Expression Editor button.
- (Optional) To add another Wrap-up Code variable, click next to Update Statements.