Add new work plan bid
Prerequisites
- Genesys Cloud CX 3, Genesys Cloud CX 4, Genesys Cloud CX 3 Digital, Genesys Cloud CX 1 WEM Add-on II, Genesys Cloud CX 2 WEM Add-on I, or Genesys Cloud EX license
- Workforce Management > Work Plan Bid > Add permission
To add a new work plan bid:
- Click Admin.
- Under Workforce Management, click Work Plan Bids.
- Click Admin > Workforce Management > Work Plan Configuration > Work Plan Bids.
- In the Business Unit field, select the business unit.
- Click New Bid.
- In the New Bid page, configure your bid information by entering details in each section. Configure this information in the specified sequence. The next section is enabled only when you complete the preceding section. Click each section for details on these steps.
- Click Settings. The Settings page opens.
- In the Bid Name field, enter the name of the bid.
- In the Data Visible to Agents field, select the data show to agents when the bid opens for bidding. Note: This setting defines the data that agents see when they enter their preferences.You can select either or both options. The values are:
- Work Plan Name
- Minimum/Maximum Paid Hours
- In the Bid Window field, set the start and end dates for the bid. In this window, agents can give their preference. The bid window can be set only to a future date.
- In the Start Date field, click to select the start date.
- In the End Date field, click the select the end date.
- In the Effective From field, click the field to set the date that the work plan becomes effective. When you generate future schedules, the agent’s work plan automatically updates for schedules on or after the date selected. Note: The effective date only happens on the business unit’s start day of the week. Workforce Management does not automatically end existing work plan rotations on the effective date of new changes applied through work plan bids. The administrator updates the work plan rotation end date directly in the agent’s record.
- In the Decision Metrics section, select your options. You cannot make the same selection in both fields.
- In the Agent Ranking field, select the option. The available options are:
- Hire date: Bids are selected based on the agent hiring date. You can sort the details in ascending order (longest first). For example, when only one slot is available and two agents place bids for the same slot, then whoever has an earlier hire date gets preference for this bid.
- Performance: The system adds an integer value for this field based on the selected agent’s bid. You can sort the agents based on their performance (top performer first).
- Custom: You can sort the custom selection in ascending order.
- Random: You can sort the random selection in ascending order.
- In the Tie-Breaker field, select the option. Based on the selection made in the previous field, the fields for selection appear in this field.
- In the Agent Ranking field, select the option. The available options are:
- Click Save. Note: The custom Decision Metrics, Performance and Tie-Breaker (Custom), must be imported using the User Attribute Service APIs:For more information, see workforcemanagement/users
- /api/v2/workforcemanagement/users/workplanbidranks/bulk
- /api/v2/workforcemanagement/users/{userId}/workplanbidranks
- /api/v2/workforcemanagement/users/{userId}/workplanbidranks
Note: You cannot select forecast weeks that are impacted by daylight savings time.
- In the Select Date field, select the required date and click the option available against the corresponding week entry.
- In the Selected Week drop-down, select the week. You can select up to six weeks.
- Click Save.
- Click Run Calculation to generate and review the staffing recommendations. Note: There can be only one open bid at a time. If an open bid exists, the calculation is unsuccessful.
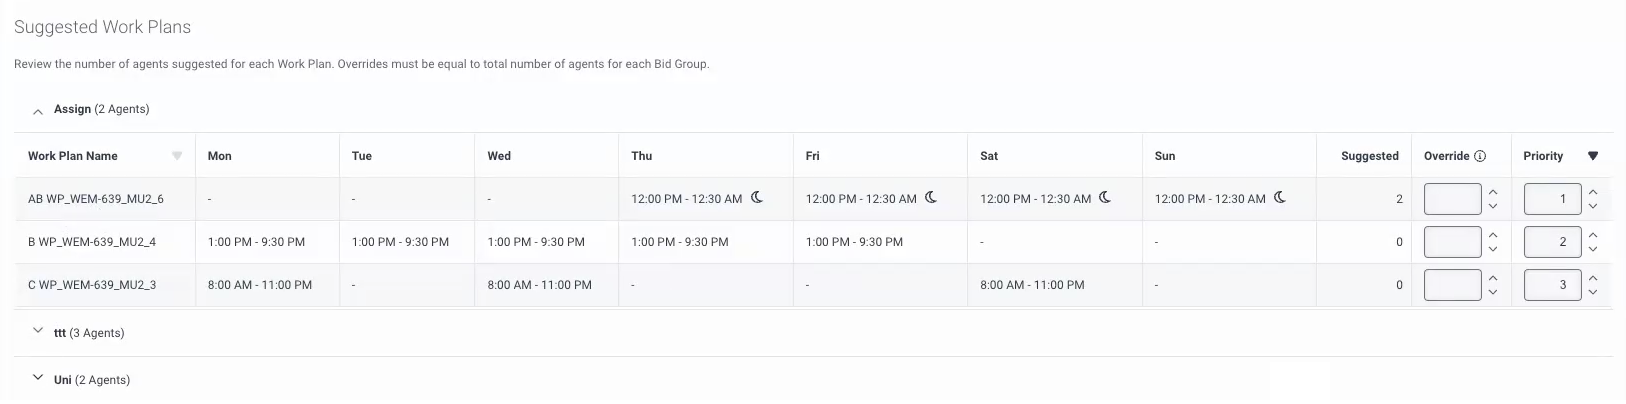
- The Suggested Work Plans view is displayed with the work plan details. Click the image to enlarge.
- The Work Plan column indicates the name of the work plan.
- The Weekday columns indicate if there are any hours assigned for the said days.
- The Suggested column indicates the number of agents required for the work plan.
- The Override column allows the administrator to modify the values mentioned to balance out the number of agents required. The total count of agents in this field must match with the number mentioned in the suggested field. If the count does not match, you cannot save the changes,
- The Priority column indicates the administrators’ priority of the work plan. The system uses this information to allocate work plans to agents who could not submit a bid or submitted a partial bid and none of the preferences were possible.
- Click Save.
- Click Agent Submissions.
- Click Schedule Bid. When you enable this setting, the agents submit their bids. This page updates with the details of the agents who submit their bids versus the agents who have not. The submissions page is open until the set end date. After the bid window closes, move to the next step of publish.
- Click Review and Publish. Review the details available on this view.
- Click the Edit button available against each agent row to edit the assigned work plan.
- The Override Work Plan dialog box appears, where you can modify the details.
- Click Override.
- Review the changes in the Review and Publish view.
- Click Publish. The Publish Bid confirmation pop-up is displayed.
- Click Yes.
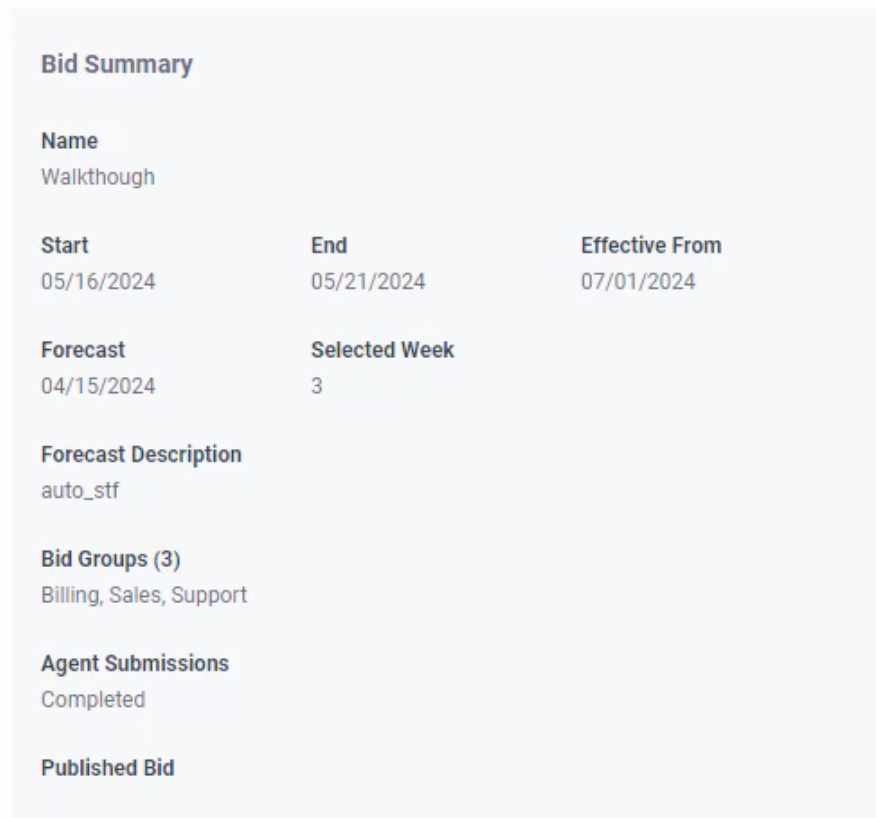
The main view appears with completed sections.
This section displays a summary of the bid and automatically updates based on the changes you make to the bid. Click the image to enlarge.