
Configure External Routing integration in Salesforce Service Cloud
Configure the following components in Salesforce after installing the External Routing package in Salesforce. Launch the GC External Routing Integration app, which is available upon installation of the External Routing package.
- On the Setup Home page in Salesforce, click the App Launcher icon.
- Search for GC External Routing Integration in the Search apps and items box and open the app.
The integration provides the following sections that are essential for setting up the External Routing integration with the Salesforce Service Cloud:
- Get Started
- Configure Genesys Cloud OAuth Settings
- External Routing Settings
Get Started
This section provides the setup information and explains how External Routing integration works. It details the seamless integration between Salesforce objects and Genesys Cloud’s Automatic Call Distribution (ACD).
Configure Genesys Cloud OAuth settings
CX Cloud from Genesys and Salesforce integration needs additional authentication to configure specific features. For External Routing authentication, you require a Genesys Cloud OAuth client with the correct permissions. The OAuth client serves as the intermediary between your Genesys Cloud and Salesforce Service Cloud providing secure access to the required resources. For more information, see OAuth client permissions for CX Cloud from Genesys and Salesforce.
To configure the OAuth settings in Genesys Cloud, create an OAuth client of Client Credentials grant type. For more information, see Create an OAuth client. Copy the Client ID and Client Secret from the OAuth client.
- On the Setup Home page in Salesforce, click the App Launcher icon.
- Search for GC External Routing Integration in the Search apps and items box and select the item.
The CX Cloud, External Routing for Salesforce Service Cloud page displays.
- Click Configure OAuth Settings.
- In the Configure OAuth Settings section, click Edit.
- Enter the Client ID and Client Secret from your OAuth client in Genesys Cloud.
- Click Save.
- Under the Region section, select a Genesys Cloud region from the list.
- Click Save.
- Click Validate to test the credentials.
Manage external routing settings
You can configure the following routing rules and the integration settings:
- Conversation Type – Select Messaging as the interaction type.
- Logger Configuration – To capture detailed information about the execution of Apex code, select Enable Apex Logging. Enter the number of logs to store and the log level. You can configure different log levels, such as DEBUG, INFO, WARN, and ERROR. Click Save Logger Settings.
- Routing Options – To retrieve the Genesys Cloud queues, messaging integrations, and open messaging integration picklist values, click Retrieve Options.
- Queue Mappings – Map Salesforce queues to Genesys Cloud queues. Click Add Mapping and select the Salesforce queue and the corresponding Genesys Cloud queue from the list. Also, select a default external routing queue when there is no specific mapping is available. Click Save Queue Mapping.
Configure Genesys Cloud Implicit Grant setup for Salesforce
To set up the Implicit Grant flow for Genesys Cloud integration with Salesforce:
Add your Salesforce redirect URI to the list of allowed redirect URIs in the Genesys Cloud OAuth configuration. Use the following format for the redirect URI:
https://xxxx.lightning.force.com/resource/genesysps__genesysAuthCallback_ExtRoute
Replace xxxx with the base name of your Salesforce org. For example, if the base name of the Salesforce org is genesys-1d6-dev-ed.develop, then the redirect URI is:
https://genesys-1d6-dev-ed.develop.lightning.force.com/resource/genesysps__genesysAuthCallback_ExtRoute
Enable pop-up authentication
The authentication process opens a new window or tab for the Genesys Cloud login. Ensure that your browser settings allow pop-ups for your Salesforce domain. After successful authentication, the pop-up closes automatically and the main Salesforce window is updated with the authenticated session. If pop-ups are blocked, the authentication process fails. Hence, allow pop-ups for the Salesforce domain in your browser settings.
Troubleshooting authentication issues
- If you encounter issues with authentication, ensure that the redirect URI is correctly configured in both Genesys Cloud and Salesforce org.
- If the authentication window does not appear, check your browser’s pop-up blocker settings.
- If you experience persistent authentication issues, clear your browser cache and cookies.
Create an Omni-Channel Flow in Salesforce
An Omni-Channel Flow in Salesforce helps to automate the routing process for incoming interactions, ensuring that they are directed to the appropriate queues and handled efficiently. Follow these steps to set up an Omni-Channel Flow:
- In Salesforce, create a flow using the Omni-Channel Flow template.
- From Setup, search for Flows in the Quick Find box and select Flows.
- Click New Flow.
- Select Start From Scratch and click Next.
- Under All Flow Types, select Omni-Channel Flow as the flow type and click Create.
- To add elements to the canvas, select Free-Form.
- Create the recordId and input_record variables as described in the Salesforce documentation. These variables hold specific data used within the flow.
- Drag the Route Work action onto the canvas and enter the values for the new action.
- Give the action a Label and API Name and optionally, a Description.
- Under Set Input Values > RecordID, select the recordId that you created.
- Under Service Channel, select the channel created for Messaging.
- Under Route To, select Queue.
- Under Queue, enter the Salesforce queue ID that you want to route through Genesys Cloud.
- Click Done.
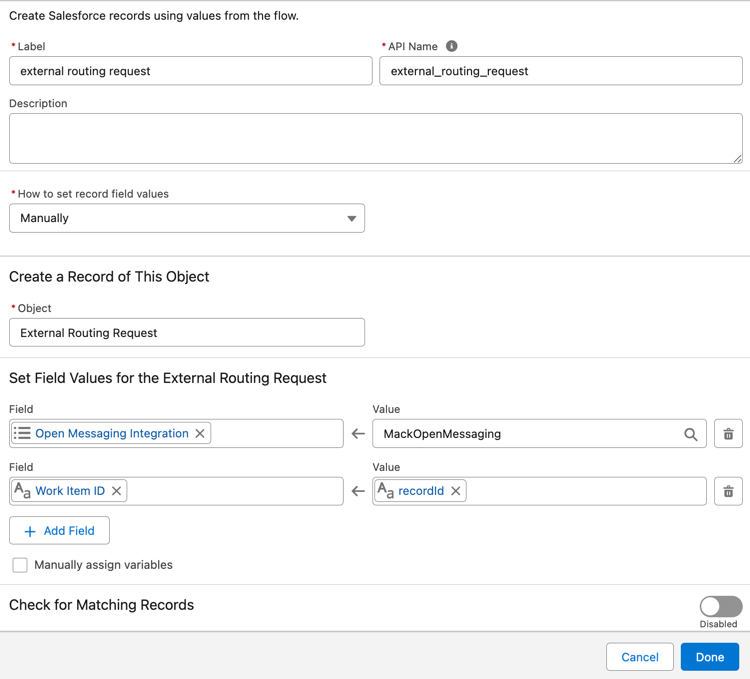
- Drag the Create Records action onto the canvas and enter the details of the record.
-
- Type a name for the record.
- Select the option Manually to configure the record fields.
- Select the object External Routing Request from the list.
- Add the following fields Open_Messaging_Integration__c and Work_Item_ID__c and set the values for the fields.
- Open Messaging Integration – Select the picklist values retrieved from Genesys Cloud.
- Work Item ID – Select the recordId variable that you created for the messaging session object.
- Add the ParticipantData_Attributes and the values in the format
Attribute1=Value1, Attribute2=Value2. If you are adding any Salesforce objects, use the formatAttribute={!Object.Value}. For example,priority={!Case.Priority}andstatus={!Case.Status}. - Click Done.
Note: You can add or edit the external routing package message attributes in theOpenMessageService.apxcfile except for the custom attribute,SF_ExternalRoutingWorkItemId. Ensure that you do not edit or remove the custom attributeSF_ExternalRoutingWorkItemId. For more information about the API referenced by the routing package, see Inbound open messages . -
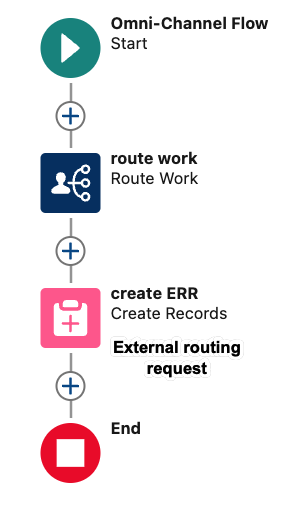
- Connect the Start element to the Route Work action element in the flow.
- Connect the Route Work action element to the Create Record element in the flow.
- Click Save.
- Click Activate.
This setup ensures that interactions are effectively managed and directed to the appropriate queues and agents, enhancing operational efficiency.
Transfer work items using external routing
To transfer a workitem to another queue using external routing, follow these steps:
1. External Routing settings
- In the External Routing settings, click Retrieve Options to fetch the available Genesys Cloud queues.
- Map the Salesforce queues to the corresponding Genesys Cloud queues.
- Set a default External Routing queue. If no specific queue is mapped, the workitem is routed to the default queue.
2. External Routing request
The External Routing Request Salesforce object has a field called isTransfer. When creating a External_Routing_Request record, set the isTransfer field to true. The variable indicates that the workitem must be transferred to another queue.
3. Omni-Channel flow for transfer
Create an Omni-Channel flow that triggers when the owner of a workitem is updated. In this flow, create a new External_Routing_Request record with the isTransfer field set to true. This variable initiates the transfer of the interaction to the specified queue in Genesys Cloud.
4. Create a new interaction
If the requirement is to create a new interaction instead of transferring the existing one, set the isTransfer field to false when creating the External_Routing_Request record. It creates a new interaction in Genesys Cloud rather than transferring the existing one.
Configure screen pop in Salesforce
The screen pop feature in Salesforce automatically displays relevant information to agents when they receive an interaction, which improves agents’ efficiency and response times. To set up a screen pop in Salesforce using the CX Cloud, External Routing component, follow these steps:
- On the Setup Home page, search for App in the Quick Find box and select App Manager.
- Select an existing Lightning app from the list and click Edit.
The Lightning App Builder opens.
- Select the Utility Items tab and click Add Utility Item.
- From the list of available custom components, select CX Cloud, External Routing and set the component properties:
- Genesys Cloud Region – Enter the region of your Genesys Cloud organization.
- Genesys Cloud Implicit Grant Client Id – Enter the Client ID from your Genesys Cloud OAuth Implicit Grant setup.
- Start automatically – Ensure to select this option to make the component start when the app is launched.
- Click Save and then click Back to return to the App Manager.
Example to create flows in Salesforce to route cases
The following video shows how to create Omni-Channel flow and Record-Triggered flow in Salesforce to route cases through Genesys Cloud:
For more information, see About CX Cloud from Genesys and Salesforce.