
Work with Embedded Signup Flow
Prerequisites
- Genesys Cloud CX 1 Digital Add-on II, Genesys Cloud CX 2, Genesys Cloud CX 2 Digital, Genesys Cloud CX 3, or Genesys Cloud CX 3 Digital license
- Messaging > Integration > All permission
- Login credentials for customer’s Meta/FaceBook business manager
- Valid phone numbers you want to register on the WhatsApp Business Platform and the WhatsApp display names to use for each number that you register
Please make a note of WhatsApp’s Country Restrictions below before proceeding to create your integration:
- Businesses in Cuba, Iran, North Korea, Syria, and three sanctioned regions in Ukraine (Crimea, Donetsk, Luhansk) are not eligible to use the WhatsApp Business Platform.
- WhatsApp Messenger and WhatsApp Business app users in Cuba, Iran, North Korea, Syria, and three sanctioned regions in Ukraine (Crimea, Donetsk, Luhansk) are not eligible to receive messages sent via the WhatsApp Business Platform.
- Businesses in Turkey can use the platform, but app users in Turkey cannot receive messages sent via the Cloud API.
For more information on how to create your Cloud-hosted WhatsApp integrations using Embedded Signup Flow, refer to the procedure below.
You can use the Embedded Signup Flow to set up a new WhatsApp Messenger Integration. Ensure that you meet the Meta/Facebook business manager account and meet the valid phone number criteria. Then, set up the WhatsApp Messenger configuration.
Meta/Facebook business manager account
You must have a Meta/FaceBook Business Manager Account. For more information about how to create an account, see Create a Business Manager.
The brand that interacts with WhatsApp users owns the business manager account. A business manager that a partner, integration resource, or ad agency owns is not accepted for customers. When you set up the WhatsApp Integration in Genesys Cloud, you must be able to log in to the Meta/FaceBook business manager. You must also have a post that can step through the Embedded Signup Flow to connect the relevant Meta Business Accounts and WhatsApp Business Accounts.
Valid phone number criteria
Make sure that you have valid phone numbers to register on the WhatsApp Business Platform, along with the WhatsApp display names to use for each number that you register. The phone number for your business must meet the following criteria:
- Is owned by the business
- Has a country and area code, such as landline, mobile numbers, or toll-free numbers
- Must be able to receive voice calls or SMS
- Must not be a short code
- Is not used with the WhatsApp Business Platform or the WhatsApp Messenger/Consumer app, or the WhatsApp Business App Note: If you want to use a phone number already registered with the WhatsApp Consumer or Business App. See Migrate an Existing WhatsApp Number to a Business Account for instructions on how to delete your account from the mobile app first, before going through the embedded signup.
Set up the WhatsApp Messenger integration
To set up a new WhatsApp Messenger integration, perform the following steps:
- Click Admin.
- Under Message, click Platforms.
- Click Create New Integration.
- Click WhatsApp Messenger.
- In the WhatsApp Authorization dialog box, click Confirm.
To log in to the Meta/FaceBook business manager, perform the following steps:
- From the WhatsApp Messenger page, click FaceBook Login. If you do not see the Facebook Login button, send an email to GenesysCloudWhatsAppRequests@genesys.com with your Genesys Cloud Org Name/ID and Region. When this button is available, you can proceed to the next step.
- In the Embedded Signup Flow dialog box, log in to your Meta/FaceBook Business Manager.
- If you are logged in to your Business Manager in your browser, click Continue. The system uses the same login credentials. You can also log in with another FaceBook account. This login method allows Genesys to use information that is related with your Meta and WhatsApp Business Accounts and then connect them to Genesys Cloud. Note: Do not enter information in the Phone Number, Name, or Certificate fields under the Facebook Login button. However, do enter your name and phone number after you complete the signup flow. The Certificate field is optional with Embedded Signup and disappears from the page after you complete the flow.
To select a Meta business account, perform the following steps:
- After you log in, click Get Started > Continue to connect your account to Genesys Cloud.
- Select an existing Meta Business Account from the list.
- Choose the appropriate option and create the new Meta business account.
If Meta rejects your business, the trial period ends with immediate effect. For this reason, Genesys recommends that you use the number for production traffic until Meta verifies the business. If a business manager is verified, the business must pass other WhatsApp checks, such as display name and commerce policy, before they can send a high number of messages. Until these checks are complete, the business has access only to the unverified trial experience.
To select a WhatsApp business account and business profile, perform the following steps:
- If you are an existing embedded signup flow user and created a WABA previously, then select an existing WABA from the drop-down and create a new WhatsApp Business Profile. Note: You can only edit the Business Profile (phone profile) Display Name and not the WABA name.
- If you are using an embedded signup flow for the first time, create a new WhatsApp business account and business profile (your phone profile).
- In the Create a WhatsApp Business Profile page, complete the WABA and profile information. Note: See WhatsApp’s Display Name guidelines for more information on the business profile display name guidelines to ensure that the business profile display name complies with WhatsApp Commerce Policy and WhatsApp Business Messaging Policy. The business profile display name must also represent your business, be consistent with external branding, and have a clear relationship with your business.
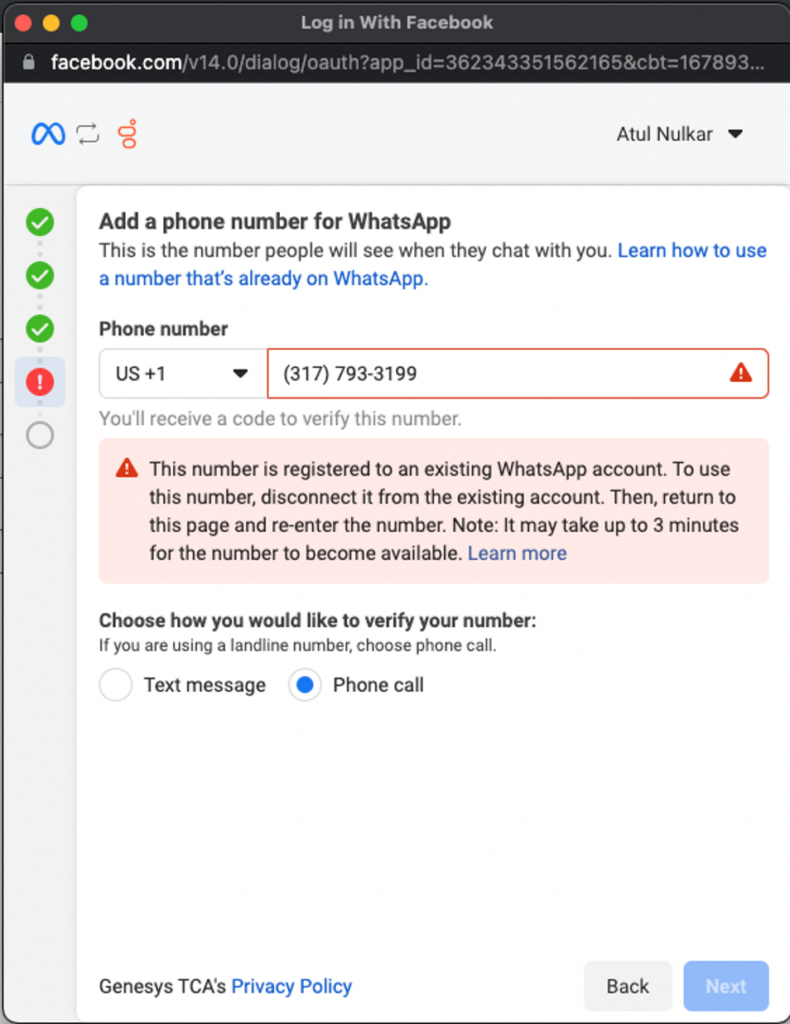
To verify and register your phone number, perform the following steps:
- In the Phone Number field, enter your WhatsApp phone number.
- Choose a verification method. If you choose to verify by phone call/voice method, the number should not be behind an IVR system. If the number is behind an IVR system, then to receive the verification code, temporarily reroute voice calls to another mobile or landline number. Note: You can only add and register one phone number at a time via the embedded signup flow. To register more than one number, review the signup flow again, and create a new integration for each number. If you try to add a phone number that is already registered with a WhatsApp Consumer or Business App, the following message appears. Click the image to enlarge.
 Before you attempt to add the number and complete embedded signup, for more information about how to delete your account from the mobile app first, see Migrate an Existing WhatsApp Number to a Business Account. Note: After the WhatsApp phone number verification activates billing in Genesys Cloud, you immediately begin to incur the monthly recurring fee for your WhatsApp integration. If you are not ready to incur the monthly fee for Genesys Cloud for WhatsApp, do not complete the verification for the number profile you add to your WABA.
 - After you add your number, enter the six-digit verification code that you receive via SMS or voice.
- Click Next.
- When the verification completes, click Finish.
To complete the WhatsApp integration setup, perform the following steps:
- In the Phone Number box, use the E.164 format to enter the phone number related to your WhatsApp account. Include the + sign and full number with country and area code, without any other characters or white spaces).
- In the Name box, type a name that you want to assign to your WhatsApp Messenger integration.
- In the PIN field, enter the PIN number. Note: Create the PIN to register your phone number on WhatsApp. Your PIN can be a combination of any six digit number of your choosing and can be used for future actions on your WhatsApp phone number. It is encouraged that you save or store the PIN before you move on to create your integration as Genesys does not persist this PIN. If you forget or misplace the PIN, you can change it using the Phone Number Settings in your WhatsApp Manager.
- Click Create Integration.
- Click Confirm to create and save the integration. After your WhatsApp integration successfully saves, it switches to Active status in the integrations list. Configure your inbound message routing to ensure that interactions reach your agents. For more information about inbound message routing, see Manage an inbound message route.
After the WhatsApp integration is in active status, to optionally update your WhatsApp Messenger configuration, select a supported content profile. For more information about supported profiles, see Supported content profiles. If you do not select a supported content profile, the integration uses your organization’s default content profile. To select a supported content profile, perform the following steps:
- Click Admin.
- Under Message, click Platforms.
- In the Platforms list view, select the WhatsApp Messenger platform.
- Click Configure.
- In the Supported Content box, select a profile.
- Click Save.
The following warning messages are displayed for certain actions.
| Warning message | Description |
|---|---|
| Invalid integration | The integration request is invalid for the operation. You can view one or more errors reported. |
| Phone number already in use | A WhatsApp integration has already been created for this phone number.”, httpStatusCode = “409”. |
| Invalid phone number | The phone number provided is invalid as it is not in E.164 phone format. |
| Missing required field value | A required field was not provided or is blank. |
| WhatsApp permissions error | Encountered a permissions error while integrating the provided WhatsApp Business Account. Contact your WhatsApp Business Administrator.”, httpStatusCode = “403”. |
| Phone number not found on WABA | The phone number provided was not found on the WABA. |
| Please ensure two factor authentication is disabled | Please ensure two-factor authentication is disabled. |