
Screen pop in Genesys Cloud for Salesforce
Prerequisites
- Outbound > Contact > View permission
- To receive screen pops, your Salesforce organization must have a softphone layout. This layout must include Salesforce objects that you want to screen pop. For more information, see Customizing Softphone Layouts in the Salesforce documentation.
Screen pop functionality in Salesforce allows agents to see the most relevant record based on pre-configured behavior. The screen pop behavior differs depending on your softphone layout settings in Salesforce and the interaction type.
Softphone layout settings
In your softphone layout settings in Salesforce, select which Salesforce objects to display. If you do not select an object, Salesforce cannot screen pop that object.
You can configure screen pops to open in the same browser window (default) or in a new window. You can also control what happens when Salesforce does not find a match during a search.
For more information, see Designing a Custom Softphone Layout in the Salesforce documentation.
Default screen pop behavior
A default screen pop presents a record based on interaction attributes. The default screen pop behavior differs depending on the interaction type.
By default, when an inbound call, callback, outbound dialing, SMS, ACD voicemail, or WhatsApp interaction alerts, Salesforce searches all phone number fields for the caller ID (ANI) and screen pops based on the search results.
By default, when a Facebook Messenger, LINE Messaging, or Twitter Direct Message interaction alerts, Salesforce searches for the user’s name and screen pops based on the search results.
Administrators can use the default settings or customize the screen pop behavior.
By default, when a chat or Genesys Cloud web messaging interaction alerts, Salesforce does not screen pop a page. However, administrators can configure screen pop behavior for chat and Genesys Cloud web messaging interactions.
By default, when an email interaction alerts, Salesforce searches for the email address and screen pops based on the search results. Administrators can use the default settings or customize the screen pop behavior.
Screen pop configuration
Administrators can customize the screen pop behavior. Screen pop configuration allows for popping to Salesforce pages or Salesforce search results. The process for configuring screen pops differs depending on the interaction type.
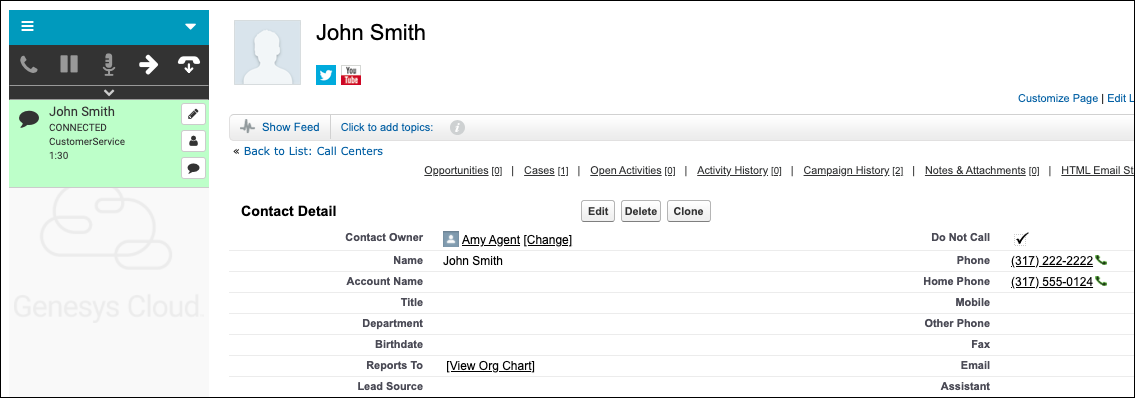
The integration uses the SF_URLPop custom attribute to screen pop a specific Salesforce page for inbound calls, callbacks, emails, messages (including Genesys Cloud web messaging), and ACD voicemails. The screen pop could be a standard Salesforce page, a Visualforce page, or a new record page with pre-populated data from an Architect flow. For information about pre-populating a new record page as part of the screen pop, see Format Salesforce URL for new record screen pop
This procedure relies heavily on Architect configuration and only describes high-level steps. For more information, see Architect overview, Create a new flow, Set Participant Data action, and Add a Set Participant Data action to a task.
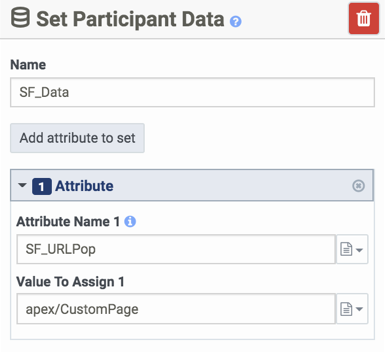
The example screen pops a Visualforce page when a new customer calls.
- In Architect, create an inbound call flow.
- Add a task with Set Participant Data as the action.
Note: This example uses the Set Participant Data action to set a custom attribute. The information used to set the attribute on the call could come from multiple different places: data dip, caller data entry, workgroup information, a static URL, or a combination of other attributes.
- In the Attribute Name box, type SF_URLPop.
- In the Value to Assign box, add a relative link to the Salesforce page that appears when an incoming interaction contains this custom attribute. In this example, the value is a custom Visualforce page, apex/CustomPage.
- Add a Transfer to ACD action to the flow.
- Select the Queue to receive this call.
- Click Publish .
When a call comes in through this call flow, it is assigned the custom attribute of SF_URLPop with a value of apex/CustomPage, which screen pops the custom Visualforce page.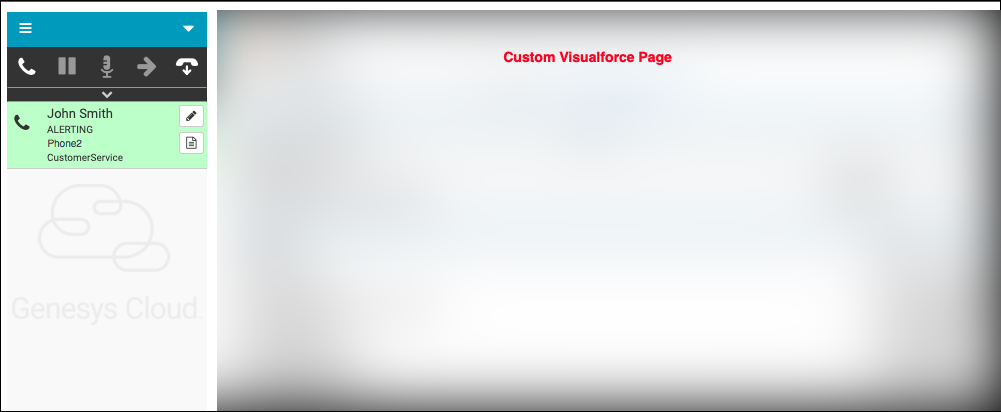
The integration uses the SF_SearchValue custom attribute to screen pop a Salesforce search result for inbound calls, callbacks, emails, messages, and ACD voicemails. The search can be for a case number, a phone number, a contact name, or other items. The behavior for no matching records or multiple matches reflects the screen pop settings defined in the softphone layout in Salesforce.
This procedure relies heavily on Architect configuration and only describes high-level steps. For more information, see Architect overview, Create a new flow, Set Participant Data action, and Add a Set Participant Data action to a task.
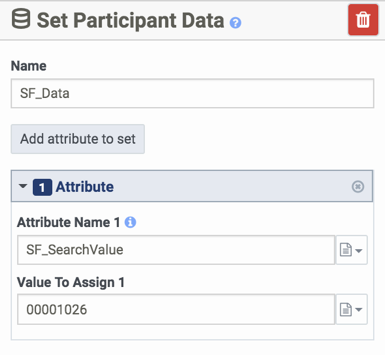
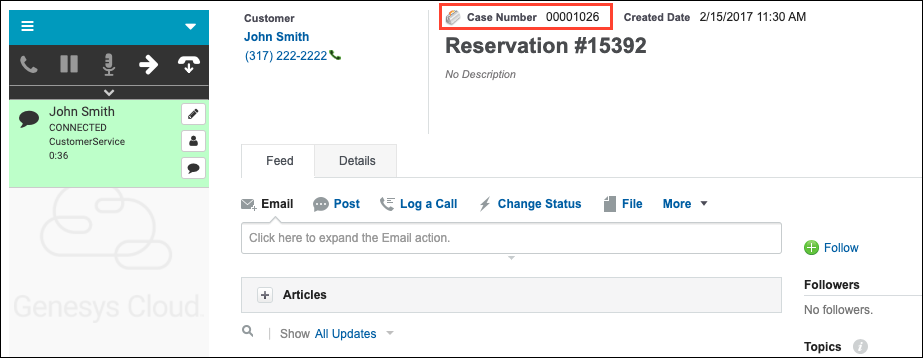
The example screen pops a customer case number when a customer calls about an existing case.
- In Architect, create an inbound call flow.
- Add a task with Set Participant Data as the action.
Note: This example uses the Set Participant Data action to set a custom attribute. The information used to set the attribute on the call could come from multiple different places: data dip, caller data entry, workgroup information, a static URL, or a combination of other attributes.
- In the Attribute Name box, type SF_SearchValue.
- In the Value to Assign box, add the value searched in Salesforce when this custom attribute is defined on an incoming interaction. In this example, the value is the case number, 00001026.
- Add a Transfer to ACD action to the flow.
- Select the Queue that receives this call.
- Click Publish .
When a call comes in through this call flow, it is assigned the custom attribute of SF_SearchValue with a value of 00001026. Once routed to an agent, the alerting call screen pops the case in Salesforce.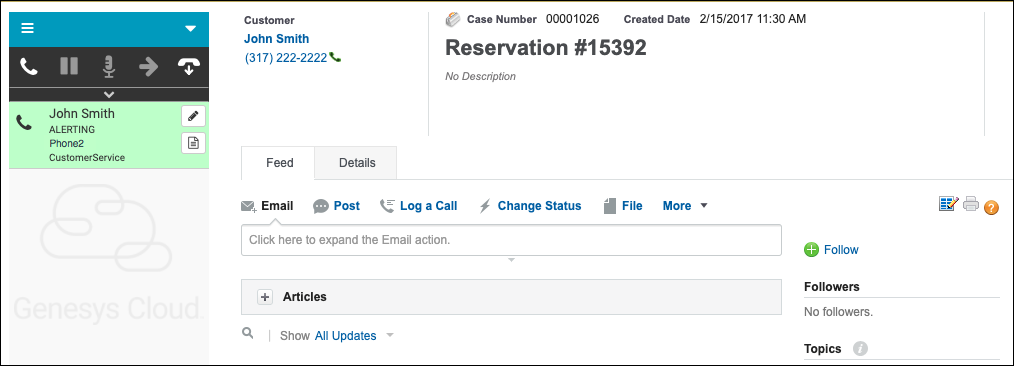
The integration uses the SF_URLPop custom attribute to screen pop a specific Salesforce page for certain calls. The screen pop could be a standard Salesforce page, a Visualforce page, or a new record page.
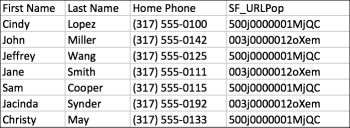
You can screen pop a Salesforce page for each contact in an outbound dialing campaign.
- Create a contact list for a campaign or modify a contact list in Genesys Cloud.
For more information, see Create a new contact list and Edit a contact list entry.
- Add a column called SF_URLPop to the contact list with values for pages to screen pop.
The values in this column are the paths of the pages that you want to screen pop to for each contact. For example, to screen pop to https://na31.salesforce.com/500j000001MjQC for Cindy Lopez, add 500j000001MjQC as the value in the SF_URLPop column for Cindy Lopez.
 Note: You can either screen pop to a Salesforce page (SF_URLPop) or to a Salesforce search result page (SF_SearchValue), but not both.
 - Upload the new or revised contact list.
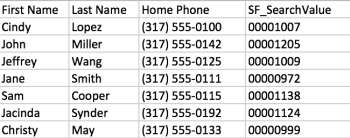
The integration uses the SF_SearchValue custom attribute to screen pop a Salesforce search result for certain calls. The search can be for a case number, phone number, or a contact name. The behavior for no matching records or multiple matches reflects the screen pop settings defined in the softphone layout in Salesforce.
You can screen pop a Salesforce page for each contact in an outbound dialing campaign.
- Create a contact list for a campaign or modify a contact list in Genesys Cloud.
For more information, see Create a new contact list and Edit a contact list entry.
- Add a column called SF_SearchValue to the contact list with values for pages to screen pop.
The values in this column are the search terms (such as case numbers, phone numbers, or contact names) that you want to screen pop to for each contact. For example, to screen pop to case 00001007 for Cindy Lopez, add 00001007 as the value in the SF_SearchValue column for Cindy Lopez.
 Note: You can either screen pop to a Salesforce page (SF_URLPop) or to a Salesforce search result page (SF_SearchValue), but not both.
 - Upload the new or revised contact list.
The integration uses the SF_URLPop custom attribute to screen pop a specific Salesforce page. The screen pop could be a standard Salesforce page, a Visualforce page, or a new record page with pre-populated data from the chat widget. For information about pre-populating a new record page as part of the screen pop, see Format Salesforce URL for new record screen pop.
You can add the SF_URLPop custom attribute to the underlying code for your chat widget or to a box in the chat widget. For example, associate the SF_URLPop custom attribute with the name boxes in your chat widget. When a customer inputs a name in the chat widget, the SF_URLPop custom attribute pops a contact record for the customer.
For more information about adding custom attributes to a chat widget, see the data variable in the Chat variables section of Web chat page (Genesys Cloud Developer Center).
The integration uses the SF_SearchValue custom attribute to screen pop a Salesforce search result. The search can be for a case number, a contact name, or other items with pre-populated data from the chat widget. The behavior for no matching records or multiple matches reflects the screen pop settings defined in the softphone layout in Salesforce.
You can add the SF_SearchValue custom attribute to the underlying code for your chat widget or to a box in your chat widget. For example, associate the SF_SearchValue custom attribute with a case number box in your chat widget. When a customer inputs a case number in the chat widget, the SF_SearchValue custom attribute pops a case record.
For more information about adding custom attributes to a chat widget, see Web chat (Genesys Cloud Developer Center).
For more information, see Screen pops are not working.
For more information about the integration, see About Genesys Cloud for Salesforce.