Series: Web chat to web messaging migration guide
Migrate web chat flows to message flows
- Enable authenticated web messaging
- Web chat to web messaging migration and impact
- Enable authenticated web messaging
- Migrate from web chat to web messaging for Predictive Engagement
- Update agent utilization for web chat to web messaging migration
- Migrate queues from web chat to web messaging
- Migrate quality management policies from web chat to messaging
- Analytics impact from web chat to web messaging migration
- Web chat to web messaging and the agent experience
- Migrate from chat to Genesys Cloud web messaging in the Genesys Cloud embedded clients
- Migrate from web chat to web messaging for Predictive Engagement
This article assumes that your organization contains published Architect inbound chat flows, and describes how to migrate your existing inbound chat flows to inbound message flows.
Web messaging requires an inbound message flow and changes to your website to deploy the new messenger. Web chat inbound chat flows cannot be used for web messaging. Currently, Genesys Cloud does not contain an automatic tool to migrate logic across different flow types. You must recreate inbound chat flows as inbound message flows manually.
Before you begin
Review the following articles:
- Get started with web messaging
- Web messaging and web chat feature comparison
- About web messaging
- Architect inbound chat flows overview
- Task and state editor actions
- Architect built-in variables
Feature impact
Built-in variable considerations
After you migrate an inbound chat flow to an inbound message flow, review the migrated built-in variables.
In the new message flow, change chat-specific expressions that are compatible with message flows. For example, change a referenced Chat.Languagevalue to Message.Language. However, consider built-in chat variables that do not have equivalent message variables, such as Chat.Guest.
Find Legacy Queue task in inbound chat flows
The Find Legacy Queue action is specific to chat flows and added to these flows by default. Because this task is not valid in inbound message flows, you cannot copy it from an inbound chat flow to an inbound message flow. The best practice recommendation in this case is to ignore the Find Legacy Queue task when you copy and paste logic between inbound chat and inbound message flows.
Steps to take
Genesys offers two ways to migrate inbound chat flows to inbound message flows manually:
- Option 1: Migrate with Archy, suitable for flows that contain lengthy or complex logic.
- Option 2: Copy logic from a chat flow and paste it into a message flow, suitable for simpler flows with few states or tasks.
Option 1: Use Archy to migrate inbound chat flows to inbound message flows
To use Archy to migrate inbound chat flows to inbound message flows, first prepare Archy in your environment by installing and setting up the program. Then, use Archy to migrate your inbound chat flows to inbound message flows.
Prepare Archy in your environment
- Install Archy.
- Set up Archy.
- Run the
archy refreshcommand. - Integrate Archy with the Visual Studio Code YAML extension.
Use Archy to migrate an inbound chat flow to an inbound message flow
- Export the chat flow to YAML format.
- In your archyHome directory, open the exported YAML flow.Note: You create this directory when you set up Archy in your environment.
- On the first line of the file, change the property from
inboundChattoinboundShortMessage. - Repeat step 3 for each instance of the
inboundChatproperty. - On the second line, add a meaningful name for the flow.
- If your inbound chat flow uses the original Find Legacy Queue task, you may encounter an error indicating that
Chat.Guest.customFieldsis not valid within the targeted message flow. To resolve this error, perform one of the following steps:- Remove the entire task from the YAML flow and adjust the structure accordingly.
- Remove the Loop action that includes any reference to
Chat.Guest.customeFields.
- If your original chat flow uses any Send Response actions, remove any reference to messageBodyStyle and its nested attributes.
- sendResponse: name: Send Response messageBodyStyle: <-- remove this lit: notice <-- remove this messageBody: exp: "\"Hello!\"" - Save the file.
- Use Archy’s
archy createcommand to create the inbound message flow in Architect. - Review and correct any errors in the YAML flow.
- If you make any corrections in the flow, save your changes with the
archy updatecommand. - Publish the flow with the
archy publishcommand.Note: You can perform additional clean up and refinement in the Architect user interface by completely removing the Find Legacy Queue task from the flow structure if it is irrelevant to your flow logic.
Option 2: Use copy and paste to migrate chat flows to messaging flows
You can use Architect editing tools to copy and paste customized tasks and states from a chat flow to a message flow. For more information, see Work with Architect editing tools.
- You can only copy and paste objects that are shared across compatible flow types. You cannot share flow-specific objects that are available in one flow type, but not another. For example, you can copy a Send Response or Transfer to ACD action because they apply to both chat and message flows.
- You can copy up to 10 task editor actions.
- When you copy a task, Architect renames the task and appends it with a consecutive number. For example, Task 1.
- When you copy a task, Architect takes a snapshot of the task in real time, enabling you to copy multiple versions of the same task.
- When you copy an object to the Clipboard, it appears in a Paste object list. To view information about the object, click the pasted object’s help icon.
- Copied content is not available between tabs. For example, if you have Architect flows open in different tabs, an attempt to copy an object from one tab to another tab fails. If you refresh the tab that includes an Architect flow, then Clipboard content does not persist.
- When you copy an action with a non-secure string variable (for example, Task.myString) into a secure flow that contains a variable with the same name, Architect creates a variable. This behavior occurs because the secure settings do not match.
Copy and paste logic from an existing inbound chat flow to a new inbound message flow
- Open the web chat flow that contains the objects you want to copy.
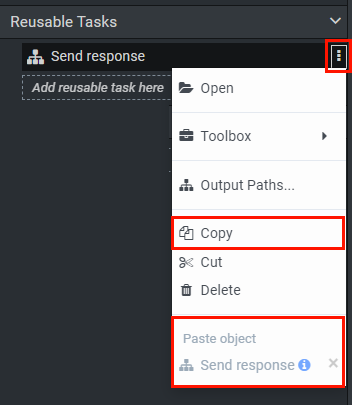
- Next to the objects you want to copy; for example, a complete task or state, click More .
- From the menu that appears, click Copy.
- Create an inbound message flow.
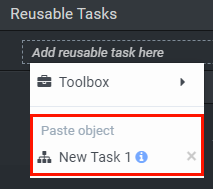
- Navigate to the location in the message flow where you want to paste the copied selection.
- Click More .
- From the menu that appears, under Paste Object click the appropriate copied selection.Note: When Architect copies a task to your clipboard, it renames the task and appends it with a consecutive number. For example, New Task 1.
- Save and publish the inbound message flow.