
Google Cloud Dialogflow ES quick start guide
-
This feature requires Edge and Media Tier version 1.0.0.8734 or later on premises Edge appliances. The cloud-based media services for Genesys Cloud Voice and BYOC Cloud are already running the necessary versions.
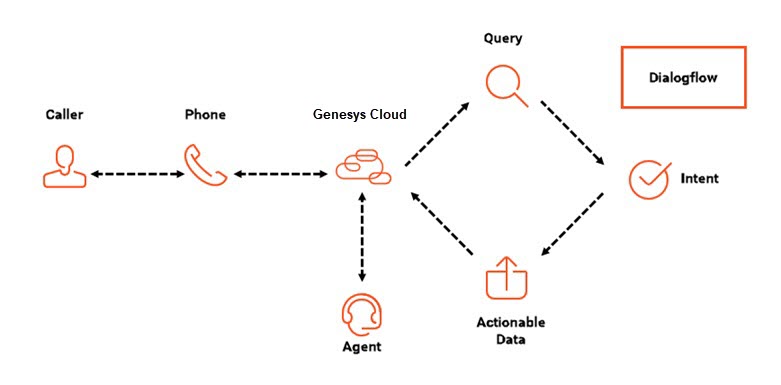
Google and Genesys developed a partnership to help organizations deliver advanced capabilities to enhance customer experiences, blending AI and Google voice interaction technologies with Genesys contact center automation.
Google Cloud Dialogflow ES bots use Google machine learning. This machine learning implements natural language understanding (NLU) to recognize a user’s intent and then extracts entities such as time, date, and numbers. With the evolving functionality of artificial intelligence tools, conversational interactions with computers are now mainstream. Contact centers are a natural progression into this world of virtual assistants.
Organizations can stream audio in real time from Genesys Cloud to Google Cloud Dialogflow ES and return intents and slots to Genesys Cloud. The self-service fulfillment of intent can be handled on the Google side or in Architect flows. When required, customers gracefully escalate to an appropriate agent.
Click the image to enlarge.
Quick start steps
This quick start article helps guide you through implementing the Google Cloud Dialogflow integration. Here, you learn how to perform the following steps:
- Create the Google Cloud Dialogflow ES platform service account credential.
- Obtain the Google Cloud Dialogflow ES integration from Genesys AppFoundry.
- Configure the Google Cloud Dialogflow ES platform service account credential.
- Activate the Google Cloud Dialogflow ES integration.
- Set up a Genesys Cloud Architect flow and then associate the Google Cloud Dialogflow ES bot with the Architect flow.
- Route a Genesys Cloud phone number to the Architect flow.
Step 1: Create the Google Cloud Dialogflow ES platform service account credential
This section describes how to create a Google Cloud Dialogflow ES platform service account credential in the Google Cloud Platform console.
Prerequisites
To create the Google Cloud Dialogflow ES platform service account credential, perform the following steps:
- In the Google Cloud Platform console, create a new project and then create a service account for the project.
- Grant the following roles to the service account:
- Dialogflow API Client
- Dialogflow API Reader
- Create a service account key and download the JSON version of it.
Step 2: Obtain Google Cloud Dialogflow ES from the Genesys AppFoundry
This section describes how to access and install the Google Cloud Dialogflow ES integration from the Genesys AppFoundry. Before you can obtain the Google Cloud Dialogflow ES premium application, you must contact Genesys Cloud Sales to update your subscription. For more information about these applications, see What are premium applications? and About premium applications.
To install Google Cloud Dialogflow ES in your org, perform the following steps:
- Log in to Genesys Cloud for the org in which you want to add Google Cloud Dialogflow ES:
- Select the appropriate organization.
- Enter your email address and password.
- Click Log in.
- Click Admin.
- Under Integrations, click Integrations.
- Click Integrations .
- In the Search box, type Google Cloud Dialogflow. The card for Google Cloud Dialogflow appears.
- Click the Google Cloud Dialogflow card. Information about the app appears.
- Click Install.
Google Cloud Dialogflow ES is now available to configure and activate from Genesys Cloud’s Admin > Integrations > Integrations page.
Step 3: Configure the Google Cloud Dialogflow ES platform service account credential
This section describes how to configure the Google Cloud Dialogflow ES platform service account credential in Genesys Cloud.
Prerequisites
- Edge and Media Tier version 1.0.0.8398 or later
- The previously downloaded service account key JSON file
To configure the Google Cloud Dialogflow ES platform service account credential, perform the following steps:
- In Genesys Cloud, open the Admin menu and navigate to Integrations. Then, search for and open the Google Cloud Dialogflow ES integration.
- On the Google Cloud Dialogflow ES integration page, click the Configuration tab.
- Click Credentials, and then click Configure.
- Open the Google Cloud Dialogflow ES JSON service account key file that you downloaded previously.
- Copy the information from the JSON service account key file into the appropriate Genesys Cloud fields.
- Copy the “client_id” value from the JSON file into Genesys Cloud’s Client ID field.
- Copy the “client_email” value from the JSON file into Genesys Cloud’s Client Email field.
- Copy the “private_key_id” from the JSON file into Genesys Cloud’s Private Key ID field.
- Copy the “private_key” value from the JSON file into Genesys Cloud’s Private Key field.Note: Ensure that you copy all information that appears between the quotation marks. Ensure that you copy and paste the exact value shown, and that no values convert to invalid commands. For example, a third-party copy program can convert the \n value to a new line.
- Click OK.
Step 4: Enable the Google Cloud Dialogflow ES integration
- In the Status column, click Inactive. The Change Status dialog box opens.
- Click Yes. The Google Cloud Dialogflow ES integration status changes to Active.
Click the image to enlarge.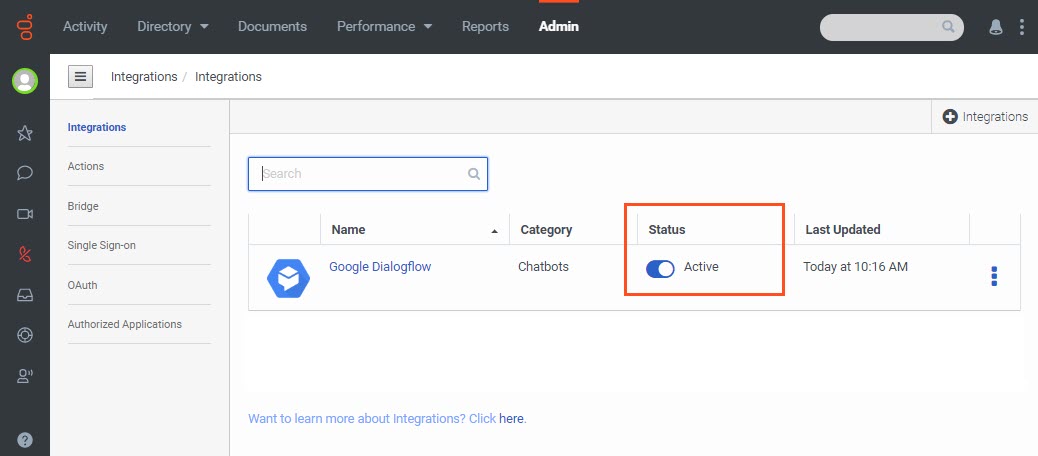
Step 5: Create a Genesys Cloud Architect flow and configure it with a Google Cloud Dialogflow ES bot
In the following example, we demonstrate how to create an Architect flow that allows customers to order flowers for delivery. We provide an extra example that displays how to set up Architect for a pre-configured Google Cloud Dialogflow ES bot for car rental. These examples assume that you have a previously configured Google Cloud Dialogflow ES agent, and also Genesys Cloud queues and data actions.
Prerequisite
- A Google Cloud Dialogflow bot configured in the Google Cloud Dialogflow ES console. For more information, see the Google Cloud Dialogflow ES documentation.
To create an Architect flow, perform these steps:
- In Genesys Cloud, click Admin.
- Under Architect, click Architect. The Architect home page appears.
- From the Architect home page, click or hover over the Flows menu and choose the appropriate flow type.
- Click Add . The Create Flow dialog box opens.
- In the Name field, enter a unique name for the flow.
- (Optional) In the Description field, include a short sentence or phrase to describe this flow.
- Click the Default Language list and select the flow’s default supported language.
- Click the Divisions list and select the division in which to place the flow.
- Click Create Flow. The flow configuration page opens.
- From the Architect toolbox, expand the Task category and drag a Task action into the Reusable Tasks area.
- Click Set this as the starting task.
- Name the task.
- Under Initial Greeting, assign a prompt or text-to-speech.
- Click Click to open.
- From the Architect toolbox, expand the Data category and drag a Call Dialogflow bot action beneath the Start action.
- In the Call Dialogflow Bot panel, perform these steps:
- (Optional) Rename the Call Dialogflow action.
- Select the previously configured Dialogflow ES agent. In this example, we use MyDialogflowBot.
- Under Intents > OrderFlowers, use variables to set the number of flowers, delivery address, delivery date, and type.
Example:
Click the image to enlarge.

- From the Architect toolbox, expand the Audio category and drag a Play Audio action below the Order Flowers path.
- Add a prompt or text-to-speech that thanks the customer for the flower order.
- Expand the Transfer category and drag a Transfer to ACD action below the LiveAgent path.
- Configure the Transfer to ACD action for the following options:
- The queue to transfer the customer when they want to speak to a live agent.
- (Optional) Pre-transfer and failed transfer audio.
- (Optional) Routing priority, preferred agents, and language skills.
- (Optional) Failure outputs.
Example:
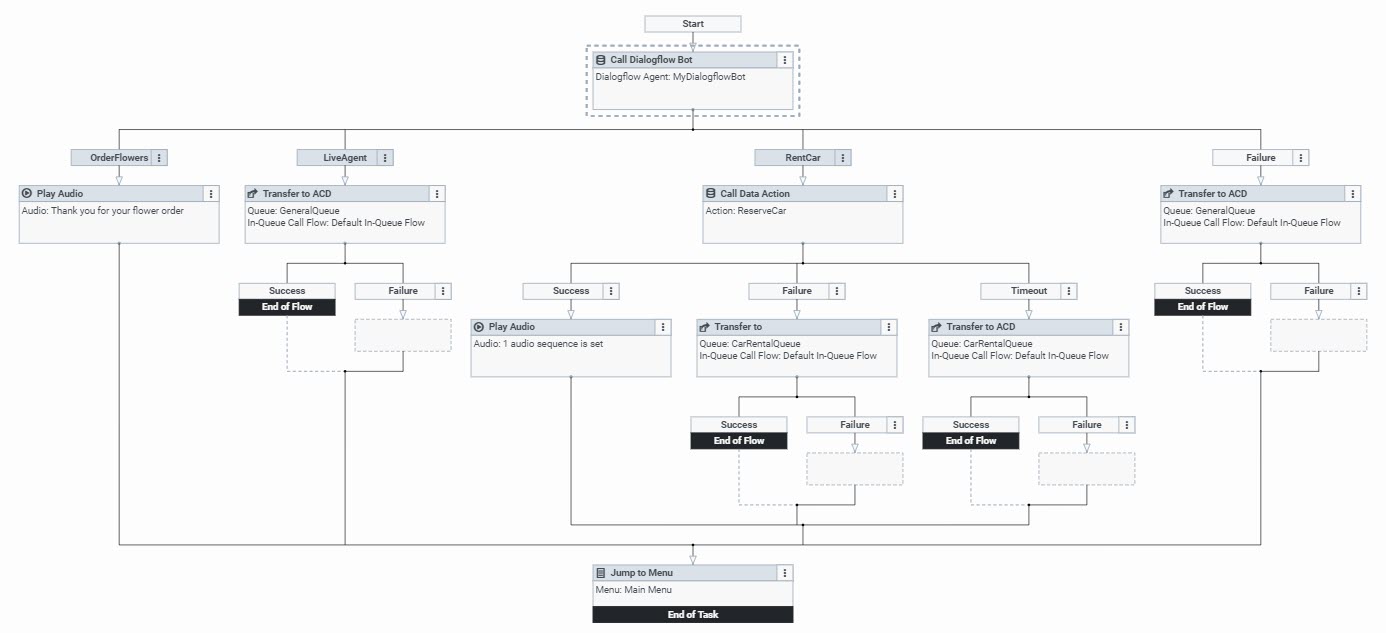
Click the image to enlarge.
![]()
As the following image demonstrates, we also configure the Google Cloud Dialogflow ES bot and associated flow to include a car rental option. This example also includes an Architect Call Data action, for which we configure success, failure, and timeout paths.
Click the image to enlarge.
Step 6: Route a Genesys Cloud phone number to the flow
If you already own a phone number, you can associate it with the flow you created previously. You can also purchase a Genesys Cloud Voice phone number. For more information about Genesys Cloud Voice, see the Learn more section below.
Prerequisites
This task requires the following permissions:
- Architect > Flow > View
- Telephony > Plugin > All
To configure the call route entry, perform the following steps:
- In Genesys Cloud, click Admin.
- Under Routing, click Call Routing.
- Click Add .
- In the Name field, type a unique call routing name. This name appears in your list of entries on the Call Routing page.
- To add phone numbers to associate with the configuration, do the following:
- Under Addresses, click Add .
- Type the complete telephone number string in numeric format only.
- Click Submit.
- Repeat step 5 to add more telephone numbers.
- Click Save.
To always route to a single flow, do the following:
- Under Regular Routing, ensure that the Use Schedule Based Routing toggle is disabled.
- Click the All Calls list, type the first few letters of the published flow that users enter when they dial the associated number or numbers, and select it from the list.
- Click Save. A message appears, indicating that your entry saved. Your entry may take a few minutes to appear in search results.
Note: Only flows previously published in Architect appear in this list. You cannot associate a call route configuration with an unpublished flow.
Summary
Congratulations! You are now set up and ready to test your Google Cloud Dialogflow ES Agent with Genesys Cloud. You can now route interactions to a flow in Genesys Cloud Architect. You can also use the Google Cloud Dialogflow ES Agent associated with the Architect flow to steer interactions and set up escalation to a live agent in Genesys Cloud.