
Configure the Genesys Cloud browser extensions
The extensions can be configured either by individual users or by administrators. The type of installation determines who can configure the extension.
If the extension was installed on individual computers, then users can configure the extension in their browser settings. If administrators installed the extensions remotely, then administrators configure the extensions but can allow users to configure the extension in their browser settings. These browser settings override the administrator settings. For more information, see Install the Genesys Cloud browser extensions.
Available settings
The following list describes the settings available to configure the extensions. The names in the list match the names that appear in the browser settings. For more information, see Individual configuration. The names that administrators use to configure the settings programmatically differ slightly. For more information, see Administrator configuration.
- Genesys Cloud for Chrome URL or Genesys Cloud for Firefox URL is the domain that the app uses.
The extension must reference the region where your Genesys Cloud organization is located. Otherwise, anyone using your organization, including agents, cannot log in. By default, the integration points to US East.
Modify the URL that appears under Genesys Cloud for Chrome URL or Genesys Cloud for Firefox URL based on where your Genesys Cloud organization is located.
Genesys Cloud region AWS region Domain Americas (Canada) Canada (Canada Central) apps.cac1.pure.cloud Americas (Sao Paulo) South America (Sao Paulo) apps.sae1.pure.cloud Americas (US East) US East (N. Virginia) apps.mypurecloud.com Americas (US West) US West (Oregon) apps.usw2.pure.cloud Asia Pacific (Mumbai) Asia Pacific (Mumbai) apps.aps1.pure.cloud Asia Pacific (Osaka) Asia Pacific (Osaka) apps.apne3.pure.cloud Asia Pacific (Seoul) Asia Pacific (Seoul) apps.apne2.pure.cloud Asia Pacific (Sydney) Asia Pacific (Sydney) apps.mypurecloud.com.au Asia Pacific (Tokyo) Asia Pacific (Tokyo) apps.mypurecloud.jp EMEA (Dublin) EU (Ireland) apps.mypurecloud.ie EMEA (Frankfurt) EU (Frankfurt) apps.mypurecloud.de EMEA (London) EU (London) apps.euw2.pure.cloud EMEA (Zurich) EU (Zurich) apps.euc2.pure.cloud Middle East (UAE) Middle East (UAE) apps.mec1.pure.cloud - Auto Redirect to SSO allows you to use a single sign-on identity provider.
By using a single sign-on identity provider, an agent can sign in to one application such as Okta and then is automatically logged in to the client. For information about the single sign-on providers that Genesys Cloud supports, see About single sign-on (SSO).
- In the SSO Identity Provider Name box, input the name of the single sign-on identity provider that you want to use.
For a list of valid values, see the provider parameter at Additional Authorization Parameters (Genesys Cloud Developer Center).
- In the Genesys Cloud Organization Name box, input the name of the Genesys Cloud organization that uses this single sign-on identity provider.
Note: Make sure that the capitalization of the organization name matches the capitalization of the short name of your organization. For more information, see View organization settings.
- In the SSO Identity Provider Name box, input the name of the single sign-on identity provider that you want to use.
- Enable Dedicated Login Window allows you to use login providers that do not work in embedded windows.
This setting causes a separate login window to open. If you close this window, you can reopen it by clicking Open Authentication Window in the client. In this window, you sign in using Genesys Cloud credentials or credentials for other providers that you configured in your Genesys Cloud organization. To direct all agents to a single provider, use this setting with the Auto Redirect to SSO. For information about the single sign-on providers that Genesys Cloud supports, see About single sign-on (SSO).
- Enable Click-to-Dial allows phone numbers that are tel: links and email addresses that are mailto: links on webpages to be clickable links.
This click-to-dial functionality is selected by default. For more information, see Turn off click-to-dial.
- Enable Click-to-Dial in Dynamic Content allows phone numbers that are tel: links and email addresses that are mailto: links on dynamic webpages to be clickable links.
- Enable Call History allows agents to view their call history in the client.
This setting is selected by default. For more information, see Access call history.
- Enable Server-Side Logging allows Genesys Customer Care to access server-side logs directly.
By default, logs appear in your browser console that you can use to troubleshoot issues. With this setting, you can configure the browser extension to save logs server side. Customer Care can then access these logs directly. For more information, see Enable server-side logging.
Tip: If you have a slow or unreliable Internet connection, or you risk running out of session storage, Genesys recommends that you do not select Enable Server-Side Logging. - Enable Configurable Caller ID allows agents to input caller ID names and numbers in the client.
The names and phone numbers that agents input appear to recipients of outbound calls. After enabling this setting, configure Calling for your external trunk in your Genesys Cloud organization. For more information, see Configure caller ID.
- Search Genesys Cloud External Contacts searches external contacts in your Genesys Cloud organization.
- Default Outbound SMS Country Code allows you to control which country code appears in the client when agents send outbound SMS messages.
For more information, see Send an SMS message.
Individual configuration
If the extensions were installed manually on individual computers or administrators allow individuals to override the administrator configuration, then individual users can configure the extensions in their browser settings.
To access the settings, follow these steps:
- In the address bar, type chrome://extensions.
- Locate Genesys Cloud for Chrome.
- Click Details.
- Click Extension options.
Click image to enlarge.

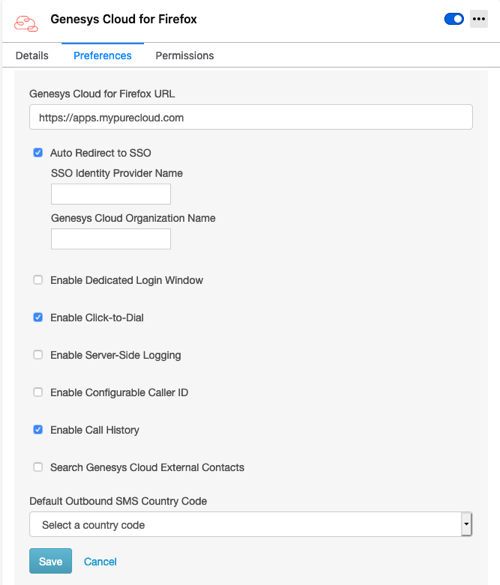
To access the settings, follow these steps:
- In the address bar, type about:addons.
- Locate Genesys Cloud for Firefox.
- Click Preferences.
Click image to enlarge.
Administrator configuration
Administrators configure the settings during or after installation. (For more information, see Install the Genesys Cloud browser extension.) These settings include one that allows individuals to override any configurations that administrators set. By default, this setting (enableAgentConfiguration) is set to false.
The method of the administrator configuration differs depending on the extension and the operating system.
- Windows
Update the registry values of your enterprise users through the Group Policy Object (GPO). Add the following example and modify the values. In the example, the policy is written to the registry under the local machine (HKLM). The format of the path is HKEY_LOCAL_MACHINE\SOFTWARE\Policies\Google\Chrome\3rdparty\extensions\<extensionId>\policy. You can also use HKCU (HKEY_CURRENT_USER).
Windows Registry Editor Version 5.00
[HKEY_LOCAL_MACHINE\SOFTWARE\Policies\Google\Chrome\3rdparty\extensions\onbcflemjnkemjpjcpkkpcnephnpjkcb\policy]
"url"="https://apps.mypurecloud.com"
"clickToDial"=dword:00000001
"enableDynamicChangeMonitoring"=dword:00000000
"enableServerSideLogging"=dword:00000000
"enableAgentConfiguration"=dword:00000000
"enableConfigurableCallerID"=dword:00000000
"useSSO"=dword:00000001
"providerName"=""
"orgName"=""
"defaultOutboundSMSCountryCode"=""
"dedicatedLoginWindow"=dword:00000000
"searchExternalContacts"=dword:00000000
"enableCallHistory"=dword:00000001
- Mac OS
Configure the settings through the MCX (Managed Clients for Mac OS X) preferences for the com.google.Chrome.extensions.onbcflemjnkemjpjcpkkpcnephnpjkcb bundle. To do so, add the following example to a plist file and modify the values. Then import the file using the command-line utility
dscl.<?xml version="1.0" encoding="UTF-8"?> <!DOCTYPE plist PUBLIC "-//Apple//DTD PLIST 1.0//EN" "http://www.apple.com/DTDs/PropertyList-1.0.dtd"> <plist version="1.0"> <dict> <key>com.google.Chrome.extensions.onbcflemjnkemjpjcpkkpcnephnpjkcb</key> <dict> <key>url</key> <dict> <key>state</key> <string>always</string> <key>value</key> <string>https://apps.mypurecloud.com</string> </dict> <key>clickToDial</key> <dict> <key>state</key> <string>always</string> <key>value</key> <true/> </dict> <key>enableDynamicChangeMonitoring</key> <dict> <key>state</key> <string>always</string> <key>value</key> <false/> </dict> <key>enableServerSideLogging</key> <dict> <key>state</key> <string>always</string> <key>value</key> <false/> </dict> <key>enableAgentConfiguration</key> <dict> <key>state</key> <string>always</string> <key>value</key> <false/> </dict> <key>enableConfigurableCallerID</key> <dict> <key>state</key> <string>always</string> <key>value</key> <false/> </dict> <key>useSSO</key> <dict> <key>state</key> <string>always</string> <key>value</key> <true/> </dict> <key>providerName</key> <dict> <key>state</key> <string>always</string> <key>value</key> <string></string> </dict> <key>orgName</key> <dict> <key>state</key> <string>always</string> <key>value</key> <string></string> </dict> <key>defaultOutboundSMSCountryCode</key> <dict> <key>state</key> <string>always</string> <key>value</key> <string></string> </dict> <key>dedicatedLoginWindow</key> <dict> <key>state</key> <string>always</string> <key>value</key> <false/> </dict> <key>searchExternalContacts</key> <dict> <key>state</key> <string>always</string> <key>value</key> <false/> </dict> <key>enableCallHistory</key> <dict> <key>state</key> <string>always</string> <key>value</key> <true/> </dict> </dict> </dict> </plist> - Chrome OS
First configure the extension in the admin console at https://admin.google.com. Then add the example JSON object to a txt file and modify the values. Upload the file to the admin console.
{ "url": { "Value": "https://apps.mypurecloud.com" }, "clickToDial": { "Value": true }, "enableDynamicChangeMonitoring": { "Value": false }, "enableServerSideLogging": { "Value": false }, "enableAgentConfiguration": { "Value": false }, "enableConfigurableCallerID": { "Value": false }, "useSSO": { "Value": true }, "providerName": { "Value": "" }, "orgName": { "Value": "" }, "defaultOutboundSMSCountryCode": { "Value": "" }, "dedicatedLoginWindow": { "Value": false }, "searchExternalContacts": { "Value": false }, "enableCallHistory": { "Value": true } } - Linux
Add the following example to a JSON file and modify the values. Add the file to /etc/opt/chrome/policies/managed.
{
  "3rdparty": {
    "extensions": {
      "onbcflemjnkemjpjcpkkpcnephnpjkcb": {
        "url": "https://apps.mypurecloud.com",
        "clickToDial": true,
	"enableDynamicChangeMonitoring": false,
        "enableServerSideLogging": false,
        "enableAgentConfiguration": false,
	"enableConfigurableCallerID": false,
	"useSSO": true,
	"providerName": "",
	"orgName": "",
	"defaultOutboundSMSCountryCode": "",
        "dedicatedLoginWindow": false,
        "searchExternalContacts": false,
	"enableCallHistory": true
      }
    }
  }
}
For more information, see Configuring Apps and Extensions by Policy in The Chromium Projects documentation.
Create a manifest (JSON) file with the following content and modify the values. For Windows, you can name the file anything. For Mac OS and Linux, name the file purecloudForFirefox@mypurecloud.com.json.
{
    "name": "purecloudForFirefox@mypurecloud.com",
    "description": "Admin managed settings",
    "type": "storage",
    "data": {
        "url": "https://apps.mypurecloud.com",
        "clickToDial": true,
	"enableDynamicChangeMonitoring": false,
        "enableServerSideLogging": false,
        "enableAgentConfiguration": false,
	"enableConfigurableCallerID": false,
	"useSSO": true,
	"providerName": "",
	"orgName": "",
	"defaultOutboundSMSCountryCode": "",
	"dedicatedLoginWindow": false,
	"searchExternalContacts": false
    }
}- Windows
Create a registry key at HKEY_LOCAL_MACHINE\SOFTWARE\Mozilla\ManagedStorage\<extensionId> that points to the manifest file’s location.
Windows Registry Editor Version 5.00
[HKEY_LOCAL_MACHINE\SOFTWARE\Mozilla\ManagedStorage\purecloudForFirefox@mypurecloud.com]
@="C:\\Path\\To\\manifest.json"
- Mac OS
For global visibility, add the manifest file to /Library/Application Support/Mozilla/ManagedStorage/purecloudForFirefox@mypurecloud.com.json. For per-user visibility, add the manifest file to ~/Library/Application Support/Mozilla/ManagedStorage/purecloudForFirefox@mypurecloud.com.json.
- Linux
For global visibility, add the manifest file to /usr/lib/mozilla/managed-storage/purecloudForFirefox@mypurecloud.com.json. For per-user visibility, add the manifest file to ~/.mozilla/managed-storage/purecloudForFirefox@mypurecloud.com.json.
For more information, see Managed storage manifests in the Mozilla documentation.
For more information about the extensions, see About the Genesys Cloud browser extensions.