
Create a contactable time set
Prerequisites:
- Outbound > Contactabletimeset > Add, Delete, Edit, View permissions
- Each contact column in your contact list must have a corresponding time zone column.
- Each time zone column in the contact list must contain a time zone name. See Understand time zone names.
- Know the time zones names used your contact list.
- Know when it is permissible to call each zone.
The procedures in this article and video explain how to define a set of contactable times, indicating when the system can contact specific time zones.
-
-
Click Admin.
-
Under Outbound, click Contactable Time Sets.
-
Click Create New.
-
Type a name for the contactable time set. Names can contain spaces, numbers, and special characters but must be unique.

-
To open a properties page used to define when the system can contact a time zone, click Save and Add Time Zones.
Note: If you click Save, the system saves a new entry in the Contactable Times Sets view, but the entry does not contain information that specifies when contacting can occur. Clicking Save and Add Time Zones lets you define that information now. -
Select a zone from the Time Zone filtered box. Typing all or part of a zone name narrows selections to choose from. As a convenience, your local time zone is automatically selected by default.
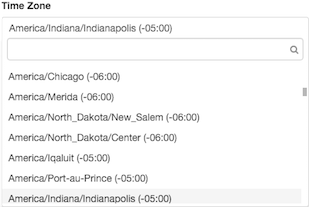
For example, if you type “Africa” in the filter box, the box lists zones for that continent. If you don’t type any filter text, it lists all zones. See Understand time zone names.
Note: Contactable time sets account for Daylight Savings Time. One contactable time set can work all year round. Make sure to select a time zone that uses Daylight Savings Time. For example, CST does not change for Daylight Savings Time, but CST6CDT does. -
To configure when a campaign can contact that zone, complete one of the following procedures.
Note: This step defines the time that the campaign can contact a time zone during that time zone’s local time. For example, if your local time is Eastern time and you created a contactable time set to contact from 1pm to 2pm Central time, then the campaign can start contacting at 2pm Eastern time (1pm Central time).Use a calendar to define time slots visually (fastest, easiest method)
Using the calendar, you can define new time slots by clicking and dragging, or change the duration of time slots by resizing or moving intervals.
-
Select the Calendar View tab, which is the default.
-
To create a new time slot, click an empty place in the calendar where the time slot begins. Then drag down to extend duration, releasing the mouse button when finished.
-
To shorten a time slot, drag its handle upward to decrease the duration of time.
-
To increase a time slot, drag its handle downward to increase the duration of time.
-
To reposition a time slot, click inside its borders and drag it to a new position.
-
Manually define time slots (most flexible method)
-
Select the Detail View tab.
-
Each time slot defines when calling can occur for a specific day of the week and one time range within that day. By default, the system defines time slots to dial every day of the week between 9 AM and 5 PM.

-
To change start or stop times, click an hour, minute, or AM/PM indicator. To modify the value displayed, type a different value, or use the up and down arrows.
-
To add another time slot, click the button. This button duplicates the current entry so that you can constrain dialing to non-contiguous time ranges within a day. An example would be dialing a time zone during business hours but not over the lunch hour.
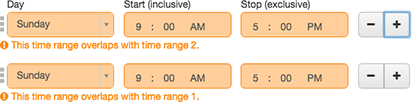
Since duplication of a time slot creates time ranges that overlap, edit time ranges for the same day so that they do not overlap:

-
Define, edit, or remove other time slots as needed.
Tips:-
To delete time slots, use the - button.
-
Reposition time slots by clicking and dragging the handle in front of each time slot.
-
The edit controls - and + are not available if the user does not have permission to add or remove time ranges.
-
-
-
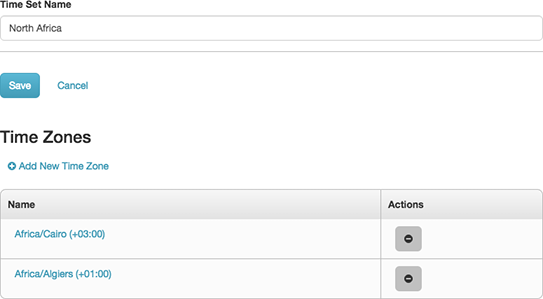
Click Done. The new entry appears in the list of Contactable Time Ranges.
-
To designate contactable times for another time zone, click Add New Time Zone. Repeat steps 5-6.
-
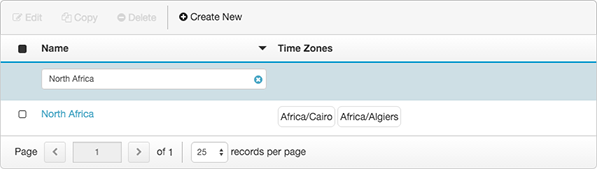
When you define time slots for all needed time zones in the set, click Save. Control returns to the Contactable Times view. The new entry has no effect until you assign it to a campaign.
-